BitLocker is a security feature that adds an extra layer of protection to your computer and protects it from unauthorized access. A lot of beginners and even some hard-core Windows users are unaware of the fact that you can set up, configure and use BitLocker on their Windows 11/10 computer. In this post, we will talk about how you can do the same.
What is BitLocker and why is it used?
BitLocker is a device encryptor used to protect your data from theft. It is a built-in Windows technology that not only protects your computer from data theft but also stops it from getting exposed to lost, stolen or inappropriately decommissioned systems.
On your computer, it is used alongside TPM or Trusted Platform Module (version 1.2 or above), which is a device added to your computer for security purposes to secure the user’s data and makes sure there is meddling with your system as it is offline. Since BitLocker needs TPM, if you want to use the encryption feature, then you will have to insert a USB startup key to start the computer or resume from hibernation.
When you set up BitLocker, you will get a security key that will be used to fetch the data. If you want to know how to get this key or set up BitLocker, or anything else about this security feature, continue reading.
Read: Difference between Device Encryption and BitLocker
Set up, configure and use BitLocker on Windows 11
Before seeing how to set up, configure and use BitLocker, you need to know that even though this feature is supported on all Windows 11 versions, the Home needs to use Device Encryption which is a trimmed-down version of BitLocker, which is still capable enough, and the Pro, Enterprise, and Education editions will get all the features of BitLocker. That is why we have separate guides for the following versions.
- Use BitLocker on Windows 11 Home
- Use BitLocker on Windows 11 Pro
Let us talk about each of them separately.
1] Use BitLocker on Windows 11 Home
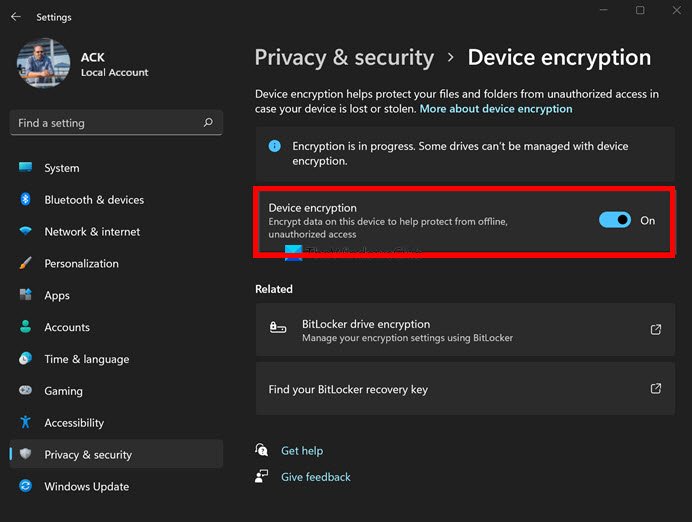
To configure bitLocker on your system, follow the prescribed steps.
- Open Windows Settings by searching it out of the Start Menu or by Win + I.
- Go to Privacy & Security from the top-right corner of the window.
- Click on Device encryption.
- Now, use the toggle to enable the feature.
- Click on the BitLocker drive encryption button from the Related section.
- Go to the Operating system drive and click on Back up your recovery key.
- Finally, save the Bitlocker recovery key somewhere on your computer and make sure to note the path address.
As mentioned earlier, Windows 11 Home has Device encryption which lacks some advanced features of BitLocker. Another thing to note here, this feature is not available on all the devices, if you are not able to able to see Device Encryption then this could mean that your computer is not compatible. After this, we have mentioned a method to know if your device supports BitLocker, do check that out.
Read: How to Turn on Device Encryption in Windows 11/10
To disable BitLocker on your Windows 11 Home computer, follow the prescribed steps.
- Launch Settings.
- Go to Privacy & Security > Device encryption.
- Disable the toggle for Device encryption.
This way, Bitlocker will be disabled and the decryption process will begin.
Read: Device Encryption not showing or working in Windows
2] Use BitLocker on Windows 11 Pro
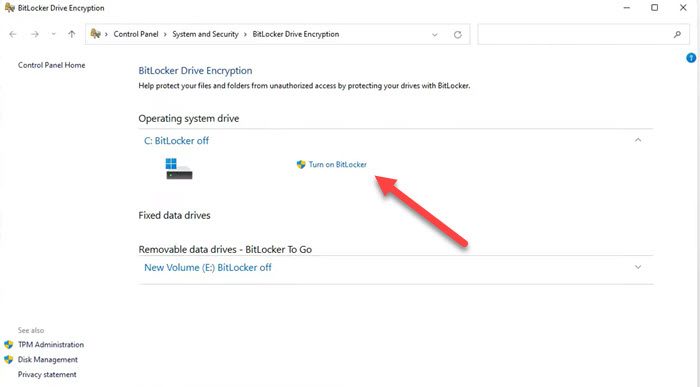
The Pro version of Windows allows you to use even the most advanced feature of BitLocker. To configure BitLocker on your Windows 11 Pro, Enterprise, or Education edition, follow the prescribed steps.
- Launch Settings.
- Go to System > Storage.
- Navigate to the Storage management section and then click on the Advanced storage section.
- Go to Disk & Volume.
- Go to the drive and then to participation you want to encrypt and then click on Properties.
- Click on Turn on BitLocker.
- Again, click on Turn on BitLocker.
- Select an option to which you want to save the key.
- Follow the on-screen instructions to set up BitLocker depending on your preferences.
After restarting your system, BitLocker will be enabled. Hopefully, this will do the job for you.
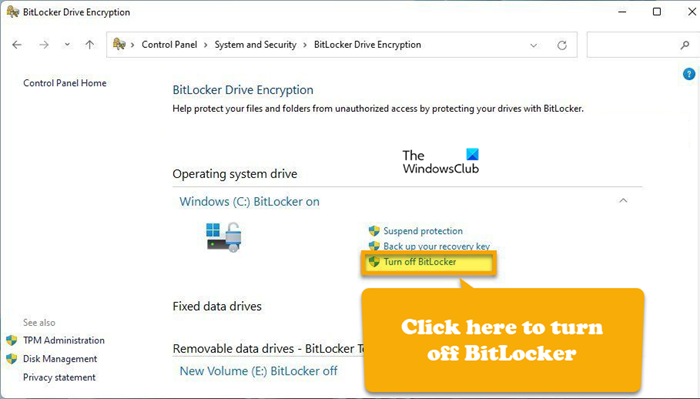
Having done this, you can check the status of BitLocker for the drive at any time.
In case, you feel like there is no need to encrypt your data and BitLocker is not needed, just follow the on-screen instructions to disable BitLocker on your system.
- Open Control Panel from the Start Menu.
- Go to System and Security > BitLocker Drive Encryption.
- From the Operating System drive, click on Turn off BitLocker.
BitLocker will be disabled on your computer.
Read: Fix BitLocker Waiting for Activation error on Windows
How to know if your computer supports BitLocker
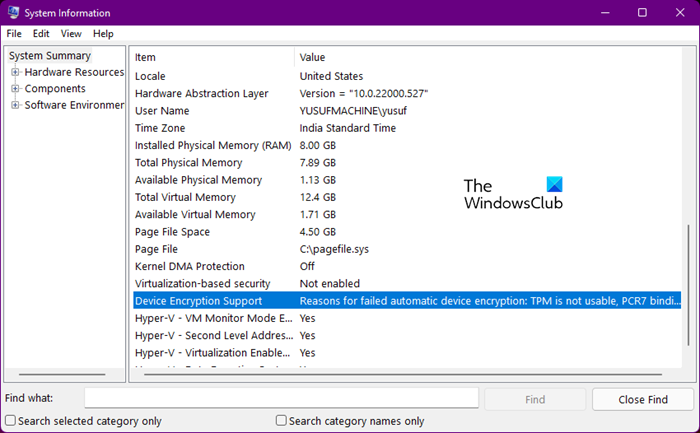
As mentioned earlier, not every system can enable BitLocker regardless of the fact that they have TPM hardware installed on their system. You can check if your computer supports BitLocker or not and the reason for the same as well. To know if your computer supports this feature or not, search “System Information” from the Start Menu. Now, look for Device Encryption Support, and you will see the reason why the feature is not available on your computer. Side note, you can use the System Information page to know all about your computer.
Read: Enforce BitLocker drive encryption for removable data drives
How do I lock a drive using BitLocker in Windows 11?
To lock a drive using BitLocker in Windows 11, check the guide above for Windows 11 Pro. All you need to do is go to the drive you want to encrypt and turn on BitLocker. Once you do that, the device will be encrypted, and you will be provided a security key.
Read: How to update BitLocker Password on Protected Drive in Windows
Does BitLocker work on Windows 11?
Yes, BitLocker works on Windows 11. However, its full security features can only be enjoyed on Pro, Enterprise, and Education versions of Windows, the Home gets a trimmed-down version, which is still pretty secure, but defiantly a bit inferior to what you get on the Pro versions. If you want to know how to enable or use BitLocker, check the guide mentioned in this post.
Also Read: How to create a BitLocker Drive Encryption shortcut in Windows 11/10.