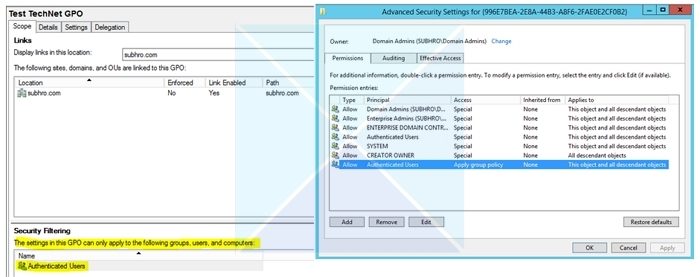
Group Policy is an essential tool that allows network administrators in charge of Microsoft’s Active Directory to implement specific configurations for users and computers. It is a tool that can apply security settings to users and computers. This comes in pretty handy when you want to manage user permissions. This post will share how you can set up Security Group Filters in Windows.

How to set up Security Group Filters to the GPO in Windows?
When setting up Group Policy Filtering, you can do two main things. These are:
- Allow members of a group to apply GPO
- Prevent members of a group from applying a GPO
Now let us walk you through the steps to allow or prevent groups from applying GPO.
Note: It works with computers or users who have joined a domain or Windows Server. Also, the Group Policy Management tool is different from Group Policy Editor.
1] Allow members of a group to apply a GPO

The first method is to allow a group of members to apply a security filter on the GPO. If you want to permit other users to make changes in the GPO, then you have to follow the below steps:
- First, launch the Group Policy Management Console. Or you can use any other server management tool.
- From the navigation menu, find and click on the GPO you wish to modify.
- Next, under Security Filtering, click on Authenticated Users and click on Remove. You need to remove the default permission granted to all the authenticated users to restrict the GPO to only the groups you specify.
- Click on Add.
- Next, select the User, Computer, or Group dialog box.
- Type the next name of the group whose members are to apply the GPO and click on OK.
- Also, you can click on Advanced to browse the list of groups available in the domain.
2] Prevent members of a group from applying a GPO
Apart from allowing a group to apply security filters in GPO, you also have to prevent members from applying a GPO. And this can be done by following the below steps:
- First, launch the Group Policy Management Console.
- Find and click the GPO you wish to modify from the navigation pane.
- Next, from the details pane, click on the Delegation tab.
- Click on Advanced.
- Under the Group or user names list, click on Add.
- Next, Select the User, Computer, or Group dialog box.
- Now type the name of the Group whose members you wish to prevent from applying the GPO and click on OK.
- You can also click on Advanced to browse the list of groups available in the domain.
- Afterward, select the Group in the Group or user names list, and select the box in the Deny column for both Read and Apply group policy.
- Finally, click on OK > Yes.
So that was all about how to set up Group Policy Security Filtering in Windows. Using the Group Policy Management Console, you can easily allow users, computers, or groups to apply a GPO or prevent them. Now go ahead and check it by yourself. If you get stuck anywhere, feel free to comment below.
How do I add a security filter to a GPO?
To add a security filter to a GPO on Windows 11/10 PC, you can find the steps in the article. There are multiple things you must keep in mind while setting up the filter on your computer. For that, it is suggested to go through the above-mentioned steps to get it working smoothly.
Do you need authenticated users for GPO?
It’s always a good idea to have authenticated users in any GPO, but you can always refine it as needed. Just be careful with GPOs and test them carefully. it’s a good idea to prefer creating GPOs using PowerShell scripts so the admin can keep them in case he needs to recreate them later.