Cloudflare is a Global Network Service provider. Recently, they have their own DNS service that will directly competes with Google’s OpenDNS Service. This service from Cloudflare will be far focused on the privacy and security of the users as well as the Internet connection. Cloudflare claims their service 1.1.1.1 will not keep your connection’s logs for more than 24 hours and hence will be helping to boost the privacy of the users on the Internet.

Another plus-point of using this DNS server is that it is faster than others. It takes 14ms for sites outside their network to be fetched and located. And it is even faster for those which are index by them.
Cloudflare’s service supports DNS over HTTPS (and DNS over TLS) which protects your browsing information from your ISP as well. And the best thing is this service is 100% free for anyone. Also, Cloudflare claims to never use the data for marketing and other uses. This is being proved by getting KPMG auditing their code. For those who don’t know, KPMG is a well-respected marketing firm. They will be checking their code and practices annually and a public report will soon be published when it is ready.
This service is now live and can be used by anyone now.
If you want to learn how to use it, please follow our tutorial below:
Setting up Cloudflare’s 1.1.1.1. DNS service
First of all, let me assure you that doing this is really a piece of cake. You need not be a professional or an expert to do this. Just a few clicks will lead your way towards setting this up. Just follow our steps carefully.
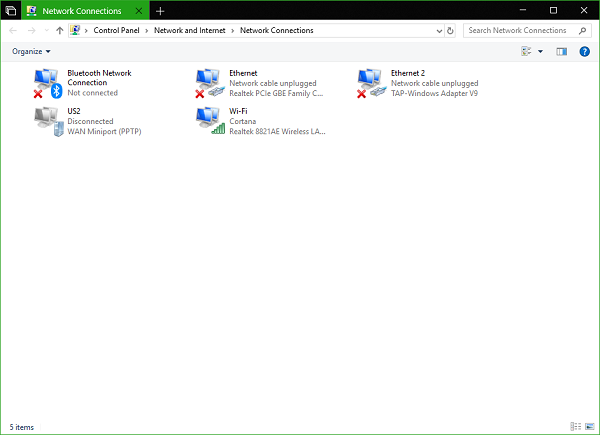
To change the DNS server settings, you can right-click on the WiFi or the Ethernet connection icon in the system tray and then select Network and Internet Settings and then click on Change Adapter Options.
Then you will see a window popping up that will look something like this

Now, select the network connection who DNS server you wish to change. This connection could be an Ethernet Connection or a WiFi Connection.
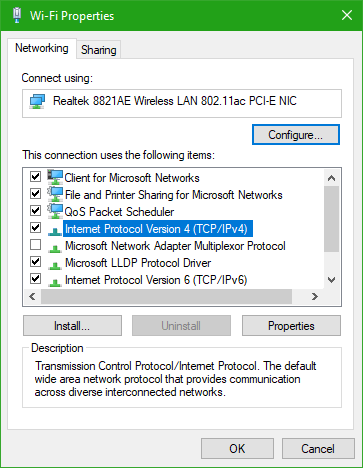
Right-click on that connection and select Properties.
From the list of items, now select Internet Protocol Version 4 OR Internet Protocol Version 6 according to your requirement.

Now click on the button that says Properties.
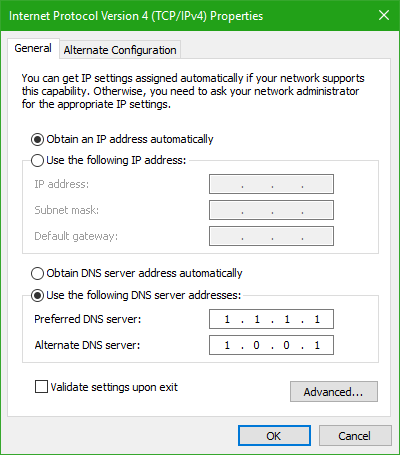
A new box will pop up that will show multiple fields to enter IP Addresses or DNS Addresses. Now, in the DNS Service section, click on the radio button that says Use the following DNS Servers.
Now if you selected the IPv4 server, enter 1.1.1.1 in the Primary DNS section AND 1.0.0.1 in the Secondary DNS section.

If you selected IPv6 server, enter 2606:4700:4700::1111 in the Primary DNS Server section AND 2606:4700:4700::1001 in the Secondary DNS Server.
Click on OK to close the configuration pop up and Close to finalize the settings.
Restart your browser for the changes to take an effect.
You are all set now!
You can read more about this new DNS service here.
Here is a list of some good free and Public DNS Servers that may interest you.
How do I use a 1.1.1.1 DNS server?
In order to use the 1.1.1.1 DNS server on Windows 11 or Windows 10 computers, you need to open the Network Connections panel first. Then, right-click on the internet source and select the Properties option. Next, double-click on the Internet Protocol Version 4 menu and select the use the following DNS server addresses option. Finally, enter 1.1.1.1 in the Preferred DNS server and 1.0.0.1 in the Alternate DNS server box.
How do I change my DNS to 1.1.1.1 on my router?
Different routers come with different settings. In order to use the Cloudflare DNS server for faster browsing, you need to open the respective panel first. For that, your device must be connected to the Wi-Fi router. Next, you can enter 1.1.1.1 as the Preferred DNS and 1.0.0.1 as the Alternate DNS server.
TIP: You can also take a look at Cloudflare 1.1.1.1 for Families.
Other DNS services you can check out: Comodo Secure DNS | Angel DNS | OpenDNS.
Leave a Reply