Managing and monitoring the network’s IP address infrastructure is quite easy by setting up IPAM on the Windows server. IPAM simplifies tasks like tracking IP address usage, managing DHCP, and DNS servers, and ensuring compliance with the network policies. In this article, we will walk through the step-by-step process of how to set up IPAM on a Windows Server, from installing IPAM to configuring Server discovery and settings.
What is IPAM in Windows Server?
IPAM (IP Address Management) in Windows servers is a feature designed to automate and centralize the management of IP address infrastructure. It allows admins to monitor, manage, and audit DHCP, and DNS servers, as well as track IP address allocation across the network.
How to setup IPAM on Windows Server?
To setup IPAM on Windows Server, follow the steps mentioned below:
- Verify Prerequisites
- Install IPAM
- Configure IPAM in the Windows Server
- Configure server discovery
- Manage servers and settings
Let us walk in through the whole process.
1] Verify Prerequisites
Addressing some essential prerequisites before initiating the IPAM setting process is necessary. The first step is to ensure that the server is operating on a supported Windows server version and is part of an active directory domain. Confirming that DHCP and DNS roles are set up and functioning is also recommended. Once done, it’s time to move on to the next step.
2] Install IPAM

To start off, we are going to install IPAM on the Windows server after ensuring that prerequisites are met. Follow the steps mentioned below to do the same.
- In Windows Server, launch the Server Manager Console, and go to the Local Server section.
- Go to the Manage tab, select the Add Roles and Features option, and hit the Next button when the Add Roles and Features Wizard opens up.
- Click on Role-based or feature-based installation in the Installation type, hit Next, and then click Select a Server from the server pool in the Server selection screen.
- Choose the server where IPAM will be installed, and hit the Next button twice.
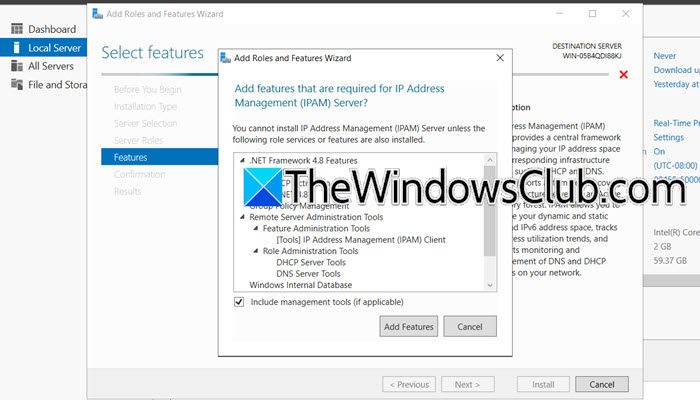
- In the Features page, scroll down to find and select the IP Address Management (IPAM) server feature. This will open up a new window, click on the Add Features button, then select Next, and lastly hit the Install button.
Alternatively, users can also install IPAM via command prompt by executing the following command:
Install-WindowsFeature IPAM -IncludeManagementTools
Wait for the wizard to complete the installation, and once done click on the Close button. The next step after installing IPAM is to configure IPAM in the server.
3] Configure IPAM in the Windows Server

Once we have installed IPAM, the next step involves configuring provisioning to grant permission for file sharing and accessing settings on the manager server. This access allows the IPAM server to communicate with it, so follow the steps mentioned below to do the same:
- In Server Manager, select IPAM from the left pane and click on Provision the IPAM server.
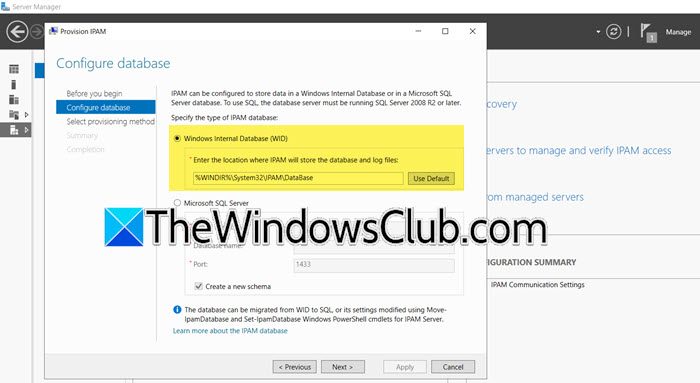
- Click on the Next button, select a database for storing IPAM server data, here we are selecting WID, and then click the Next button. If users decide to select the alternate option, then checking the Create a new Schema box is necessary.
- Select Group-based Policy, type in a GPO prefix in the GPO name prefix box, and click the Next button.
- Verify all the settings, and hit the Apply button to save the changes.
The IPAM provisioning completed successfully message will flash on the screen informing users that the process has been completed.
4] Configure server discovery and settings

The next step is to configure server discovery and settings.
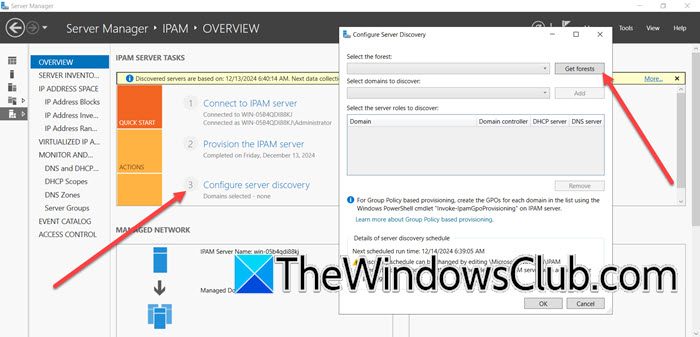
- In the IPAM Overview page, click on the Configure server discovery option, and in the Configure server discovery wizard, click on the Get Forests button. Wait for a few seconds and then hit the OK button.
- Click the drop-down menu, select all the domains that you need the IPAM server to manage, and hit the Apply button.
- Once done, again navigate to the Overview page, click on the Start Server discovery option to begin the discovery process of servers in the selected domain, and then wait for the process to complete.
Move to the next step.
Read: How to create a Failover Cluster in Windows Server
5] Manager servers and settings
Once the list of servers is compiled, we are going to add them to IPAM for management and verify their access status. This ensures that IPAM has control over the servers to manage the IP addresses, DNS, and DHCP configurations.
- Click on Select or Add servers to manage and verify the IPAM access link to add specific servers to the IPAM inventory for management. If the IPAM access status is blocked for the server, indicating that the required Group Policy Objects are not configured, then open PowerShell as an administrator, and run the following command:
Invoke-IpamGpoProvisioning –Domain mylab.local –GpoPrefixName MYLAB_IPAM –IpamServerFqdn WS2K19-SRV02.mylab.local -DelegatedGpoUser [email protected]
- Next, launch Group Policy Management, and ensure that IPAM GPO is present under your domain.
- On your domain controller, open Command Prompt as an administrator and run
gpupdate /force - Once done, right-click on the server, select the Edit Server option, navigate to the Manageability status drop-down menu, and select Managed > OK. Right-click the server, and click on Retrieve server access status to refresh and verify the server’s access status.
- Next, verify that the IPAM access status is now switched to unblocked, indicating successful integration with IPAM.
- Again, right-click the server, and select Retrieve All Server Data to retrieve DHCP, DNS, and other network data from the managed servers from IPAM to manage and monitor.
Now, users are all set up to use the IPAM console to manage their network’s IP address infrastructure.
Read: How to install and configure File Server on Windows Server
How do I add an IP address to IPAM?
To add an IP address to IPAM in Windows, open the IPAM console, navigate to the IP Address Space section, and select the desired IP Address block. Click on Add IP address and provide details such as the IP address, status, associated device or client, and any relevant custom fields. Save the changes, and the new IP address will be added to the IPAM database.
Also Read: Install File Server Resource Manager on Windows Server.