If you do not want to pay for an LLM or want to keep your data secure, you should set up LocalGPT. It allows you to have full control over how the AI operates and processes data. It also ensures privacy since all data stays on your local system instead of being sent to external servers.
Set up Local GPT on Windows PC
LocalGPT is an open-source tool inspired by privateGPT, designed to run large language models (LLMs) locally on user devices for private use. Unlike privateGPT, which relies solely on CPU execution, LocalGPT supports hardware acceleration via GPUs for better performance and reduced latency. Instead of the GPT-4ALL model and LlamaEmbeddings, which are pretty hefty, LocalGPT uses Vicuna-7B LLM and InstructorEmbeddings. It works with models like Blenderbot and WizardLM-7B allowing us to swap models based on specific needs. The entire pipeline operates locally, ensuring data privacy while delivering advanced NLP capabilities without external API reliance, making it a perfect candidate for a locally operated AI mode.
In this guide, we will set up Local GPT on Windows. You can follow the steps mentioned below.
- Download and install Miniconda
- Install LocalGPT Repository
- Install dependencies
- Run LocalGPT
Let us discuss them in detail.
1] Download and install Miniconda
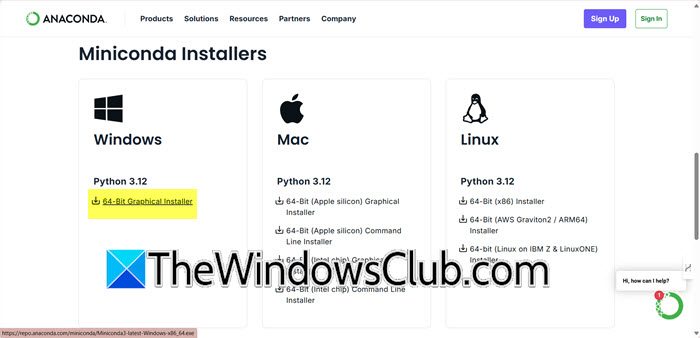
Miniconda is a lightweight distribution of the Conda package manager, designed to set up Python environments quickly. It provides only the essentials, allowing users to customize their installations by adding specific packages as needed. To download it, go to anaconda.com, scroll down, go to Miniconda Installers, and then download it for Windows as this guide is for Windows.
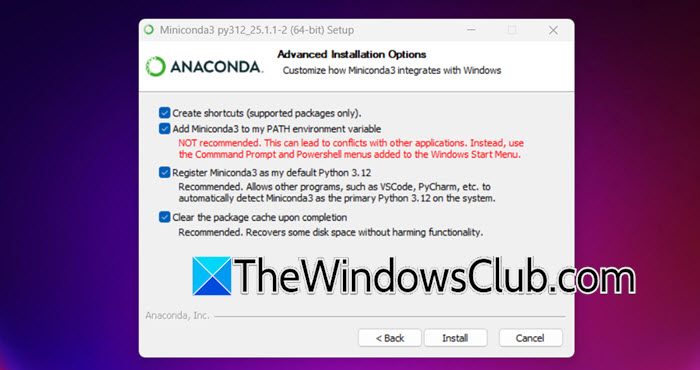
Now, run the installer and follow the on-screen instructions to complete the installation process, however, make sure that when you are on the Advanced Installation Options, tick all the boxes, and finally, complete the installation.

To check if it is installed or not, search “Anaconda Prompt” in the Start Menu and open the CLI. Now, you can run the conda list just to confirm that it is installed.
2] Install LocalGPT Repository
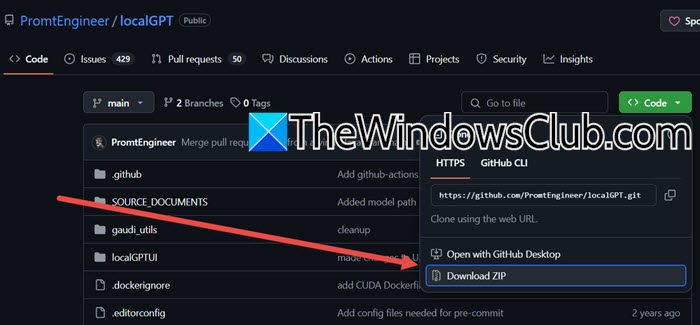
Now, we need to install the LocalGPT Repository is hosted on GitHub by the Prompt Engineer. We can get it from there. To do so, navigate to github.com. You can go through the page to learn more about the LocalGPT and to install it, you need to click on Code > Download ZIP. Once the ZIP file is downloaded, go to the Download folder, right-click on the ZIP file, select Extract, set a location where you want to extract the file and complete the process. Open the extracted folder, inside it, you will a folder called LocalGPT-main. Just for the sake of simplicity, we are pasting the folder on the Desktop and naming it “LGPT”.
3] Install dependencies

Now we need to create a virtual environment where we are going to install all the dependencies. To do so, open the “Anaconda Prompt” from the Start Menu and run the following commands.
conda create -n environment_name python=3.10
conda activate environment_name
Note: Replace the variable “environment_name” with any name of your choice.
If it asks you to download any package, please give your consent and proceed.

Now, we need to install the package that we downloaded the extracted earlier. To do so, you need to first navigate to the directory using the following commands.
cd Desktop
cd LGPT
Instead of installing all the components one by one, we can use the following command to install all of them at once.
pip install -r requirements.txt
You may encounter two errors.
- import torch ModuleNotFoundError: Run
pip install torch torchvision torchaudio and then run the aforementioned command.
- Microsoft C++ is required: Click on the mentioned URL, and download Visual Studio by clicking on Download Build Tools, once Visual Studio is open, you need to go through the tools that you don’t have and download them.
After resolving the issue, run the installer command again, and once installed, move on to the next step.
4] Run LocalGPT
First of all, you need to run the Python Ingestion which means importing data from the source documents, processing your documents, and storing their embeddings in a vector database (Chroma DB). To do so, you need to execute the following command.
python ingest.py
We recommend that you keep an eye on CPU usage using the Task Manager.
Now, access the constants.py file within your LocalGPT directory. Disable the Llama 3 model by adding a comment to its line, and activate the Llama 2 model (7B parameters) by removing the comment from its line.
Once done, you need to run the LocalGPT using the following command.
python run_local_gpt.py
If you encounter an error stating that llama is missing, run pip install llama-cpp-python.
Hopefully, you will be able to run LocalGPT on your computer locally with the help of this guide.
Read: How to use Perplexity AI for research
How to install PrivateGPT on windows?
To install PrivateGPT on Windows, first, install Python and a package manager like Conda. Then, clone the PrivateGPT repository and set up a virtual environment. You then have to install dependencies using Poetry or PIP. Download a compatible language model. Finally, you have to configure environment variables, ingest documents, and run the application to start querying your data locally.
Read: How to run DeepSeek locally on Windows 11
How to setup WSL on Windows?
To set up WSL on Windows, open PowerShell as Administrator and run wsl –install. This enables WSL, installs the Linux kernel, and sets WSL 2 as default. Restart your computer, then choose a Linux distribution to install. Launch the distribution, set up a username and password, and you’re ready to use Linux on Windows.
Also Read: Run ChatGPT Clone locally on computer using GPT4All.
Leave a Reply