Are you looking for a tutorial to sharpen an image in GIMP on your Windows 11/10 PC? Image sharpening is an image enhancement technique that lets you sharpen the edges of an image and make it look more clear and defined. You can easily sharpen an image in GIMP. It is a popular free and open-source image editor that can be used to create new graphics and edit existing ones. Let’s see how you can make your images look sharper and clearer in GIMP.
Does GIMP have a Sharpen tool?
Yes, GIMP provides a Sharpen tool to make your images look sharper. It offers a variety of paint tools one of which includes a Sharpen tool as well. It works like a drawing tool just like how you draw over an image using a brush in GIMP. You can use it to sharpen a specific area or the whole image. In this post, we have mentioned the exact steps that you can follow to use it. So, check out below.
How to sharpen an image in GIMP?
You can sharpen an image using GIMP software in two different ways. Here are the two methods you can use to sharpen your pictures in GIMP on Windows 11/10:
- Use the Sharpen tool.
- Apply the Sharpen filter.
1] Use the Sharpen tool
GIMP provides several picture editing, drawing, and editing tools to customize the color profile of an image, rotate it, flip it, crop it, and do more editing. It also offers a dedicated drawing tool to sharpen your images on a computer. Let us check out how you can use this tool to sharpen a picture:
- Make sure you have installed GIMP on your PC.
- Launch the app and open the input image.
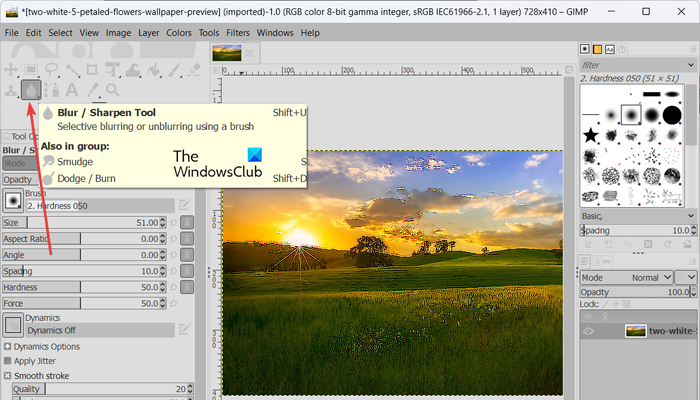
- Click on Blur/Sharpen Tool.
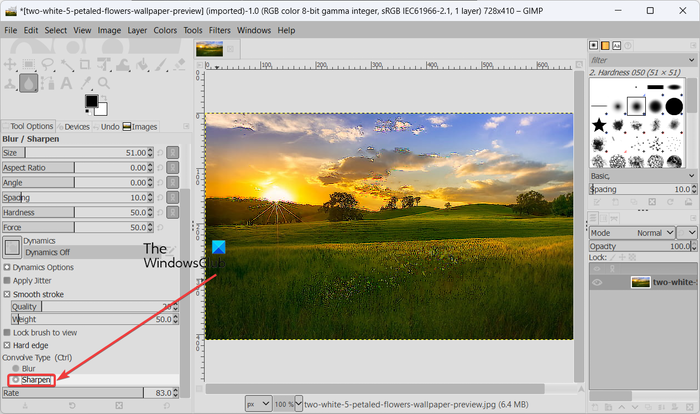
- Set Convolve Type to Sharpen.
- Customize brush settings.
- Set sharpen rate (intensity).
- Use the sharpen brush to sharpen a particular area of the image.
- Save the final image
First of all, download and install the GIMP application on your computer and then launch the application. After that, open the source picture that you want to sharpen using the File > Open option.

Now, from the left-side pane, you can see various painting and transformation tools. You can simply pick the Blur/Sharpen Tool from the available tools. In case you can’t see this tool in the toolbox, you need to press the Shift + U hotkey and then Blur/Sharpen Tool will be visible and selected.
Alternatively, you can also go to the Tools menu and click on the Paint Tools > Blur / Sharpen option to enable and select the Sharpen tool.

Next, a dedicated tab named Tool Options for the chosen tool will open up in the left-side panel. From here, you need to set the Convolve Type to Sharpen. Then, you can customize the image-sharpening brush settings that you are going to use to sharpen your image. These options include Opacity, Size, Aspect Ratio, Force, Hardness, Angle, Smooth Stroke, Hard edge, and a few more.
Read: How to scan an Image with GIMP?
One of the most important settings for the Sharpen tool is Rate. This option is basically used to customize the intensity of the sharpening effect on your image. We recommend you keep it to a lower value and then increase it as per your requirement.
Once the above settings are customized, you can use the brush to draw over a particular section of your image and it will sharpen your image. You can then use the brush to sharpen the rest of the areas on your picture. The real-time preview of the image is displayed on the screen.
Finally, you can save the sharpened image to its original format or some other image format like JPEG, PNG, BMP, TIFF, WEBP, GIF, etc. To do so, use the File > Export as option.
The Sharpen tool in GIMP gives you the flexibility to apply the sharpening effect to your image up to whichever degree you want. Also, if you only want to apply the sharpening effect to a particular part of your image, you can do that too using this tool.
See: How to Batch Resize Images with GIMP in Windows?
2] Apply the Sharpen filter
Don’t want to manually sharpen the image using the tool as discussed above? Well, GIMP provides an option for such users also. You can use a direct filter to sharpen an image in GIMP. Just click on the filter and it will sharpen your whole image at once. Here are the steps to do so:
- Open the image.
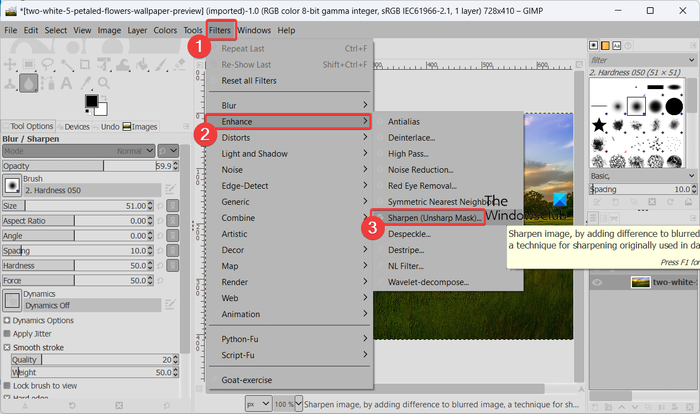
- Click on the Filters menu.
- Go to the Enhance category.
- Select the Sharpen filter.
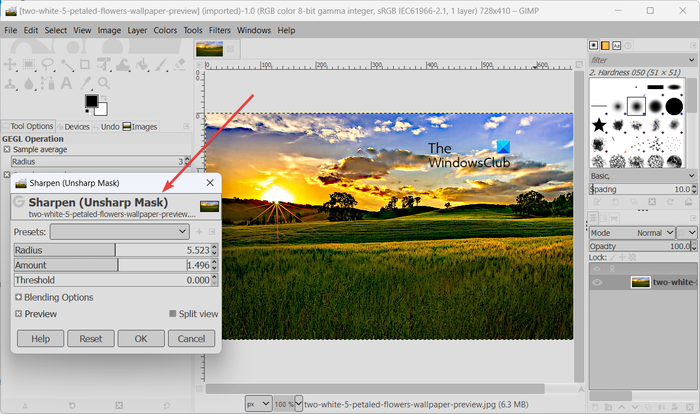
- Customize the filter settings.
- Save the resulting image.
First, browse and import the input image in GIMP using its File > Open option.

After that, click on the Filters menu from the top menu bar. Then, move to the Enhance category and click on the Sharpen (Unsharp Mask) filter.

A small prompt window to set up the filter will open up. Here, you can customize the filter settings using options like Radius, Amount, Threshold, and Blending Options (Mode and Opacity); set up these settings accordingly.
The preview of the sharpened image is available right on the screen by default. In case you want to compare the before and after images, you can simply click on the Split View option and it will show a comparison between before and after images. You can analyze both images side by side.
When done, press the OK button to apply the filter on the image and save the final image in its native format. If you want to convert the image format, you can do that using its File > Export as function.
See: How to crop, rotate, and change Image size in GIMP?
How do I increase the sharpness of an image in GIMP?
If you are using the Sharpen tool in GIMP, you can increase the Rate value from Tool Options. It will make your image look sharper. In case you are applying a direct filter to sharpen your image, set a higher Amount value for the Blur/Sharpen filter to increase the sharpness of your image.
So, these are the two methods of sharpening an image in GIMP. The first method can be used to sharpen a part of the image or the whole image exactly to the degree you want. While the second method makes it easy and convenient to quickly apply a Sharpen filter to the entire image to give it a sharper appearance.
Now read: How to Check and Change Image DPI in Windows?
Leave a Reply