When we open a document in Word or a spreadsheet in Excel, its name is displayed on the Title Bar of Word and Excel respectively. When we create a new document or spreadsheet, its default name is shown on the Title Bar. But Excel or Word does not display the file path or file location on the Title bar by default. In this article, we will learn how to show the File Path in Title Bar in Excel and Word. We save our Word documents and Excel spreadsheets in different locations on our hard drives. This trick is useful if you have many documents or spreadsheets saved in different locations on your system. If you know this trick, you will be able to display the file location for a particular Word document or Excel spreadsheet on the Title Bar so that you could locate it easily.

Does Title Bar display file path?
You can display the file path in Title Bar in Word and Excel by running a Macro. First, enable the Developer tab, then create a Macro. After that, save it as an Excel Macro-Enabled Workbook for Microsoft Excel Spreadsheet and a Word Macro-Enabled Document for Microsoft Word. After that, you just have to run the Macro, and Word and Excel will display the complete file path of the opened document and spreadsheet in the Title Bar. We have explained the entire process in detail in this post.
Both Microsoft Excel and Word have an option to create Macros. We can use these Macros to display the complete file path in a Word document and an Excel spreadsheet. The procedure to create a Macro for displaying the complete file path in Title Bar is different for Excel and Word. We will explain the process separately.
How to show File Path in Title Bar in Microsoft Excel
Go through the following steps to display the complete file path in the Title bar in Microsoft Excel.
- Open Microsoft Excel.
- Create a new blank spreadsheet.
- Click on the Developer tab.
- Create a Macro and save it.
- Save the spreadsheet as a Macro-enabled spreadsheet.
- Open any other Excel spreadsheet.
- Run the Macro.
Below, we have explained all these steps in detail.
1] First open a blank Microsoft Excel spreadsheet. Now, click on the Developer tab. By default, the Developer tab is disabled in Microsoft Excel. Therefore, if you have not enabled it before, enable it first. You can follow any of the following options to enable the Developer tab in Excel:
- Via the Options Menu
- Via the Registry Editor
The Options Menu is the easiest method to enable the Developer tab in Excel.
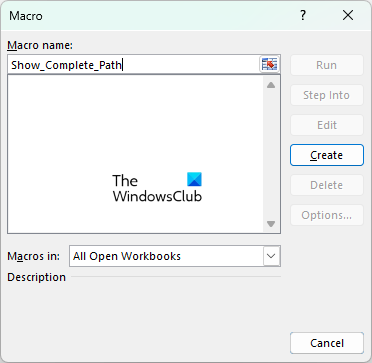
2] After enabling the Developer tab, select it and then click Macros. Give a name to your Macro. Do note that the words in the Macro’s name should not be separated by a space. You can use underscore instead of space. Now, click on the Create button. This will open the Microsoft Visual Basic window.
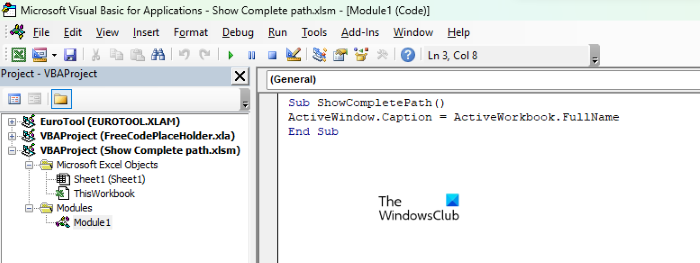
3] Now, copy the following command, go to the Microsoft Visual Basic window, and paste it between Sub and End Sub (refer to the above screenshot).
ActiveWindow.Caption = ActiveWorkbook.FullName
4] Go to “File > Save” and close the Visual Basic window. Now, save your Excel file. Go to “File > Save” and select the location to save the Excel file. After that, give a name to your Excel file and Excel Macro-Enabled Workbook in Save type. Click Save.
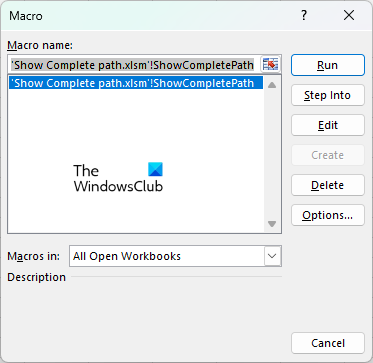
5] You have created a Macro to display the file path in the Title Bar in Excel spreadsheets. Now, open an Excel Spreadsheet and select the Developer tab. If you see a Security Warning ribbon, click Enable Content. Click Macro, select the Macro from the list, and click Run. After that, Excel will show the complete file path in the Title Bar of that spreadsheet.

Now, you can display the complete file path in any Excel Spreadsheet by running the Macro you have created. But for this, first, you have to open the Macro-enabled spreadsheet, otherwise, your Macro will not be shown in the Macros list.
Read: How to change default Excel worksheet direction from right to left.
How to show File Path in Title Bar in Microsoft Word
Now, let’s see the steps to show the file path in Title Bar in Microsoft Word.
- Open Microsoft Word.
- Create a new blank document.
- Click on the Developer tab and create a Macro.
- Save the Macro.
- Save the Word document as a Macro-enabled document.
- Open any Word document and run the Macro to display the document location in the Title Bar.
Below, we have explained all these steps in detail.
1] Open Microsoft Word and create a new blank document in it.
2] Click on the Developer tab and then click on Macros. If the Developer tab is not available on the Menu ribbon, you have to enable it. The steps to enable the Developer tab in Word are the same as in Excel. We have already talked about how to enable the Developer tab in Microsoft Excel.
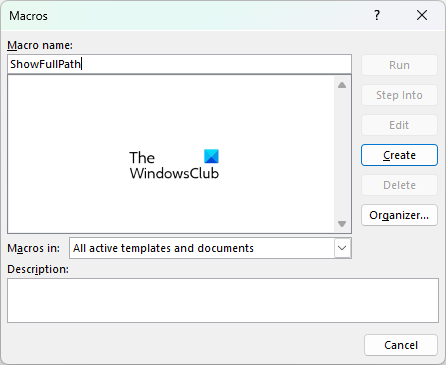
3] After enabling the Developer tab, click Macros. Write the name of your Macro and click Create. Your Macro name should not contain space. When you click on the Create button, Word will open the Microsoft Visual Basic window.
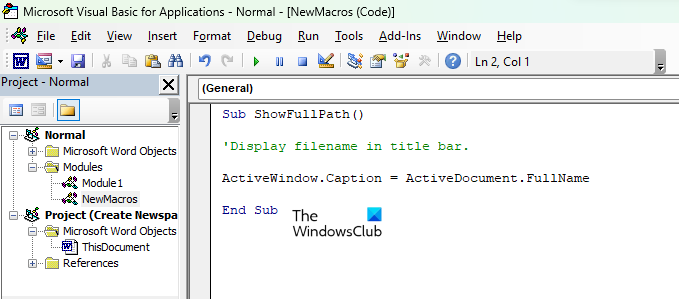
4] Now, copy the following command, go to Microsoft Visual Basic window, and paste it between the Sub and End Sub (see the above screenshot).
'Display filename in title bar.

ActiveWindow.Caption = ActiveDocument.FullName
5] Go to “File > Save.” After that, close the Microsoft Visual Basic window and save your Word file as a Word Macro-Enabled Document. The Macro has been created.

6] Now, you can display the complete file path in Title Bar in any Word document by running the Macro that you have just created. Open a Word document and click on the Developers tab. After that, click Macros and select the Macro from the list. Click Run. As you click on the Run button, Word will show the complete document location in the Title Bar.
How to show File Path in Quick Access Toolbar in Excel and Word
You can also display the file path or file location in Quick Access Toolbar in Excel and Word. For this, you need not create a Macro. This is a built-in feature in Excel and Word but it is disabled by default. The steps to show the file path in Quick Access Toolbar are the same for both Word and Excel.
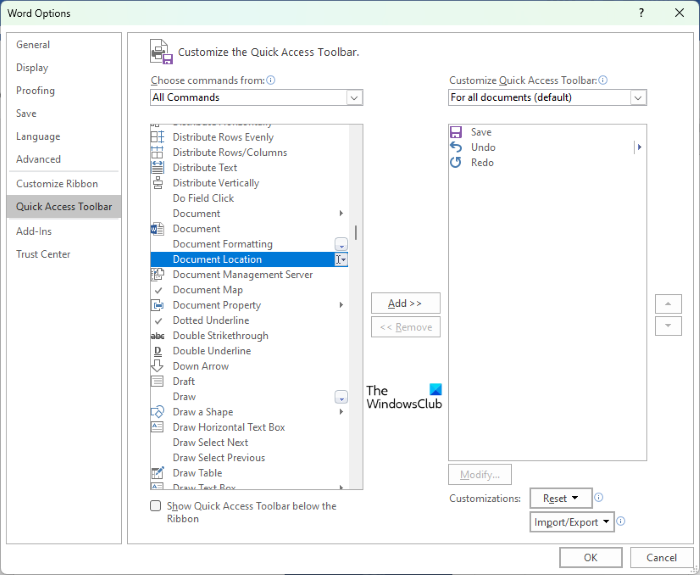
Follow the steps written below:
- Open Microsoft Excel or Microsoft Word.
- Go to “File > Options.”
- Select Quick Access Toolbar from the left side.
- In the “Choose commands from” drop-down menu, select All Commands.
- Scroll down and locate Document Location.
- Once you find it, select it and click on the Add button.
- Click OK to save the changes.
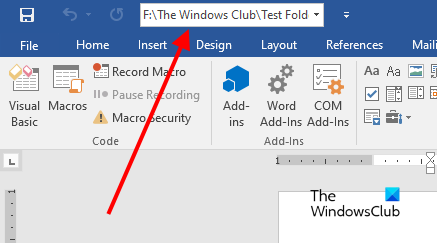
After that, Excel or Word will show you the complete file path or file location in the Quick Access Toolbar. If you want to remove the file path from the Quick Access Toolbar in Word or Excel, go to “File > Options > Quick Access Toolbar” and select the Document Location in the box on the right side, and click on the Remove button. After that, click OK to save the changes.
Read: How to insert Headers and Footers on specific pages in Microsoft Word.
How do I show the file path in the Title Bar or Toolbar in Excel?
You can show the complete file path in the Title Bar in Excel by creating a Macro. First, open a blank Excel spreadsheet, then create a Macro in it, and save it as an Excel Macro-Enabled Workbook. Now, open the Excel workbook in which you want to display the file path in Title Bar and Run the Macro. Then, Excel will show you the file path in the Title bar.
We have explained the detailed process to do this in Excel above in this article.
Hope this helps.
Read next: How to subtract multiple cells in Excel.