In this tutorial, we will help you to show hidden Performance Overlay in Windows 11. With the Performance Overlay feature of Windows 11, you will be able to keep an eye on your system resources in real time. You can check the real-time CPU usage, disk usage, GPU usage, RAM usage, etc., on your computer screen. This is handy when you are playing a game or using a heavy graphics program (like some video editor) and need to check how much system performance is affected using a particular program.
While there are some best free software to monitor system performance and built-in tools like Resource Monitor available to check system performance, the Performance Overlay feature has its benefits. For example, you don’t have to leave the program or application you’re using or go back and forth to monitor the system’s performance. You can continue to use the application and check the PC performance at once.
How to show hidden Performance Overlay in Windows 11
You can show hidden Performance Overlay on your Windows 11 PC using two different native ways. These are:
- Show hidden Performance Overlay using the Game Bar
- Show hidden Performance Overlay using Task Manager.
1] Show hidden Performance Overlay using the Game Bar

Game Bar (previously known as Xbox Game Bar) feature in Windows 11 lets you take screenshots, start recording while gaming, view real-time system performance, and more. Apart from CPU, RAM, and GPU usage, it can show FPS in games and VRAM usage which makes it more useful.
Before you can use this feature, you need to enable or turn on the Game Bar feature. For this, open the Settings app (Win+I) > Gaming > Game Bar > and turn on the Allow your controller to open Game Bar option. After this, follow these steps to show hidden Performance Overlay using the Game Bar:
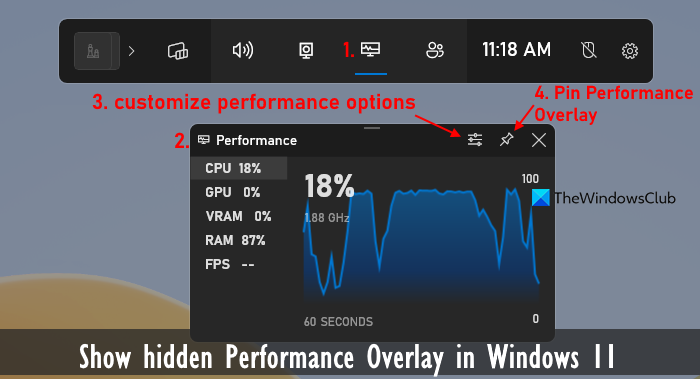
- Press Win+G hotkey. This will activate the Game Bar feature and its Home Bar will be visible on your desktop screen
- Click on the Performance widget icon present in the Home Bar
- A Performance Overlay or box will open where you will see CPU, GPU, and other options. Selecting an option will show its live usage along with a chart or graph
- Click on the Performance options icon in that box for the customization. Now you can select the graph position (Right, Bottom, or Left), accent color, and Metrics (CPU, VRAM, FPS, etc.) to view in the Performance Overlay
- Once the options are set, come back to the Performance Overlay box
- Click the Pin icon and Performance Overlay will remain on top of your desktop screen over other apps to view the system performance. If you want, you can also hide or collapse the chart to make Performance Overlay compact.
To exit the Performance Overlay, press the Win+G hotkey, select the Unpin icon for the Performance Overlay, and close it.
Read: How to run Computer Performance Benchmark Test on Windows PC
2] Show hidden Performance Overlay using Task Manager

Windows 11 Task Manager is another option to show the hidden Performance Overlay on your computer. You can use it to view real-time CPU usage, network or Wi-Fi usage, disk usage, memory (or RAM), and GPU usage along with a graph. For each of the metrics, it shows additional details or information. For example, for memory, it shows total memory in use, available memory, cached memory, paged pool, non-paged pool, memory speed, etc. Now, let’s check the steps:
- Right-click on the taskbar and click on the Task Manager option or press the Ctrl+Shift+Esc hotkey to open the Task Manager
- Select the Performance tab
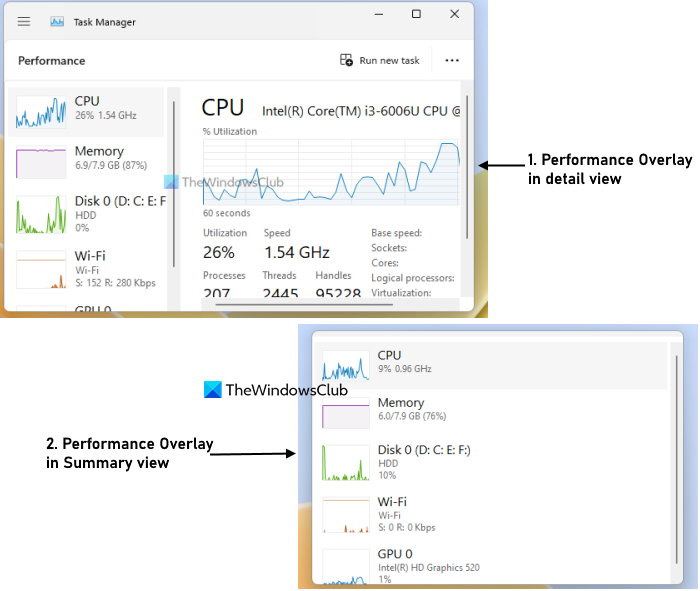
- Click on any of the available metrics and a graph and information related to that particular metric will be visible on the Task Manager. If you want to view the summary or real-time usage of all the metrics in Performance Overlay, then you can right-click on any of the available options, and select the Summary view option
- Now, to show the Performance Overlay, click on the Settings option available in the bottom left corner of the Task Manager
- Under the General section, expand the Window management menu
- Select the Always on top option
- Task Manager window will close and re-open instantly. Now again select the Performance tab
- Adjust the size of the Task Manager window as per your need and place it anywhere on your desktop screen.
Now you can monitor the performance metrics and continue working with other program(s). To undo the changes, access the Settings option of Task Manager in the Performance Overlay and uncheck the Always on top option. After that, you can close the Task Manager.
TIP: You can also place the mouse cursor on the system tray icon of Task Manager to view real-time CPU, Network, GPU, and Memory usage when Task Manager is opened or running.
Hope it helps.
How do I open the Performance tab in Windows 11?
If you want to open the Performance tab in the Task Manager of your Windows 11 PC, then use the left Navigation section. There, select the Performance tab available below the Processes menu or tab. And, if you want to open the Performance Monitor tool in Windows 11, then you can do it using the Search box or type perfmon in the Run Command box (Win+R) and hit Enter.
How can I monitor my PC Performance while gaming?
There exist some best free game monitoring software for Windows PCs that you can use to monitor your PC performance while gaming. Some of the good examples of such tools are MSI Afterburner, NVIDIA GeForce Experience Performance Monitoring, GPU-Z, HWMonitor, etc. You can also use Game Bar’s performance monitor overlay feature of Windows 11 to monitor system performance.
Read next: How to use Performance Monitor in Windows PC.
Leave a Reply