This post discusses how you can split a video into multiple parts in Windows 11/10. If you have a large video file and you want to split it into multiple smaller video segments, this post is for you. Here, we are going to mention multiple methods that enable you to split a video into several smaller parts without any hassle. Let us check out the methods now.
How can I split a large video file?
You can split a large video file on Windows 11/10 using its native Photos app. The Photos app comes with an inbuilt free video editor that lets you split a video. Alternately, you can also use free software, online tools, or the VLC media player to split a video. We have discussed the detailed procedure to split videos; you can check them out below.
How to Split a Video into parts in Windows 11/10
Here are the methods to split a video into multiple parts on Windows 11/10 PC:
- Split a video into multiple parts using the Photos app.
- Use free GUI-based Video Splitter software to split a video.
- Split a video into several parts through the command-line interface.
- Use a free online Video Splitter tool to split a video online.
Let us discuss the above methods in detail!
1] Split a video into multiple parts using the Photos app
You can split a video into multiple parts using the native Photos app in Windows 11/10. The Photos app has a built-in video editor that lets you split a video into two parts. We have shared the detailed procedure to split or trim videos in Photos that you can check out.
2] Use free GUI based Video Splitter software to split a video
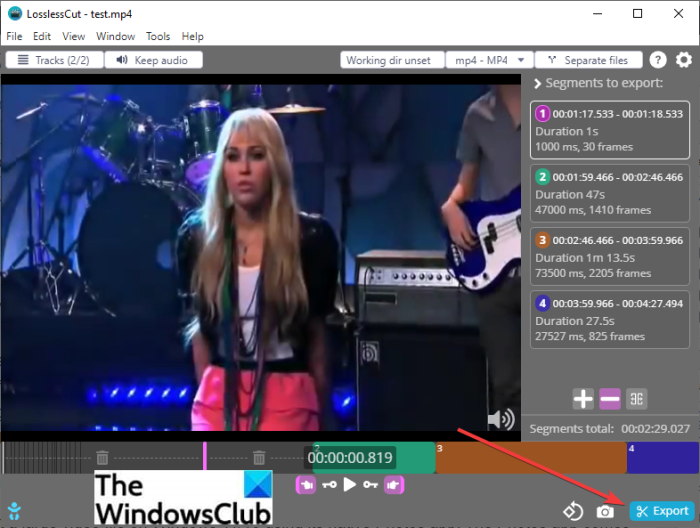
An alternative method to split a video into two or more parts, you can use free third-party software. There are multiple video splitter software that allow you to split videos on Windows 11/10. Here, we are going to use this free software called LosslessCut using which you can split videos into multiple sections. Let us discuss this software in detail now.
LosslessCut is feature-rich software that enables you to cut videos into several smaller segments without losing their quality. You can choose to keep the audio in output videos or remove the audio from the resulting video segments as per your requirement. Let us check out the steps to use this free software.
How to split a video using LosslessCut in Windows 11/10:
Here are the basic steps to split a video into several segments using LosslessCut:
- Download LosslessCut.
- Launch this portable software.
- Open a video file.
- Specify the starting and end time to split a video.
- Repeat steps (4) for multiple video parts.
- Save the video segment files.
Firstly, you need to download this free software and then unzip the compressed folder. Go to the extracted folder and run the LosslesCut.exe application file.
Now, simply open a video file that you want to split using the File > Open option.
Next, select the set cut start to current position button to set the starting position and use the set cut end to current position button to set the ending position to split a video.
After that, click on the Split segment at cursor button to add the video segment. You can find this button under the Segments to export section.
You can repeat the above steps to add multiple video segments that you want to split.
Finally, click on the Export button and then select various output options including output video format, cut mode, output directory, etc. And then, press the Export button one last time. It will start splitting the videos into the selected parts.
You can download it from github.com.
3] Split a video into several parts through the command-line interface
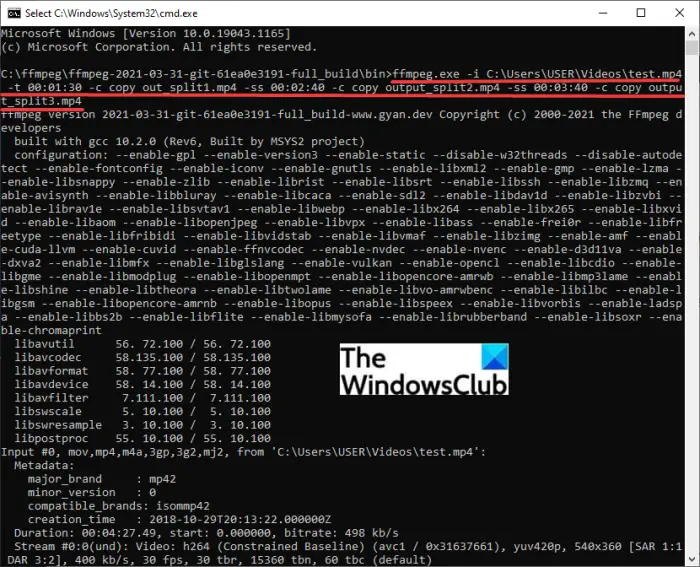
You can also split a video through the command-line interface in Windows 11/10. For that, you can use this popular command-based audio and video processing utility tool called FFmpeg. It is a free, open-source, and portable video editing software that can be used for splitting a video into multiple parts. Apart from video splitting, FFmpeg can be used to perform a lot of video-related tasks. For example, you can resize a video, batch rotate videos, edit video metadata, create a Video from an Image sequence, and do more.
Let us now discuss how you can split videos through the command-line interface using FFmpeg!
How to split a video into multiple parts through the command-line interface using FFmpeg
Here are the main steps to split a video into multiple segments via Command Prompt in Windows 11/10:
- Download FFmpeg.
- Extract the ZIP folder.
- Open the Command Prompt in the unzipped folder.
- Type a video splitting command with proper syntax.
- Press Enter to execute the command and split the video.
Let us elaborate on the above steps now!
Firstly, simply download FFmpeg from its official website. Then, unzip the compressed folder with the help of Windows built-in compress tools or Unzipper freeware.
Now, go to the FFmpeg folder and then open the Command Prompt in the folder where the ffmpeg.exe application file is present.
Next, you need to provide a video splitting command similar to the below one:
ffmpeg.exe -i input-video.mp4 -t 00:01:30 -c copy split1.mp4 -ss 00:02:40 -c copy split2.mp4 -ss 00:03:40 -c copy split3.mp4
In the above command, we are splitting a video into three parts. The first timecode 00:01:30 specifies the duration of the first part of the video, while the 00:02:40 timecode is used to tell the time from where the second video part will start. And, so on.
You need to replace input-video.mp4 with the exact path of the source video. Also, in place of split1.mp4, split2.mp4, and split3.mp4, you can enter the exact path and filename of output video parts. Else, the resulting videos will be saved in the FFmpeg folder.
After that, simply press the Enter button and it will start processing your input video. In a matter of some time, you will get the output videos.
So, this is how you can easily split a video using a simple command with the help of FFmpeg.
See: How to extract Frames from a Video with high quality
4] Use a free online Video Splitter tool to split a video online
You can also use a free online tool to split videos online in a web browser. You can find plenty of free websites that enable you to split videos and perform some other video-related tasks. To split videos online, we are going to use the following free online tools:
- Aconvert
- Split Video Online
1] Aconvert
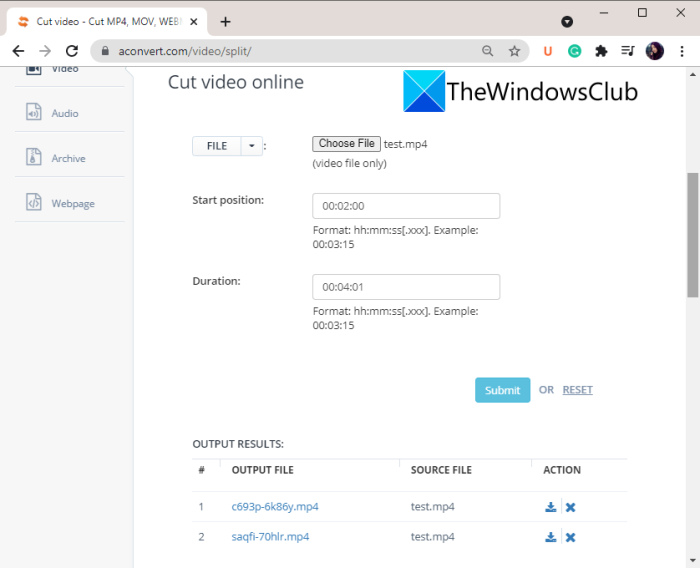
Aconvert is primarily a free file converter tool that also provides some video editing tools. One of its video editing tools is a video splitter. You can simply use it to split videos as per your requirement. Just enter the starting time and then the total duration to split a video. Here are the steps to follow to split a video online using this handy tool”
- Firstly, open the Aconvert website in a web browser.
- Now, choose the source video file that you want to split. You can import a video file from local storage, URL, Google Drive, or Dropbox.
- Next, enter the starting time from where you want to split a video.
- After that, enter the total duration for the video part you want to split.
- Then, press the Submit button to process and split the video.
- Finally, you can download the output video.
You can repeat the steps to split a video into more parts. Go to this website and try this free and online tool to split videos.
Related: Free Audio Splitter Software for PC
2] Split Video Online
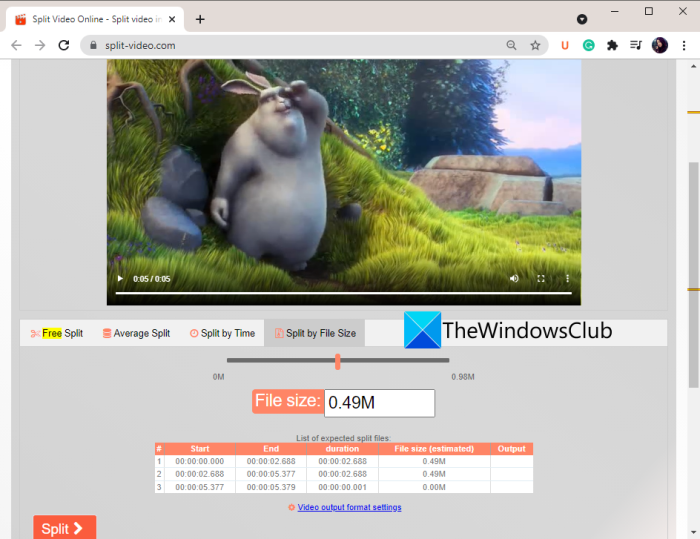
As the name suggests, Split Video Online is a dedicated online tool that enables you to split videos into multiple parts. It is a featured tool yet very easy to use. Using it, you can split a video based on multiple parameters. It allows you to split a video freely by entering timecode and duration. Or, you can use the Average Split method that lets you split a video into several equal parts. Apart from that, you can also split a video by file zie. Just enter the file size of each part or video and then split the video.
Here are the main steps to use this online tool to split a video:
- First, open your web browser.
- Now, go to the Split Video Online website.
- Next, select a video file from your PC.
- After that, choose the desired video splitting method and then enter the related parameters.
- Then, you can select an output video format to export the resulting videos. It supports a lot of video formats including MP4, GIF, AVI, MPV, FLV, MKV, WMV, etc.
- Finally, press the Split button to start the video splitting process.
When the process is done, you will be able to download the video parts.
You can try Split Video Online here.
How do I split a video in VLC?
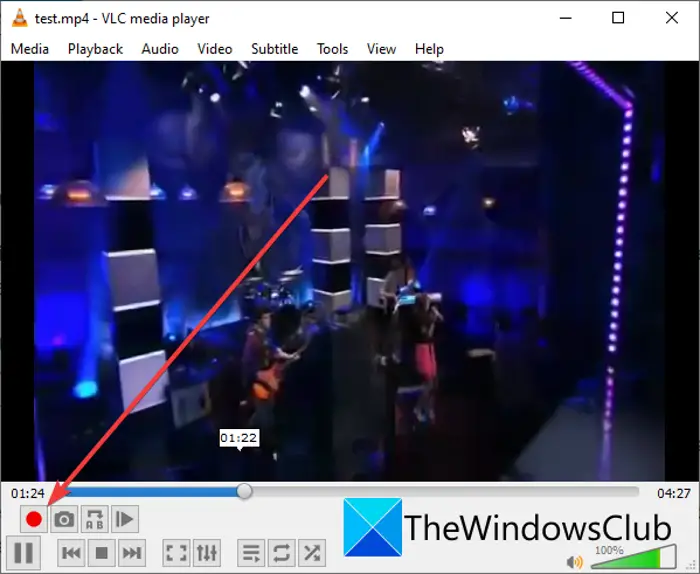
You can split a video in VLC using some simple steps. Here are the main steps to split a video in the VLC media player:
- Firstly, download and install the VLC media player if you haven’t already.
- Now, launch this media player.
- Next, open the source video file in it.
- After that, click on the View > Advanced Controls option; it will open up several playback control options.
- You now need to put the cursor at the starting point from where you want to split the video.
- Then, press the red button which is the Record button.
- Now, let the video play and again click on the Record button when the video reaches the ending point.
It will split the video and you will most probably find the output in the default Videos folder.
That’s it!
Now read: How to split and merge audio files using Audacity.
Leave a Reply