While playing a video in a PowerPoint slideshow, some users have found the video playback choppy. According to the users, there is no issue with the video, because the media players can play the video without any lag. The problem persists only with Microsoft PowerPoint. If you experience the choppy video playback in PowerPoint, here is a complete guide on how to stop Video Lag in PowerPoint.

Fix choppy video playback in PowerPoint
PowerPoint lets you insert a video by the following two methods:
- From YouTube or from a link.
- From your computer.
If you have inserted an online video, make sure that your internet connection is working fine, otherwise, you will experience choppy or laggy video playback in PowerPoint.
How to stop Video Lag in PowerPoint
The following solutions will help you stop Video Lag or fix choppy video playback in PowerPoint:
- Update Office
- Disable Hardware Graphics Acceleration
- Update your graphics card driver
- Convert your video into another format
- Compress your video
- Check for a problematic add-in
- Delete files from the TEMP folder
- Insert your video by using Windows Media Player
Below, we have explained all these fixes in detail.
1] Update Office
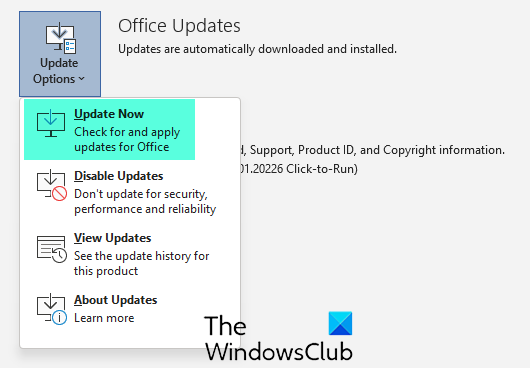
If you are experiencing problems with Microsoft Office apps, the first thing that we suggest you do is to update Microsoft Office manually. If the issue was occurring due to a minor bug, the update will fix it. To update Office, you can use any Microsoft Office program, like Word, Excel, PowerPoint, etc.
Fix: Video Stuttering and Lagging issues in Windows
2] Disable Hardware Graphics Acceleration
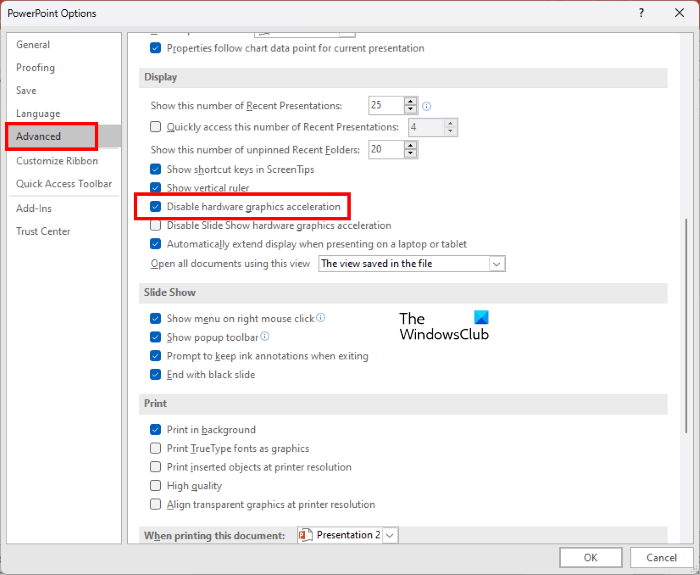
The Hardware Graphics Acceleration feature was introduced in Microsoft Office applications to improve their performance by moving the graphics and text rendering from CPU to GPU. But in some cases, this feature may cause trouble. If you are experiencing video playback issues in PowerPoint, disable Hardware Graphics Acceleration and see if it fixes the problem. The steps to disable this feature are provided below:
- Open Microsoft Powerpoint.
- Open any presentation in PowerPoint or create a new blank presentation.
- Go to “File > Options.”
- In the PowerPoint Options window, click Advanced on the left side.
- Select the Disable hardware graphics acceleration checkbox. You will find it under the Display section.
- Click OK to save the changes.
3] Update your graphics card driver
The issue you are currently facing might be caused by the corrupted or outdated graphics card driver. Update your graphics card driver and see if this helps. You can update your graphics card driver via Windows Optional Updates feature. If this does not help, follow the steps below:
- Visit your manufacturer’s website and download the latest version of the graphics card driver.
- Uninstall your graphics card driver via the Device Manager.
- Run the installer file that you have just downloaded to install the graphics card driver manually.
- Restart your computer.
4] Convert your video into another format
One effective solution to fix the video playback issues in PowerPoint is to convert the video into another format and then insert it into a PowerPoint presentation. There are many free video converter tools or software that you can use to convert your video from one format into another.
Some users were experiencing issues with the MP4 format. After converting the MP4 video into MPEG, the issue was fixed.
5] Compress your video
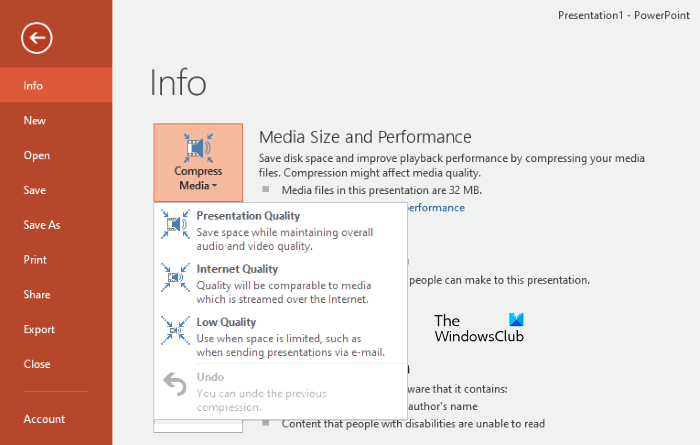
Compressing a video file in a presentation not only decreases the size of the presentation file but also fixes the video playback issues. You can compress video to fix choppy video playback in PowerPoint. To do so, go through the following instructions:
- Open the file in PowerPoint that contains the video.
- Go to “File > Info.”
- Click on the Compress Media drop-down and select the desired option to compress the video file.
The time taken by PowerPoint to compress the video depends on the size of your video.
Read: How to speed up a slow PowerPoint File
6] Check for a problematic add-in
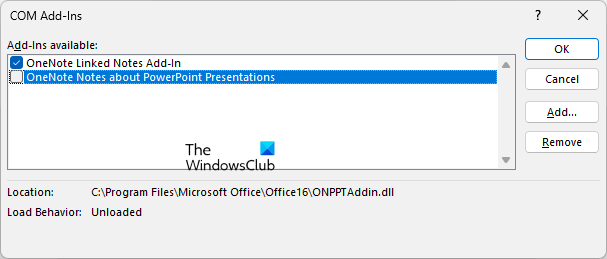
The issue might be occurring due to a problematic add-in. To check this, disable add-ins in PowerPoint one by one and play slideshow every time you disable an add-in. Check if the video lags or not. This process will take time but help you identify the problematic add-in (if any). The steps to disable an add-in in PowerPoint are written below:
- Open Microsoft PowerPoint.
- Open your presentation.
- Go to “File > Options.”
- Select Add-Ins from the left side.
- Select COM Add-ins in the Manage drop-down and click Go.
- A list of all the add-ins installed in PowerPoint will appear. Uncheck the checkbox of any of the add-ins and click OK. This will disable the selected add-in.
7] Delete files from the TEMP folder
If your TEMP folder contains a lot of files, it may slow down PowerPoint and other programs installed on your computer. Hence, delete all the files from the TEMP folder and see if this helps. To do so, open the Run command box and type %temp%. Now, click OK. This command will open the TEMP folder directly. Now, delete all the files from this folder.
8] Insert your video by using a Windows Media Player
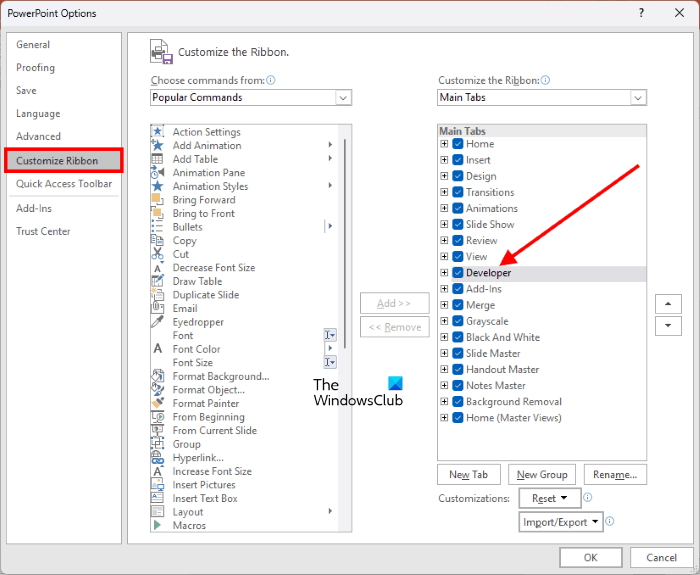
Windows Media Player can play a number of video formats. Therefore, if the problem still persists, we suggest you insert the video in PowerPoint using the Windows Media Player. For this, you have to enable the Developer tab. The following instructions will guide you on this. If the Developer tab is already enabled in PowerPoint, you can skip these steps.
- Open PowerPoint.
- Open a presentation in it.
- Go to “File > Options.”
- Select Customize Ribbon from the left side.
- On the right side, select Main Tabs in the drop-down under the Customize the Ribbon section.
- Enable the Developer checkbox.
- Click OK.
After enabling the Developer tab in PowerPoint, follow the instructions listed below to insert the video using the Windows Media Player.
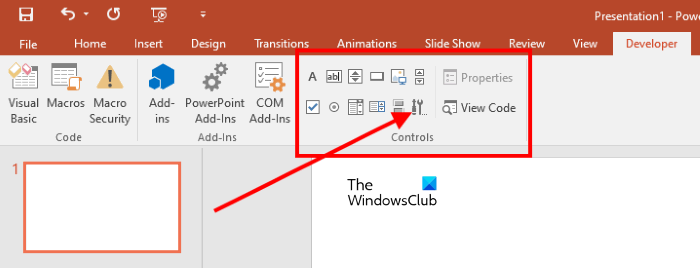
Select the Developer tab and click on the More controls option under the Controls group. This will open the More Controls popup window.
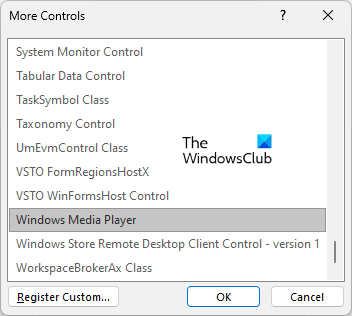
In the More Controls popup window, scroll down and select Windows Media Player. After that, click OK. As you select the Windows Media Player, you will see that your mouse pointer is turned into a Plus icon. Now, use this Plus icon to draw a rectangle on your slide. This will insert the Windows Media Player in the rectangle that you have just created.
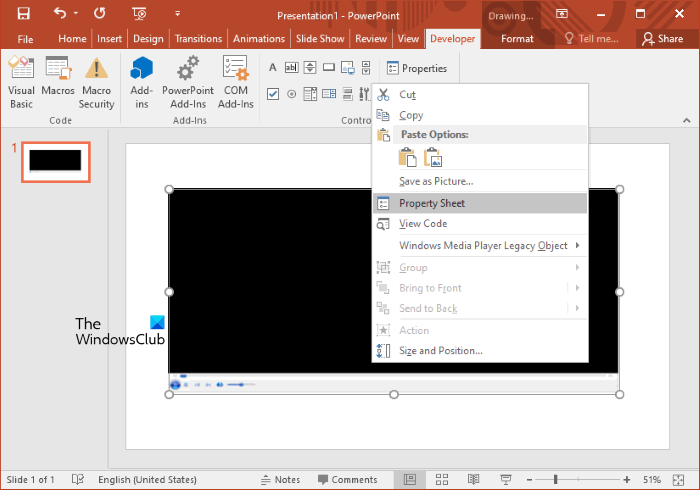
Now, right-click on the Windows Media Player and select Property Sheet. Click on the Browse button next to Custom to open the Window Media Player Properties window.
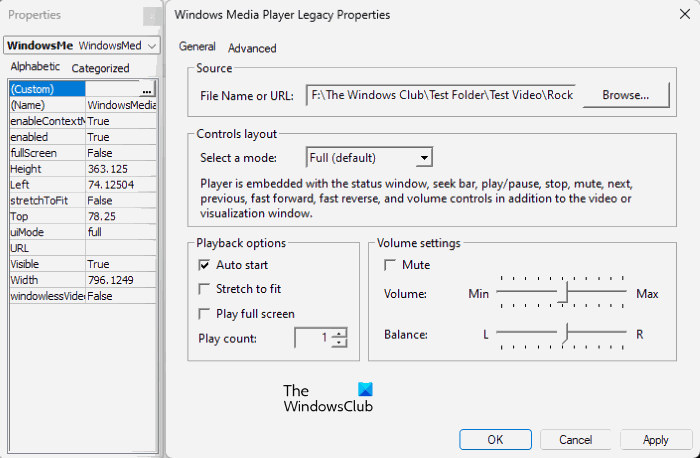
In the Windows Media Player Properties window, select the General tab and click on the Browse button next to File name or URL. Select the video file and click Open. You can also change the video settings, like playback options, volume settings, etc. When you are done, click Apply and then click OK.
The above process will insert the video in Powerpoint through the Windows Media Player.
Related read: PowerPoint video export causes stuttering or audio glitch.
How do I optimize a video for PowerPoint?
The best way to optimize a video for a PowerPoint presentation is to compress it in order to decrease its size. If you insert a video of large size into your PowerPoint presentation, you may experience some issues, like a choppy or laggy effect. You can compress a video by using some free video compression software.
You can also compress a video after inserting it into the PowerPoint. If you do not want to install any third-party video compressor software, you can use this built-in feature of PowerPoint. To compress a video in PowerPoint, go to “File > Info,” click on the Compress Media button, and select the desired option.
Read: Save button grayed out in Word, Excel, PowerPoint.
Which video formats work in PowerPoint?
The following video formats are supported by PowerPoint:
- AVI
- MP4
- M4V
- MOV
- MPG or MPEG
- WMV
If you are uploading a video having an extension other than those mentioned above, you have to convert it into the video formats supported by PowerPoint.
I hope this helps.