Word automatically selects the entire word when you use the text selection tool using your mouse. However, if you want to stop Word from selecting the entire word automatically, this guide will be handy for you. It is possible to prevent Word from selecting the whole word using the in-built option, Registry Editor, and the Local Group Policy Editor.
How to stop Word from selecting entire word automatically
To stop Word from highlighting everything or selecting the entire word or all text, follow these steps:
- Open Word on your computer.
- Click the Options.
- Switch to the Advanced tab.
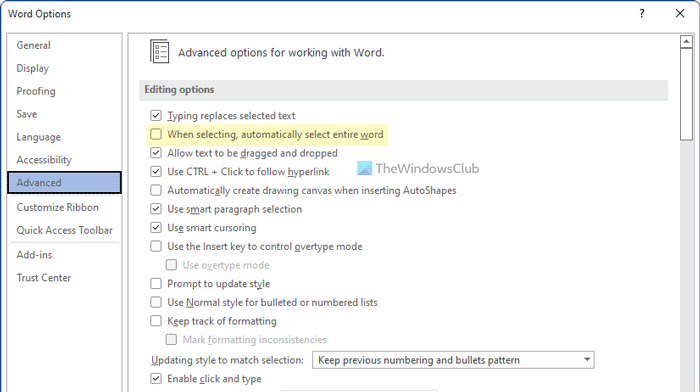
- Uncheck the When selecting, automatically select entire word checkbox.
- Click the OK button.
Let’s check out these steps in detail.
To get started, you need to open Word first. Then, click on the Options visible in the bottom-left corner and switch to the Advanced tab.
Following that, remove the tick from the When selecting, automatically select entire word checkbox.

Finally, click the OK button to save the change.
Stop Word from selecting entire word automatically using Group Policy
To stop Word from selecting entire word automatically using Group Policy, follow these steps:
- Press Win+R to display the Run dialog.
- Type gpedit.msc and click the OK button.
- Navigate to Advanced in User Configuration.
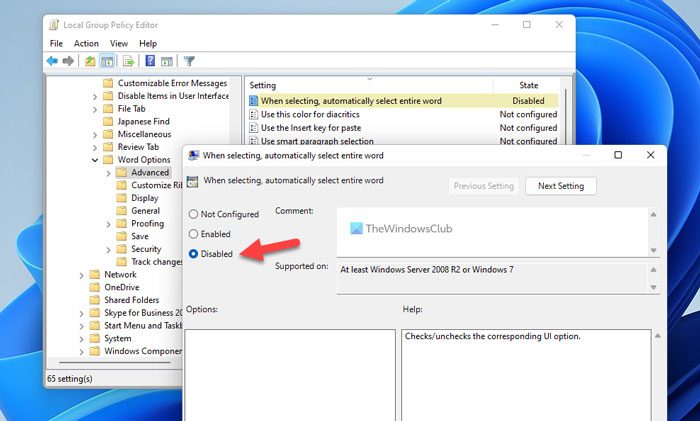
- Double-click on the When selecting, automatically select entire word setting.
- Choose the Disabled option.
- Click the OK button.
To learn more about these steps, continue reading.
First, you need to open the Local Group Policy Editor. For that, press Win+R, type gpedit.msc, and click on the OK button.
Once it is opened, navigate to the following path:
User Configuration > Administrative Templates > Microsoft Word 2016 > Word Options > Advanced
Here you can find a setting called When selecting, automatically select entire word. You need to double-click on this setting and choose the Disabled option.

At last, click the OK button and restart Microsoft Word to get the change.
Prevent Word from highlighting everything or selecting entire word using Registry
To prevent Word from selecting entire word automatically using Registry, follow these steps:
- Press Win+R > type regedit > press the Enter button.
- Click the Yes option.
- Navigate to 0 in HKCU.
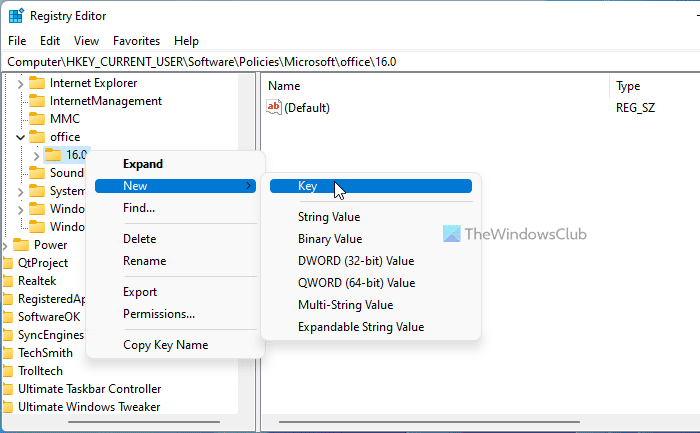
- Right-click on 0 > New > Keyand name it as word.
- Right-click on word > New > Keyand name it as options.
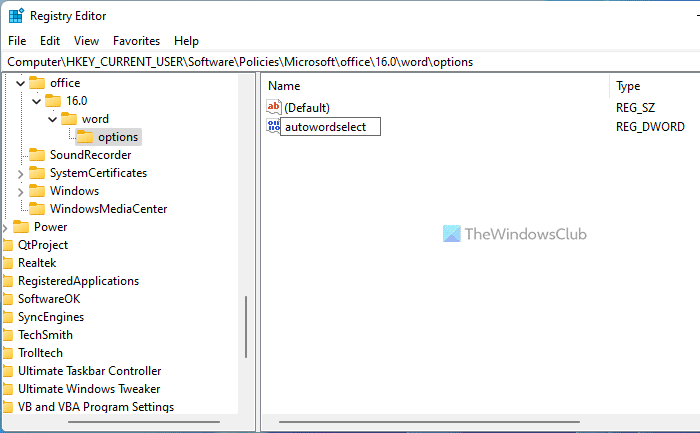
- Right-click on options > New > DWORD (32-bit) Value.
- Set the name as autowordselect.
- Restart your computer.
Let’s delve into these steps in detail.
At first, you need to open the Registry Editor. For that, press Win+R > type regedit > press the Enter button > click the Yes option.
Then, navigate to this path:
HKEY_CURRENT_USER\Software\Policies\Microsoft\office\16.0
For your information, you may need to create the office and 16.0 keys manually if they are not present already. Following that, right-click on 16.0 > New > Key and name it as word.

Repeat the same steps to create a sub-key under the word and name it as options. Then, right-click on options > New > DWORD (32-bit) Value and set the name as autowordselect.

By default, it has a Value data of 0 and you need to keep it that way. Finally, restart your computer.
Why does Word keep selecting all the text?
Sometimes, Word can select the entire word instead of selecting a specific character. However, it is possible to disable this setting. For that, you can open Word Options and go to the Advanced tab. Then, remove the tick from the When selecting, automatically select entire word checkbox.
Why is Word automatically highlighting?
Word doesn’t automatically highlight everything. Maybe, it is happening because you have a faulty mouse. If so, you need to update the driver, reinstall the driver, check if ClickLock is enabled or not, etc. You can follow this guide when your mouse is highlighting everything when you click.
Read next: