Nobody wants to lose their progress due to a system failure, so regardless of platform, there is a way to keep a backup of your system. In this post, we will use Rsync to back up Raspberry Pi without hassle. It is not a command-line tool that can simply take a backup of your system and restore it when needed.
Take a backup of Raspberry Pi
In this tutorial, we will learn how to take a backup of Raspberry Pi, schedule it, and restore it using that backup.
- Use Rsync to take a backup
- Create a full backup and schedule it using Cronjob
- Restore using the backup
Let us discuss them in detail.
1] Use Rsync to take a backup

Rsync is a helpful command-line tool used for syncing and transferring files. It is great for making backups because it only copies the parts of files that have changed. This saves time and resources. Rsync is especially useful for backing up large files or folders that change often.
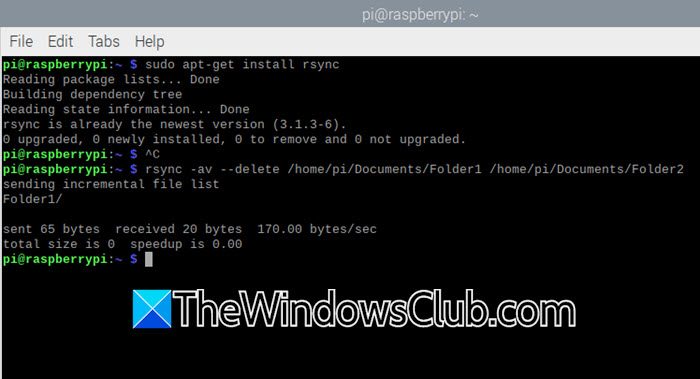
Even though it comes preinstalled in most Raspberry Pi, we still need to check from our end and install it. To do so, open Terminal and then run the following command.
sudo apt-get install
If you get a message saying rsync is already the newest version, the feature was installed, and you can proceed with the backup.
Next up, we need to decide where we want to store the backup. This could be an external drive, Network-Attached Storage (NAS), a folder on your computer, or another computer on your network.
To take a backup, you need to run the following command.
rsync -av --delete /path/to/source /path/to/destination
Now, let us break down this command for you.
- a or archive preserves file permissions, timestamps, and other attributes.
- v or verbose provides a detailed output of the files being copied.
- –delete removes files from the destination that no longer exist in the source
Make sure to give the correct source and destination path and run the command.
If you need to verify after taking the backup, you can run the following command.
rsync -avn --delete /path/to/source /path/to/destination
If no files are listed, your backup is up-to-date.
2] Create a full backup and schedule it using Cronjob

If you are familiar with Linux OS, you know that there is an option to schedule the backup in the Crontab. However, before that, we will learn how to take a full backup of your Raspberry Pi.
Since we are going to take a full backup, you need to have a backup destination in place, such as an SD card or an external drive that can hold the backup. Make sure the backup drive is formatted with a Linux-compatible filesystem like ext4 to preserve file permissions.
sudo rsync -avxhP --delete / /backup-location
However, before we go ahead and run the backup command, if there are a few directories you want to exclude, make a list of all of them, and then add them to a file, let’s say excluded-directories.txt. Once you have that, you can run the following command.
sudo rsync -avxhP --delete --exclude-from=/text-file-location/excluded-directories.txt / /home/backup/rootfs/
This command will take a full backup of the Raspberry, and exclude the directories mentioned in the excluded-directories.txt file and the /home/backup/rootfs/directory is where our files are getting stored.
Now, let us create a script to schedule the backup, but before that, create a new directory called backup at the /home/pi location.
#!/bin/bash

# Define backup and log paths
BACKUP_DIR="/home/pi/backup"
LOG_PATH="logfile-location/backup.txt"

# Verify if the backup directory is mounted
if ! grep -qs "$BACKUP_DIR" /proc/mounts; then
echo "Backup drive not mounted at $BACKUP_DIR" >> $LOG_PATH
exit 1
fi

# Log the current date and time
echo "Backup started: $(date)" >> $LOG_PATH

# Execute rsync to back up the root file system
sudo rsync -avxhP --delete \
/ "$BACKUP_DIR/rootfs/" \
>> $LOG_PATH 2>&1

# Confirm the backup completion
echo "Backup completed: $(date)" >> $LOG_PATH
echo "----------------------" >> $LOG_PATH
Make sure to replace logfile-location/backup.txt with the actual backup location.
We are going to name the file backup-full.sh.

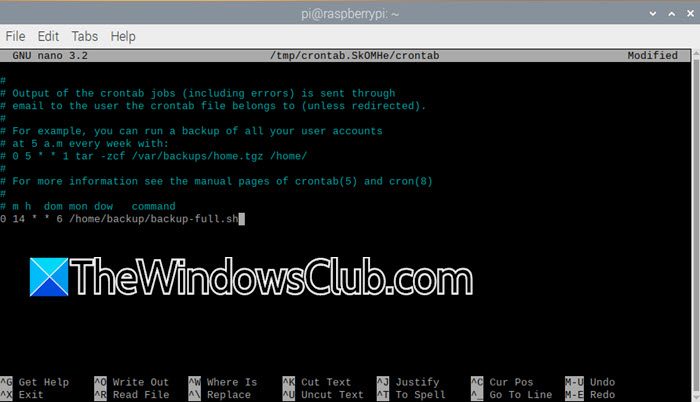
Before scheduling it, let us run chmod +x backup-pi.sh. To schedule it, type crontab -e, and then add the line 0 14 * * 6 /backupscript-location/backup-full.sh.
You can now save the file.
3] Restore using the backup
Now that we have created a backup, and scheduled it, let us see how to restore the system using it. If you want to restore a directory, run the following query.
rsync -av /home/backup/rasp /home/backup/rasp1
/home/backup/rasp is the source destination from where the backup files are being copied, whereas, /home/backup/rasp1 is the destination location where files are being copied to.
To restore your system, install a fresh copy of Raspberry Pi OS on a new SD card. Once installed, boot up your Pi and complete the initial setup. After that, connect your backup drive to the Pi. Once everything is connected and working, use the following command to restore the backup.
sudo rsync -avxhP /home/backup/rootfs/ /
Once done, reboot your computer and you will be good to go.
Read: How to set up a Raspberry Pi module with default settings
How do I save my Raspberry Pi?
If you want to save your Raspberry Pi, you can back up the operating system using the Rsync command utility. All you need to do is attach an SD card and take a full backup using the earlier command.
Read: Enable Remote Desktop access with XRDP on Raspberry Pi
How do I wipe and reset my Raspberry Pi?
There is no option to factory reset your Raspberry Pi. All you can do in this case is reinstall the Raspberry Pi OS on your SD card, which will wipe out all data. In case you want to keep a few items before reinstalling the backup of those directories, follow the aforementioned tutorial.
Also Read: Install Windows IoT Core on Raspberry Pi.