This post will show you how to take delayed screenshots on Windows 11/10 computers. The delay period gives you time to set up your computer screen for the screenshot you want. You can set a time delay (in seconds) before you can capture the entire computer screen, an active application or window with a drop-down menu or right-click context menu, etc. For that, we have covered some best free software that come with a feature to capture delayed screenshots.
How to take Delayed Screenshots in Windows 11/10
Here is a list of tools to take delayed screenshots on a Windows 11/10 computer:
- HotShots
- ShareX
- PicPick
- Bug Shooting
- Screenpresso.
Let’s see how to use these tools to take a timed screenshot.
1] HotShots
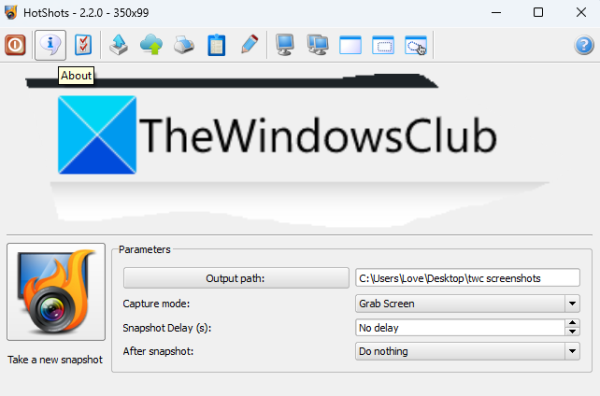
HotShots tool has a user-friendly interface. All the buttons and options available on its interface are self-explanatory. This tool lets you capture all the available screens, current screen, an opened window, capture a selected region, or take a screenshot in freehand mode.
Pre-defined hotkeys are also provided by this tool for screen capture. For taking a delayed screenshot, you can set the time between 0 to 99 seconds which gives you plenty of time to set up the screen before you can grab the required snapshot. Once you get the screenshot, it can be saved as ICO, PNG, BMP, JPG, TIFF, PPM, or another supported format.
Apart from capturing and saving the screenshot, you can also use its built-in screenshot editor feature to annotate your screenshot using numbering, text, arrow, highlighter, ellipse, etc. But, the thing that you might not like is the edited screenshot can be saved in its native format (*.hot) only. If that doesn’t work for you, then simply use it to capture the screenshot and save it to your computer.
To use this tool, you can download it from sourceforge.net. Install and launch the tool. On its main interface, set and use options like screenshot capture mode, after snapshot process, output folder, screenshot delay, and get the output.
2] ShareX
ShareX is a very popular and open-source tool available free for Windows OS. It is an all-in-one screenshot capture, screenshot editor, color picker, scrolling screenshot capture, and file-sharing tool. It lets you capture the monitor menu, full desktop screen, custom region, an active window, monitor, etc., as a PNG image file. You can also show/hide the mouse cursor for screenshot capture.
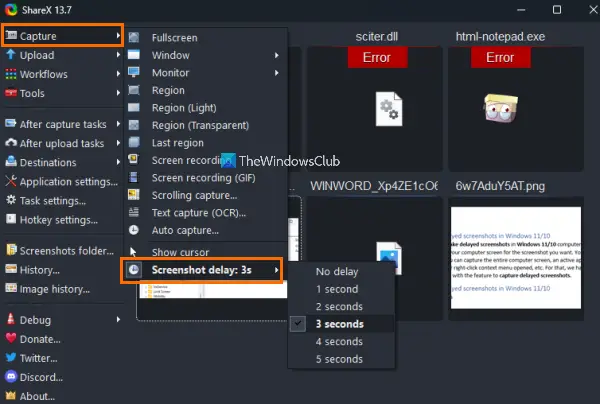
Apart from that, it can also be used to record screen as GIF and video (FFmpeg is needed), add image effects (text watermark, text font, border color, background color, etc.), and edit images, and more. In addition to that, the feature to capture delayed screenshots is also there and you can set the time delay from 1 second to 5 seconds.
To use this tool for capturing delayed screenshots, install it, and open its main interface. After that:
- Access its Capture menu available on the top left part
- Go to the Screenshot delay section
- Under that section, you will see time delay options. Select a time delay.
Now proceed further to use or set other options available on the left section. Options like setting custom hotkey to capture an active window, full screen, selecting capture mode, setting after capture tasks (use image effects, open screenshot in the image editor, save the image to file, etc.), and more can be accessed and set by you.
Once everything is ready, press the hotkey, and then the associated action will trigger for capturing the screenshot after the delay time. Based on the after-capture tasks set by you, the tool will prompt you to take further steps, and finally, you can save the screenshot.
Must read: How to take a screenshot in Windows 11/10
3] PicPick
PicPick (free for personal use) tool also brings features similar to ShareX. It is multipurpose software that you can use to capture screenshots, edit a screenshot with a built-in screenshot editor, pick color code from the screen, take a scrolling screenshot, use a pixel ruler, magnifier, whiteboard, etc.
For screen capture, it provides an active window, a specific region, a fixed region, full-screen, window control, and free-hand capture options that you can use with or without a mouse cursor. You can also use default or set custom hotkeys for all these features.
In order to take a delayed screenshot using this tool, grab its portable or installer version, and open its home screen. The home screen of this tool looks a bit similar to MS Word. Once you have opened the home screen:
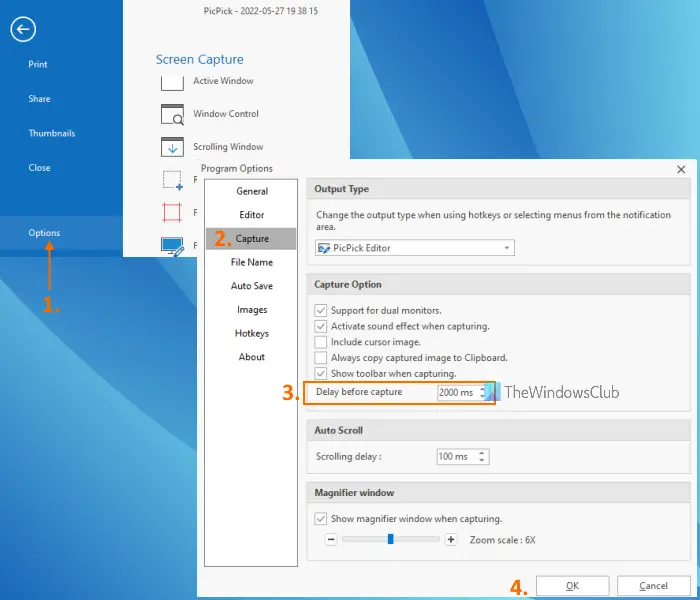
- Click on the Options available in the left section. It will open the Program Options window
- In that window, access the Capture menu
- Add Delay before capture value in the given field available under the Capture Option section. This tool lets you set time delay from 0 to 9999 milliseconds
- Once the time delay is set, you can press the OK button.
You can also set other options provided by this tool.
Now press a hotkey for taking the screenshot and it will capture the screenshot based on the delay time set by you. Once the screenshot is captured, it will open in its built-in image editor, where you can annotate the screenshot, and then save it as BMP, GIF, JPG, PNG, or PDF file.
Related: Best free screen capture software for Windows.
4] Bug Shooting
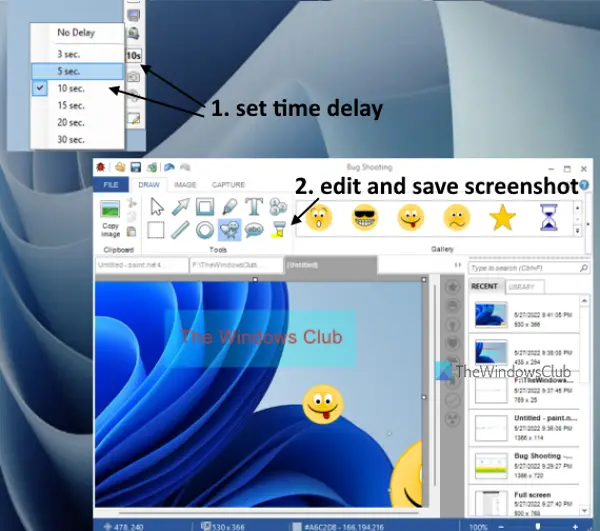
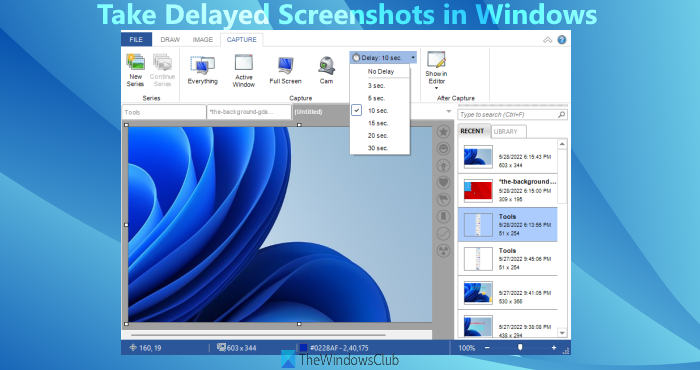
Bug Shooting is another tool that comes with a time delay screenshot capture feature. This tool lets you set the time delay for 15 seconds, 5 seconds, 10 seconds, 3 seconds, 20 seconds, and 30 seconds. You can use it to capture everything, a selected region, full desktop screen, and active window including or excluding the mouse cursor. The feature to capture images from the webcam is also there that you might find useful.
Apart from that, it has also a native screenshot editor that comes with beautiful arrows of different colors, a text tool, rectangle, ellipse, pen, highlighter, stamp, and other tools. You can use all these tools once you have captured the screenshot as the captured screenshot is opened to its screenshot editor automatically.
To use this tool, grab its setup file from bugshooting.com. After running this tool, it will sit in the system tray of the taskbar silently. Now follow these steps:
- Right-click on its system tray icon
- Click on the Show Quick Bar option. The Quick Bar will be visible on the bottom right section of your computer screen that remains on top of other opened applications or windows. This helps you easily take the necessary action related to screenshot
- In the Quick Bar, click on the Delay icon and you will see all the time delay options. Select an option
- Now, in the Quick Bar, select any option related to screenshot capture such as capture everything, full computer screen, or capture an active window
- After this, wait for the time delay and it will start the action to capture the screenshot
- Once the screenshot is captured, its image editor will be in front of you. There you can use annotation tools from the DRAW tab, flip the screenshot, turn your screenshot to greyscale, change canvas size from the IMAGE tab, etc.
- When the screenshot is ready, click on the Save as option present in the File menu, and save your screenshot to a location of your choice as JPG, PNG, GIF, BMP, or HTML file.
Read: Automatically take screenshots at regular intervals
5] Screenpresso
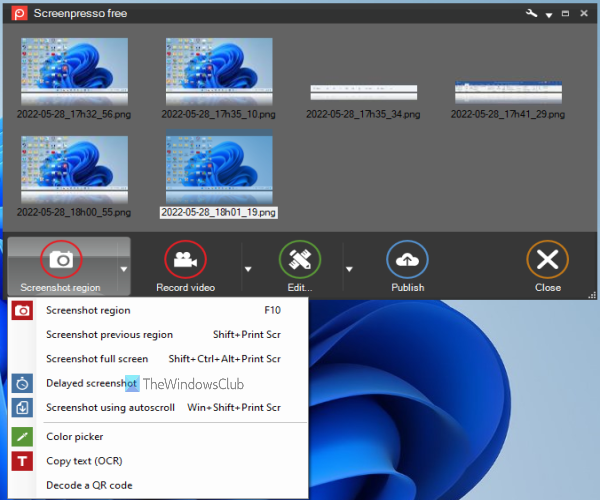
Screenpresso is a screenshot capture and screen recorder software. The free version is good enough for both purposes, but its screen recording feature adds a watermark to the final video. For screenshot capture and editing, there will be no watermark.
It comes with its own image editor to resize, crop the captured screenshot, draw ellipse, polygon, free-hand, add text, use arrow, rectangle, numbering, highlighter tools, etc. Once the screenshot is ready, you can save it as TIFF, PNG, GIF, BMP, or JPEG images. And, if you want, you can also upload your screenshot to OneDrive, Google Drive, Dropbox, etc.
To use this tool, download its EXE and execute it. After that, you can use it with or without installation to capture full screen, active window, a specific region, take a scrolling screenshot, previous region, etc. Hotkeys are also supported for all such options and you can even set a custom hotkey for those options.
For a delayed screenshot, it lets you capture an active window, window menu, or a specific region. It doesn’t come with a feature to set a time delay. It has already set the time delay to 5 seconds.
After opening its interface, you will see the Screenshot region, Record screen, and Edit, and Publish menus on the bottom part. You can access the Screenshot region for the delayed screenshot, full-screen capture, etc. But, first of all, you should access its Settings to set up custom hotkeys for screen capture and set other available options.
After that, press the hotkey set by you to take a delayed screenshot. Once the timer is over, it will let you capture an active window or a specific region. The captured screenshot thumbnail is visible on its main interface. You can double-click on that thumbnail and then its screenshot editor will open.
Finally, you can use the annotation tools to edit the screenshot or simply use Save as button to store the screenshot.
How do you delay a screenshot on a PC?
If you want to set a delay time for capturing a screenshot on a Windows 11/10 computer, then there exist some handy and free screenshot capture tools that provide such a feature. Those software let you select a delay time in seconds so that you can have everything ready on the screen to take the snapshot. You can capture the entire screen, a specific part of the desktop screen, or an active window. This post also covers a list of such tools. You can check those tools and start using the one that meets your requirements.
How do you do a delayed snip?
If you want to do a delayed snip using the Snipping tool, then it is very simple to do. This tool has a Delay option that you can access from its main interface. There, you can set snip delay for 3 seconds, 5 seconds, or 10 seconds. After that, once you try to start a snip, the time delay will start, and then the screen capture menu will appear on the top middle part of your desktop screen. From that menu, you can select a screen capture mode to take a screenshot.
Hope this is helpful.
Read next: Free Desktop Recorder & Screen Recording Software for Windows.
Leave a Reply