There could be several reasons why you would want to move your games from one PC to another PC — and for most gamers, the main reason being you have procured a new PC with much better gaming specs including an SSD (Solid State Drive) for faster loading times and better performance. In this post, we will show you how to easily move Steam, Epic, Origin, and Uplay games to a new PC.

Depending on your game launcher/client, you can follow the instructions provided in each respective section to easily and successfully transfer or move Steam, Epic, Origin, or Uplay games to a new or another PC.
How to transfer Steam games to a new PC

If you’re a PC gamer and you have recently bought a new computer, and now wondering or looking for a way to move or transfer your Steam games to the new computer without redownloading the games, then you’re at the right place!
You can easily transfer Steam games to another computer, without having to re-download all the games again, using either of the following methods:
- Copy the Steam Games folder
- Using the Steam backup feature
Let’s see both methods in detail.
Do note that the first method of moving Steam games to a new PC is much faster than the second method.
1] Copy the Steam Games folder
To copy Steam Games from one computer to another, proceed as follows:
- Locate your Steam Games library. By default, the Steam library is in the following location
C:\Program Files\Steam\steamapps\common
- At the location, you will see folders for each of your installed Steam games on that computer and drive.
- Now, simply plug in your portable flash, or hard drive and initiate a copy operation of the folders of the games that you would like to move to your other computer.
You will need at least a 500GB external portable hard drive, or at least a 128GB USB flash drive if you are looking at only transferring a few Steam games to a new PC. The size of the drive to be taken into consideration will depend on how many Steam games you intend to move over to your new computer, and how big those games are. Although you can always do multiple transfers if your Steam game library is larger than the portable drive you have.
Read: Steam Games not showing up in Library
- Once the copy operation is complete, go to your new PC.
- Make sure Steam is already installed.
- Connect the portable drive.
- Open File Explorer and navigate to the same default Steam library location mentioned above.
- Now, copy the Steam Games Folder to this location on the new PC. The folder must be placed into the common folder, otherwise Steam won’t recognize the game files.
Once all the folders are copied over, continue as follows:
- Open up Steam on the new computer, to install the games.
- Click either the blue Install button or if you have multiple games, that you want to install from the folders you just copied over, you can either SHIFT+LEFT CLICK or CTRL+LEFT CLICK, to highlight multiple games.
- Once you have made your selection, right-click the selection.
- Click INSTALL on the context menu.
Steam will now search for the already existing game files in the \Steam\steamapps\common folder. Once the game files are found, the Steam client will initiate an install operation without redownloading the entire game. The game folder must be in the correct folder, otherwise Steam won’t see it and it will start to download it from scratch.
Read: Fix MISSING DOWNLOADED FILES error on Steam
2] Using the Steam backup feature
To copy Steam Games from one computer to another using the Steam backup feature, proceed as follows:
- Connected your external USB drive to your old computer.
- Use Steam Library Manager to back up the game(s) you want to transfer directly onto the external drive.
- Once done, connect the external drive to the new computer.
- Now, restore the game(s) from the backup file.
With this method, you will notice it’s way slower than using the first method. The reason is that Steam has to do a full compression phase during the backup method, which takes a lot of time, and in this case is a waste of time with no added benefit, as you’ll be decompressing it again right afterward. The backup method proves more useful when you want to move your Steam games to a different computer and want to split them across multiple folders.
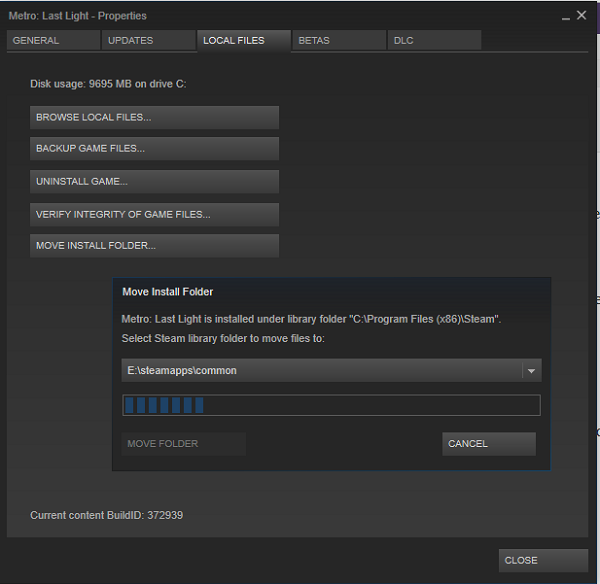
Read: How to move Steam Games to another Drive in Windows
How to move Epic games to a new PC

For some PC gamers on the Epic Games platform, it might be pretty daunting when it comes to moving their games to another location. It isn’t necessarily the case that moving games are difficult with the Epic Games launcher. However, you might lose your whole game data if you make the wrong move.
To transfer/move Epic games to a new PC, follow these steps:
- On your old PC, open File Explorer.
- Navigate to the Epic Games default installation directory below:
C:\Program Files\Epic Games\NameOfTheGame
- At the location, copy/backup the game(s) that you want to move to a USB drive with sufficient storage space.
- Next, launch the Epic Games client.
- Open Library.
- Click the ellipsis (three dots) next to the game that you want to move.
- Click Uninstall.
- Next, go to your new PC.
- Make sure the Epic Games client is installed.
- Next, start installing the game again to the location where you want on the new PC.
- Once the game installation gets to 2-3 percent, click the ellipsis again and cancel the installation.
- Exit the Epic Games launcher.
- Now, initiate a copy of the backup you made earlier to the new installation destination.
- Select the Yes, to all on the Copy dialog to replace the files that are downloaded.
- Once done, open the Epic Games Launcher and then resume the download.
Files verification will now start and complete in a couple of minutes depending on your system. After the files get verified, and the necessary prerequisites get downloaded, you will be able to play the game from the new PC.
Read: How to move Epic Games to another drive or location?
How to move Origin games to the new PC

Apart from needing to just transfer your games to a new PC, if you have a slow internet connection where you might encounter issues like the Origin installation requires an internet connection error, it might be a good idea to manually transfer the games between your PCs instead of re-downloading them. With that said, to transfer/move Origin games to another or new PC, follow these steps:
- On your old PC, open File Explorer.
- Navigate to the Origin Games default installation directory below:
C:\Program Files (x86)\Origin Games
- Alternatively, you can open your Origin library and click on the Game > Settings > Move game to open the folder for the location of the game.
- At the location, right-click the folder and copy the folder to a USB drive with sufficient storage space.
- Once the copy operation is completed, unplug the USB drive and go to the destination computer.
- At the computer, make sure the Origin client is installed.
- Next, create a folder and name it Origin Games in the location where you want the game installed. You can name the folder whatever you want and can be in any location on the local drive.
- Next, explore the newly created folder and copy the game folder from the USB drive into the open new folder.
- Finally, open your Origin client.
- Go to My Game Library.
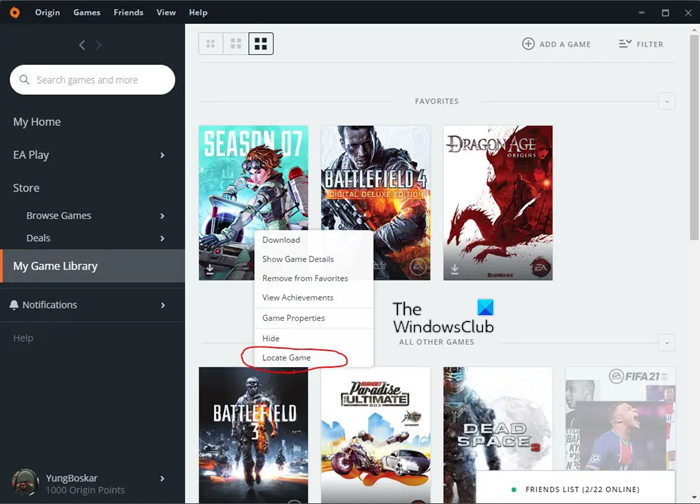
- Look for the game that you have just moved, right-click the game and select Locate game on the context menu to open File Explorer.
- Look for the Origin Games folder you created earlier, then highlight the folder and click Select folder. The game should now successfully have been moved to your new PC and you can now play the game from there
Read: Fix Origin Error while playing games on Windows PC
How to transfer Uplay games to a new PC

Most new game launchers these days include features that allow users to move their installed games to a different install location. So, if you’ve moved games that are playable through launchers on your PC, you’re probably familiar with this method of moving games, in which all you need to do is copy or move the game’s folder to another location, and then verify the game files. Steam has this feature, which is why it’s so simple for players to change the location of their installs. However, Uplay lacks this feature, making it difficult for some gamers to move their games without becoming overwhelmed by the entire process.
So, to transfer/move Uplay games to a new or another PC, folder, or drive without having to reinstall your game from scratch, follow these steps:
- Open the Uplay launcher.
- Navigate to Games.
- Click on the game that you want to move.
- Click Properties > Open Folder.
- Copy the entire game folder and paste it to the location where you want the game to be.
- Next, right-click on the Uplay icon in the bottom-right of the taskbar and Quit the launcher.
- Delete the old installation for the game and then launch the Uplay application again.
- Navigate to the game from the Games tab.
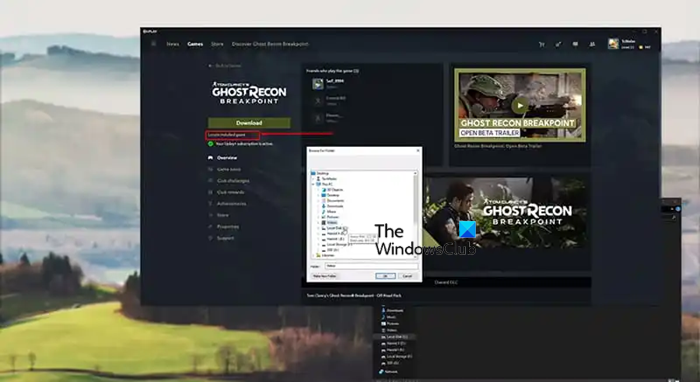
- Click on Locate Installed Game below the Download button.
- Select the folder to which you have moved the game, and the launcher will begin verifying the files for the game.
Once the game files verification is complete, instead of a Download button, you will see a Play button and you should now be able to play the game from a different location.
Read: Unable to start the game on Ubisoft Connect
That’s it on how to transfer Steam, Epic, Origin, and Uplay games to a new PC!
How do I transfer saved games from one computer to another?
To transfer game data from one computer to another, simply go to the first PC and navigate to the folder where you have saved the game you want to move its data. The Games folder on the computer may be named ‘MyGames’ or something similar. At the location, copy the contents to a portable storage device. Go to the second PC and paste the copied contents into the ‘Saves’ folder.
Read: Free Online Games with no downloads or registration required
Is there any way to transfer games from Epic Games to Steam?
If a game is available in general market, you can make the transfer happen. However, if a game is exclusive to Epic Games, there is no way to transfer it to Steam. No matter whether you use Windows 11, Windows 10, or any other version of Windows, there is no way to do that.
Leave a Reply