When upgrading or changing the primary HDD/SSD in Windows, it’s painful if you need to install Windows 11/10 again. Not only does it take time, but it is also tedious to install Windows updates, drivers, and apps, and configure everything again. Since you already have Windows 11/10 installed, it would be nice if you could clone it to a new hard drive. In this post, we will share how to transfer Windows 11/10 to an external hard drive.

Transfer Windows 11/10 to an External Hard Drive
Windows 11/10 offers an inbuilt option to create a System Image. It creates an exact copy of the current Windows 11/10 and can be used to install o any number of computers. It is handy in Businesses and IT where Windows 11/10 needs to be installed on a number of computers. Similarly, Windows 11/10 also offers to restore the computer using System Image Recovery available under the Advanced Recovery method. We will use these methods to transfer Windows 11/10 to an external hard drive. Using this post, you can move Windows 11/10 Installation to another HDD or SSD.
- Create a backup using the Create System Image feature
- Connect the new hard drive
- Restore System Image using Advanced Recovery
We have explained all these methods below:
1] Create a backup using the Create System Image feature

- Connect the external hard drive to the computer.
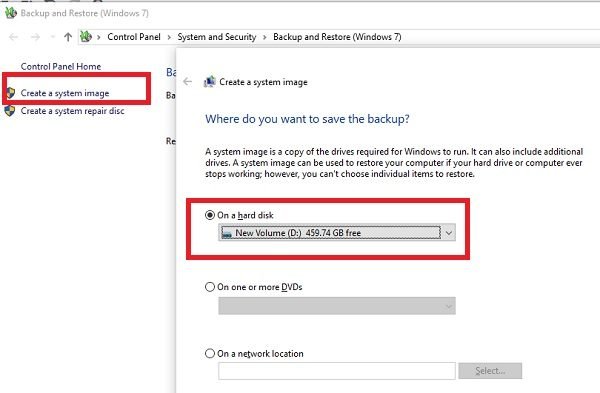
- In the run prompt, type sdclt.exe, and hit the enter key. It will open the Backup & Restore feature of Windows.
- Next, click on the Create a system image link on the left-top side.
- It will launch the Create System image wizard, and you can choose to backup files on a hard disk, DVD, or a network location.
Post this; you will have to choose which drives to back up. It is useful if you are entirely replicating your hard drive. If it’s only the OS that you want to backup, and are planning to use the trip as a secondary one, then you can skip them.
2] Connect the new hard drive
Before we go ahead, let’s get one thing clear. The hard drive where we have stored the backup cannot be the new hard drive where you are transferring Windows 11/10. Before you use the System image recovery method, make sure both the new hard drive, where you will move the Windows 11/10, and the drive which has the recovery image are connected. You do not need to create Partitions. Make sure the new hard drive is the same or has storage space more than the image size of the drive we created in the above step.
3] Restore System Image using Advanced Recovery

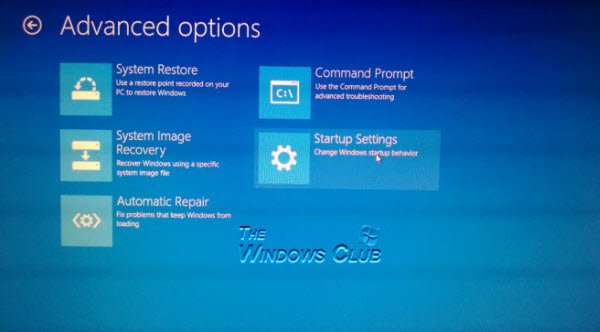
Since we are moving Windows 11/10 to a new hard drive, you will need a bootable USB to boot into Advanced Recovery mode. Make sure to set it as the boot drive in the BIOS and use F8 when the computer boots. To restore using the image, Select Repair your computer, then System Image Recovery, and then follow the on-screen instructions.
A wizard will launch which will automatically locate the system image. Click Next so that it can install the image on the primary drive connected to the computer. You will have an option to select a system image. Few advanced restore options can help you further customize the restore process. The process will wipe out the drive entirely use the model to create appropriate partitions and then restore the OS and the file.
Remove the bootable USB, and the computer should boot into the restored drive. If you haven’t changed hardware, it should work as before, but if you did change, Windows Update would download new drivers automatically.
This method can also be used to recover your computer from any major corruption or when the computer fails to boot. If you take backups using the System Image creation method regularly, then you can use it to bring back the computer to a working condition. However, there is no way to recover individual files. It is only possible using the File History method.
How to move Windows 11/10 Installation to another Disk or SSD
Even if you want to move the Windows 11/10 installation to another disk or SSD, you have to follow the same steps as above. It is possible to make the migration happen using the System Image method. Only two things are different:
- First, you have to plug in the internal hard drive. In case you do not know how to do that, take the help of a professional.
- Second, you have to choose the respective internal hard drive instead of your external hard drive while choosing the location to save the system image in the first step mentioned above.
Hope this helps.
How to create a USB bootable?
You can easily create a bootable USB flash drive on Windows 11/10. The bootable USB flash drive is used to install Windows and another operating system on a computer. To make a USB flash drive bootable, you can use a third-party tool, like Rufus. Rufus is also available in a portable version. Hence, you can run it on your system without installing it. Rufus also has some additional features that allow users to bypass TPM and other hardware requirements while installing Windows 11.
How to copy a Windows ISO file to USB?
Copying a Windows ISO file to a USB flash drive is easy. Open the File Explorer on your computer and go to the location where you have downloaded the ISO file of the Windows operating system. Now, connect the USB flash drive to your computer, copy the ISO file, and paste it into the USB flash drive. Alternatively, you can directly save the Windows ISO file to the USB flash drive while downloading it from the Microsoft website.
Read next: How to delete Windows Server Backup Copies.
Leave a Reply