Adobe Premiere Pro allows users extensive editing. You can add clips in between clips, cut existing clips into multiple parts, change their positions, etc. If you wish to know how to trim and cut videos in Adobe Premiere Pro, then please read through this article for the procedure.

Why would you need to trim videos in Adobe Premiere Pro?
When you start recording a video, you initiate the recording tool (eg. OBS), and when you complete the video, you open the recording tool once again to stop the recording process. Now, this part is not something the audience doesn’t want to see. Thus, you will need to trim the beginning and end of the video.
Why would you need to cut videos in Adobe Premiere Pro?
While you can trim videos using many free tools, you will need a sophisticated paid tool like Adobe Premiere Pro to cut videos into multiple parts and change their positions. After cutting videos, you can remove parts from in-between the clip. Then, you can add clips at that position or bridge it.
How to Trim Videos in Premiere Pro

Trimming a video means trimming a few seconds of the clip from the beginning and the end.
Trimming a video in Adobe Premiere Pro is easier than trimming them with free video editing software products. The procedure is as follows:
- Open Adobe Premiere Pro.
- Import the video clip to the Project monitor window.
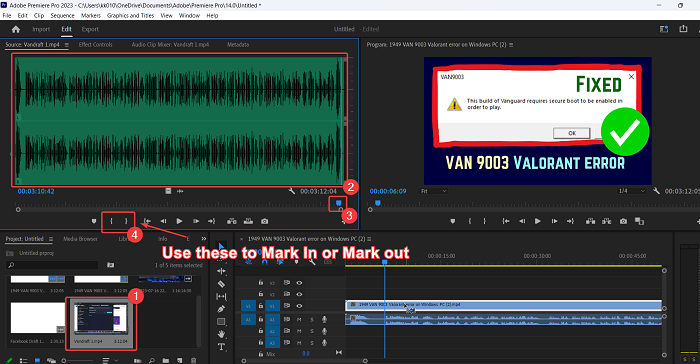
- Double-click on the clip to add it to the Source monitor window.
- Now, click on the wave-like symbol to open the waveform of the clip.
- You will notice curly brackets below the Source monitor window.
The inward-bracket is to Mark In and outward-bracket is to Mark out. Mark In from where the trimmed video starts, and Mark out is where the trimmed video ends.
Now, check the waveform. Mark in just before the waveform starts and Mark out where the waveform ends.
The reason is that when you initiated and ended the recording on the recording tool, there was no sound. When you trim the video, the soundless part is removed. This also means that the redundant part is removed.
How to Cut Videos in Premiere Pro

Cutting a video means placing cuts in between the clip and removing parts of it. The procedure to cut videos in Adobe Premiere Pro is as follows:
- Open Adobe Premiere Pro and add the clip to the Source monitor window.
- Now, drag this clip to the Timeline window.
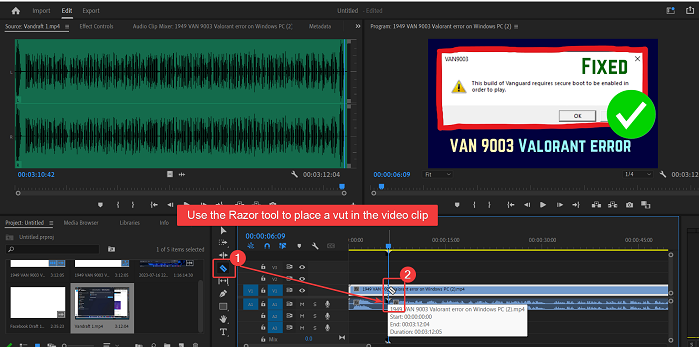
- Position the Playhit at the point where you wish to cut the video.
- Just left to the Timeline window, you will notice a list of symbols. One of the symbols is for the Razor tool.
- Select the Razor tool.
- Mark a cut where you wish to cut the video.
You can mark multiple cuts in the band of the video and use the DELETE key to remove the clip in between the bands.
How do I cut unwanted parts of a video in Premiere Pro?
To cut unwanted parts of a video in Premiere Pro, the procedure is as follows:
Use the Razor tool to mark cuts in the band of the video.
Now, use the DELETE key to delete portions between the cuts.
Lastly, you can drag the two clips to bridge the gap.
How do you trim a video in Adobe Premiere Pro?
Trimming is different from cutting. While trimming a video, you need to cut the initial and final few seconds of the video. Videos are trimmed to remove the part where you started and stopped the recording tool. This can be done in the Source monitor window using the Mark in and Mark out options.
Leave a Reply