In this post, we will show you how to turn off Palm Check on a Windows 11/10 PC. Palm Check is a feature designed to prevent unintentional touches or movements of the palm or other parts of the hand from being registered as input while typing. It is commonly found under touchpad settings on devices with touch-sensitive surfaces, such as laptops.
There are situations where you might want to disable Palm Check or a similar palm-rejection feature to get precise control over each touchpad input (such as while gaming or running applications or tasks that may require simultaneous typing and touchpad use). In this post, we will see how to turn off Palm Check on your Windows 11/10 PC.
What is Palm Check on a Touchpad?
Your palms or other parts of your hand may accidentally touch the touchpad while typing, leading to unintended cursor movements or clicks. Palm Check-enabled touchpads detect the pressure or patterns associated with typing and ignore accidental touches or pressure from the palm, allowing you to type actively without accidentally clicking or moving the cursor.
How to turn off Palm Check in Windows 11/10
When you disable Palm Check, your touchpad is more sensitive to unintentional cursor movements if you accidentally place your palm on it. However, if you find the feature too restrictive, you may turn off Palm Check in Windows 11/10 by following these methods:
- Turn off Palm Check from Touchpad Settings
- Turn off Palm Check using Registry Editor
Let us see this in detail.
1] Turn off Palm Check from Touchpad Settings
Note: The exact wording of options or settings may vary based on your device manufacturer and Touchpad driver. For example, the following demonstration applies to ELAN Touchpads only.
Click on the Start button icon and select Settings. Navigate to Bluetooth & devices > Touchpad. Scroll down and click on More touchpad settings under Related settings.
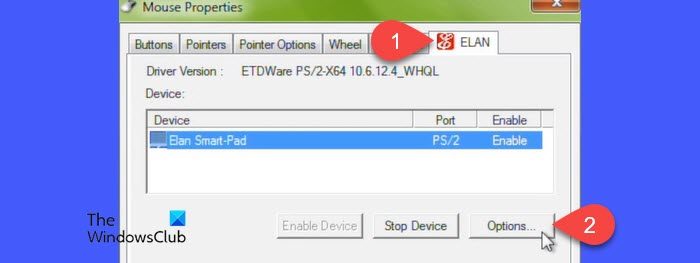
Click on the Elan tab in the Mouse Properties popup. You will see your ELAN Smart-Pad listed under the Devices section. Click on the Options button. This will bring up the window from where you may configure how certain Touchpad features (gestures or taps) work on your Windows 11/10 PC.
Click on the Additional tab. Then click on PalmTracking. Decrease the PalmTracking sensitivity setting by moving the slider to the left (toward Minimum).
![]()
Click on Apply and then on OK to close the window. Reboot your PC to apply the changes to your Windows 11/10 PC.
Similarly, for Synaptics Touchpads, you may follow these steps to turn off Palm Check from Touchpad Settings:
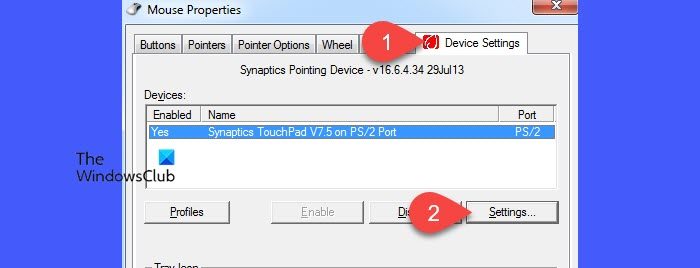
Open the Mouse Properties window and click on the Device Settings tab. Select your Touchpad device and click on the Settings button.
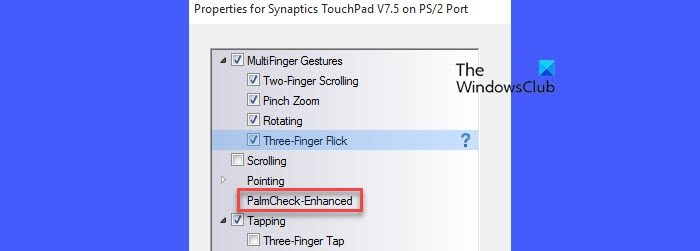
In the Synaptics Touchpad Properties window, select the PalmCheck-Enhanced option and click on the Gear icon next to it.
Drag the PalmCheck slider to the left (towards Off) in the PalmCheck-Enhanced popup. Click on Close, followed by Apply, and then OK. Reboot your PC to apply the changes.

2] Turn off Palm Check using Registry Editor
The following method demonstrates the process for Synaptics Touchpads. Proceed with caution and back up your data and registry before making any modifications.
Press Win+R and type ‘regedit‘ in the Run dialogue. Press the Enter key. Click on the Yes button in the User Account Control popup.
Navigate to the following path in the Registry Editor window:
Computer\HKEY_LOCAL_MACHINE\SOFTWARE\Synaptics\SynTP\TouchPad
Double-click on the PalmDetectConfig key in the right panel. Set the Value data to 0, keeping the Base as Hexadecimal, and click on the OK button.
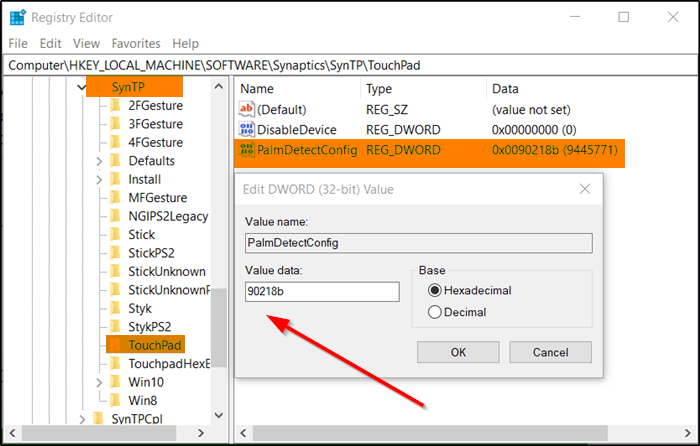
Repeat the above process for the following path as well:
Computer\HKEY_LOCAL_MACHINE\SOFTWARE\Synaptics\OEM\TouchPad
Close the Registry Editor and reboot your PC for the changes to take effect.
I hope this helps.
Read: Mouse cursor jumps or moves randomly while typing in Windows.
How do I enable my Touchpad on Windows 11?
It is quite easy to enable a touchpad on a Windows 11 PC. Press Win+I to open Windows Settings. Navigate to Bluetooth & devices > Touchpad. Look for a Touchpad toggle switch on top of the Touchpad settings. Toggle the switch to the On position to enable your Touchpad. Alternatively, press Win+X to bring up the Power User menu and select Device Manager. Navigate to Mice and other pointing devices, right-click on your touchpad device, and select Enable device.
Read Next: How to turn off Touchpad Tap to Click on Windows 11.
Leave a Reply