System Restore is a feature designed by Microsoft that helps users restore their systems to their previous healthy state. When it is turned on, it captures the snapshots of system image files and Windows Registry and saves all of them as Restore points. When a user starts experiencing problems on his Windows computer, he can use these System Restore Points to take back his system to the previous healthy state. By doing so, he can save time from reinstalling the Windows operating system. Turning off the System Restore is not recommended. However, if you want to turn off System Restore in Windows 11/10 for some reason, this article will show you how to do that.

The System Restore utility continuously monitors your system’s activity and creates a restore point when a particular activity occurs. Some of the activities that trigger the automatic creation of system restore points include:
- Installation of software
- When you update drivers
- When you install new hardware drivers
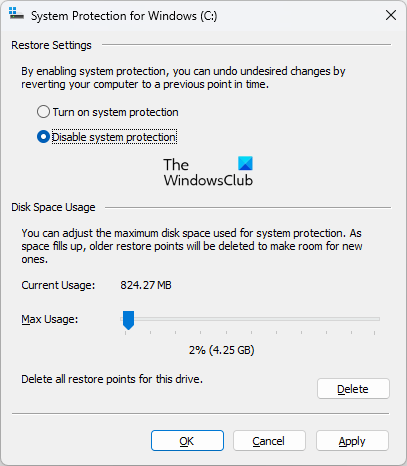
When you turn ON System Restore, Windows also shows you an option to set the maximum disk usage to save the System Restore files. You can set this by moving the slider. When the System Restore files fill up the space provided by you, WIndows deletes the old restore points automatically in order to create space for the new System Restore Points.
How to turn off System Restore in Windows 11/10
Go through the following steps to turn off System Restore in Windows 11/10:

- Press the Win + R keys to open the Run command box.
- Type control panel in the Run command box and click OK.
- When the Control Panel opens up, select Large icons in the View by mode.
- Click Recovery.
- Click on the Configure System Restore link on the Advanced recovery tools page. This will open the System Properties window.
- Select the System Protection tab and then select the C drive under the Protection Settings section.
- Click on the Configure button.
- Under the Restore settings section, click on the Disable system protection radio button.
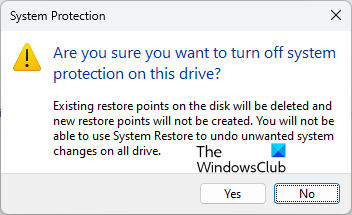
- Click Apply and then click OK. You will receive a confirmation message. Click Yes.

The above steps will disable System Restore on your Windows computer. Do note that when you disable the System Restore, Windows will delete all the previously created restore points and you will not be able to restore your system if any problem occurs.
Turn off System Restore using Group Policy Editor in Windows 11/10

This option is more powerful than the first option. It is so because this option completely disables the System Restore feature. The System Restore button in the System Protection will be greyed out and you won’t be able to access the System Restore wizard. Do not worry, you can also turn on the System Restore feature anytime. To disable or turn off System Restore using the Group Policy Editor feature of Windows 11/10, follow these steps:
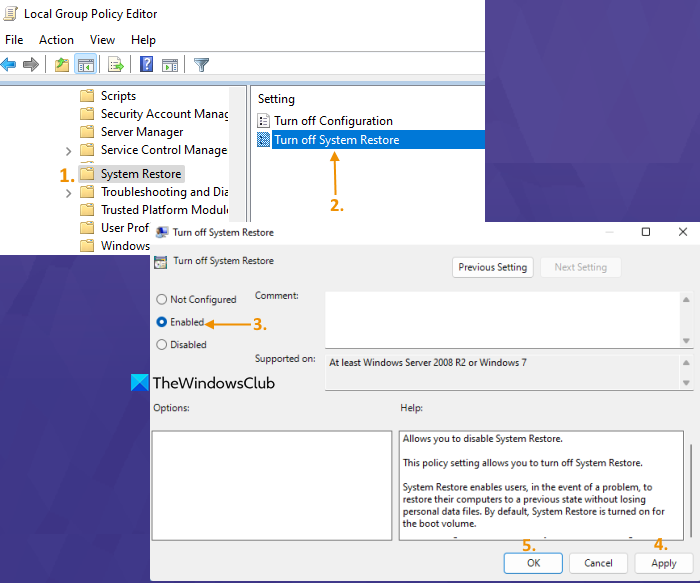
- Open Group Policy Editor in Windows 11/10. You can type gpedit.msc in the Search box and hit the Enter key to open it
- Access the System Restore folder in Group Policy Editor using the path given below:
Computer Configuration > Administrative Templates > System > System Restore
- Double-click on the Turn off System Restore setting available in the right-hand section. A new window will open
- Select the Enabled radio button in that window
- Press the Apply button
- Press the OK button.
To turn on or enable the System Restore feature in Windows 11/10 again, you can follow the steps added above, and select the Not Configured radio button for the Turn off System Restore setting. Use the Apply button and then the OK button to save the setting.
Disable System Restore using Registry Editor in Windows 11/10

You can also disable System Restore using the built-in Registry Editor feature of Windows 11/10. Here are the steps:
- Open Registry Editor on your Windows 11/10 computer. You can type regedit in the Search box and hit Enter to open it
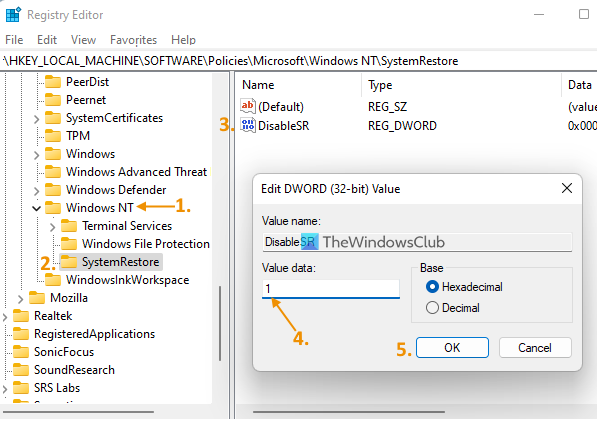
- Access the Windows NT Registry key. This is the path:
HKEY_LOCAL_MACHINE\SOFTWARE\Policies\Microsoft\Windows NT
- Create a new Registry key
- Rename the new key to SystemRestore
- On the right section of the SystemRestore key, right-click on an empty area > access New > and click on DWORD (32-bit Value)
- Rename the new DWORD value to DisableSR
- Double-click on the DisableSR value. A box will pop-up
- Add 1 in the text field available for Value data
- Hit the OK button in that box
- Close the Registry Editor window.
This will disable the System Restore feature and the System Restore wizard will also be inaccessible.
To enable the System Restore again, repeat the steps mentioned above and delete the SystemRestore key that you created.
System Restore does not affect your personal files, which include photos, videos, documents, etc. Performing a System Restore also does not delete the files that you have downloaded or copied recently. The System Restore may remove or uninstall the recently installed program but all the files that you have created by that program will not be deleted. For example, if you have installed a program recently, say a free photo editing software, all the images that you have edited through this software will not be deleted.
Some users think that System Restore helps recover the deleted files. If you have deleted files accidentally, you will not be able to recover them via System Restore. As we have explained earlier in this article, the System Restore utility creates a snapshot of your system image files and Windows Registry. Therefore, the deleted files will not be recovered by using System Restore. If you want to recover the deleted files, you can install free data recovery software.
Read: System Restore Settings and Options available in the Registry
Is it OK to disable System Restore?
It is OK to disable but not recommended. Disabling the System Restore will not harm your computer. This action will only delete the restore points created by Windows on your system. If you disable System Restore, you will not be able to take back your system to the previous working state in case any problem occurs.
Read: System Restore not working, failed or did not complete successfully.
How do I turn off System Restore in Windows 11?
To turn off System Restore in Windows 11, click on Windows Search and type system restore. After that, click on the create a restore point from the search results. This will open the System Properties window. Now, select the C drive, click on the Configure button, and select the Disable system protection option to turn off System Restore.
How do you disable System Restore?
You can disable System Restore in Windows 11/10 using Group Policy Editor and Registry Editor. Both are the native features of Windows OS. In this post, you can check both options to disable System Restore with step-by-step instructions. You can also re-enable System Restore using both options whenever needed.
What happens if I interrupt System Restore Windows 10?
Interrupting the System Restore will result in incomplete system image files and registry backup process. This will lead to errors in your file system. That’s why interrupting the System Restore process is not recommended. However, in some cases, you have to interrupt the System Restore process, like when System Restore is stuck for a long time. Interrupting System Restore may also result in an unbootable system. Hopefully, Windows can handle such situations by initiating the Automatic Startup Repair.
Hope this helps.
Read next: System restore failed while copying, restoring, mounting Registry.