If you want to turn on or off File validation in Word, Excel, and PowerPoint, here is how you can do that. It is possible to enable or disable file validation in those Office apps with the help of the Local Group Policy Editor and the Registry Editor. However, you need to install the administrative template for Office to use the GPEDIT method.
What is File validation in Office?
File Validation in Office helps you protect your computer from being attacked by malware injected into an Office file such as documents, spreadsheets, or presentations. It validates the file before opening so that users get a smooth and safe user experience while using any Office app. Earlier, it was included as an add-in. However, now you can find it as an in-built functionality. If you are testing something on your computer that requires you to disable File validation, you can follow this guide. In the following guides, we have shown the steps to turn on or off file validation for Word. However, you can follow the same steps to enable or disable file validation in Excel and PowerPoint. For your convenience, we have mentioned the exact changes in the respective places.
How to turn on or off File validation in Word using Group Policy
To turn on or off file validation in Word using Group Policy, follow these steps:
- Press Win+R to open Run prompt.
- Type gpedit.msc and press the Enter button.
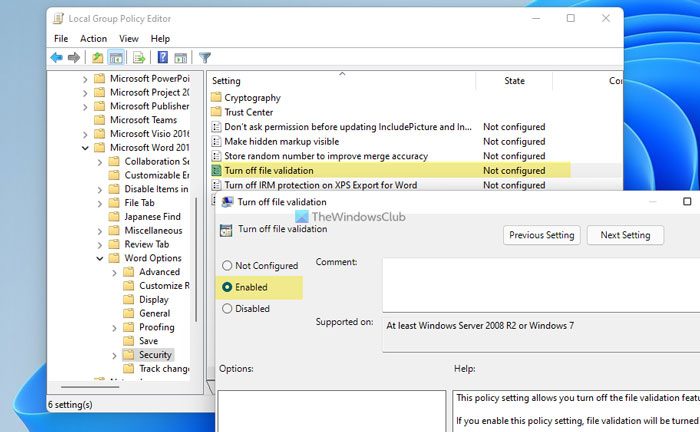
- Navigate to Word Options > Security in User Configuration.
- Double-click on the Turn off file validation setting.
- Select the Enabled option to turn off and the Disabled option to turn on.
- Click the OK button.
To learn more about these steps, continue reading.
First, you need to open the Local Group Policy Editor. For that, press Win+R > type gpedit.msc and press the Enter button. Next, navigate to the following path:
User Configuration > Administrative Templates > Microsoft Word 2016 > Word Options > Security
Double-click on the Turn off file validation setting on the right-hand side. Choose the Enabled option to turn off file validation and choose the Disabled option to turn on file validation in Word.

Click the OK button to save the change.
For Excel:
If you want to turn on or off file validation in Excel, you need to follow this path:
User Configuration > Administrative Templates > Microsoft Excel 2016 > Excel Options > Security
For PowerPoint:
If you want to enable or disable file validation in PowerPoint, follow this path:
User Configuration > Administrative Templates > Microsoft PowerPoint 2016 > PowerPoint Options > Security
If you want to get back the default setting, you need to double-click on the Turn off file validation setting and choose the Not Configured option.
How to enable or disable File validation in Word using Registry
To turn on or off file validation in Word using Registry, follow these steps:
- Press Win+R to open the Run dialog.
- Type regedit > hit the Enter button > click the Yes button.
- Navigate to word in HKCU.
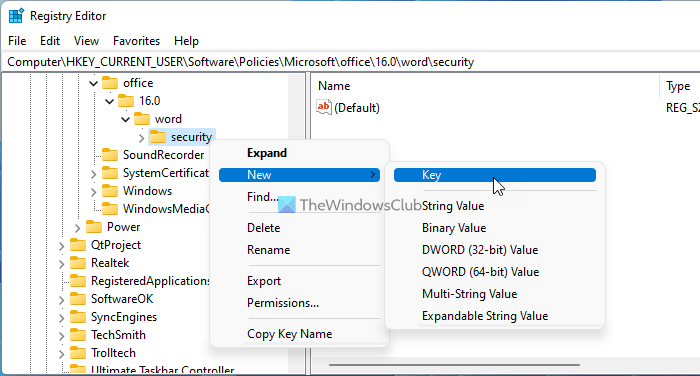
- Right-click on word > New > Key and name it as security.
- Right-click on security > New > Key and name it as filevalidation.
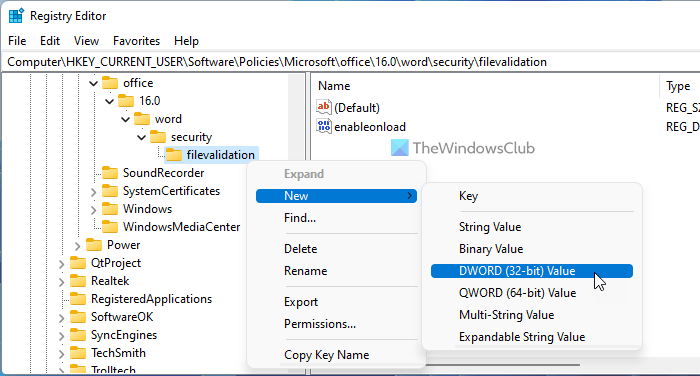
- Right-click on fielvalidation > New > DWORD (32-bit) Value.
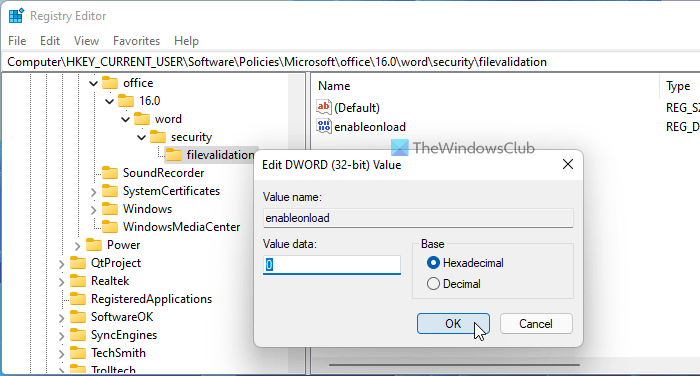
- Set the name as enableonload.
- Set the Value data as 0 to turn off and 1 to turn on file validation.
Let’s check out these steps in detail.
To get started, you need to open the Registry Editor. For that, press Win+R > type regedit > hit the Enter button > click the Yes option. Next, navigate to the following path:
HKEY_CURRENT_USER\Software\Policies\Microsoft\office\16.0\word
However, if you cannot find the word key, you need to create it manually. To do that, right-click on Microsoft > New > Key and name it as office. Then, follow the same steps to create other keys.
Right-click on word > New > Key and name it as security. Then, right-click on security > New > Key and name it as filevalidation.

Next, right-click on filevalidation > New > DWORD (32-bit) Value and set the name as enableonload.

If you want to turn off file validation, keep the Value data as 0. However, if you want to turn on file validation, double-click on it and set the Value data as 1.

Click the OK button and restart your computer.
For Excel:
For Excel, you need to follow this path:
HKEY_CURRENT_USER\Software\Policies\Microsoft\office\16.0\excel
For PowerPoint:
For PowerPoint, follow this path:
HKEY_CURRENT_USER\Software\Policies\Microsoft\office\16.0\powerpoint
In this case, you need to create the Key under excel or powerpoint instead of word. However, the name of the keys (security, filevalidation) and REG_DWORD values (enableonload) are the same as Word.
If you want to get rid of this file validation, you can delete the REG_DWORD value. For that, right-click on enableonload, select the Delete option and click the OK button.
How do I turn off Office File Validation?
To turn off Office File Validation in Word, Excel, and PowerPoint, you need to follow this guide. You can do that with the help of the Local Group Policy Editor and the Registry Editor. In the Group Policy, navigate to Word/Excel/PowerPoint Options > Security, double-click on the Turn off file validation setting, and choose the Enabled option.
How do I turn off Microsoft PowerPoint security notice?
To turn off the Microsoft PowerPoint security notice, you need to disable File validation for PowerPoint. For that, you can use the Local Group Policy Editor. You can go to PowerPoint Options > Security in User Configuration and double-click on the turn off file validation setting. Next, choose the Enabled option and click the OK button.
That’s all! Hope this guide helped.
Read: How to hide Enable or Disable Office Automatic Updates