Everybody with a Windows 11/10 computer would have noticed that sometimes the Windows operating system comes with a set of extra folders. Have you ever wondered what these extras are doing to your system? Out of the many pre-placed folders, today, we are going to exclusively focus on Public Folders. Read further to learn how to turn Public folder sharing on or off.
What is a Public Folder in Windows 11/10
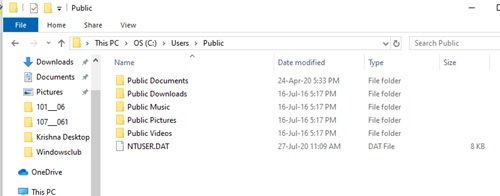
Public folders in the Windows Operating system are used to share files with other people using the same computer and with people using other computers on a shared network. So, any file/folder placed in the Public folder is automatically shared with the people who have access to your Public folder. In case you’ve not noticed, the public folder on Windows 11/10 is located in the same drive where Windows is installed; in most cases, it is at C:\Users\Public.

Any local user on the Windows computer can access these folders at any time. But again, the user can configure specific network access and decide whether or not any networked users can access the files in their folder. The Public folders are extremely useful as they offer an easy way to share files and eliminate the need to attach and send files on emails or share them over external devices like pen drives, CDs, or hard drives.
The Public folders hold subfolders that help you get organized. But these do not contain any files until the user or other using the computer has added them to it. The folders are organized by content type, and include:
- Public Documents
- Public Downloads
- Public Music
- Public Pictures
- Public Videos
Public folder sharing is turned off by default, hence you will need to enable it to start sharing files with users on your network.
Turn ON or OFF Public Folder sharing on Windows 11/10
So, when you enable Public folder sharing on your Windows system, anyone on your computer or network can access the files in these folders to open, view, and work with them just like they were stored on their own computers. Again, working with these files involves permissions, if you permit the other users to change files, any changes made will reflect on your computer. On the contrary, when Public folder sharing is turned off, only users with a user account and password on your computer can access them. Also, new folders can be added to the Public folder at any time by any user having proper permissions.

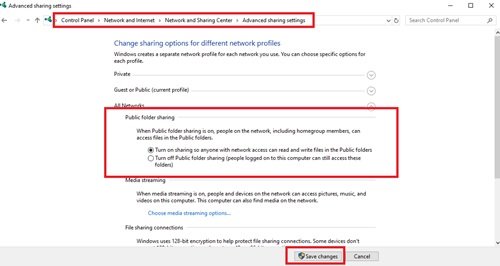
Follow these steps to turn ‘On’ the Public Folder sharing on Windows 10:
- From the ‘Start Menu’ open the Windows Control Panel
- Click ‘Network and Internet’ and then hit ‘Network and Sharing Center’
- In the left pane, click ‘Change Advanced Sharing Settings’
- On the next page, expand the ‘All Networks’ section.
- Now, scroll down to the ‘Public Folder Sharing’ section and click ‘Turn on sharing so anyone with network access can read and write files in the Public folders’.
- Finally ‘Save Changes’.

If you want you can also turn on ‘Password protected sharing’ to have better control over your files and folders.

Stop sharing with the Public folder
Public folder sharing on Windows can be disabled at any moment; Under the ‘All Networks’ section mentioned above, select Turn off Public folder sharing (people logged on to this computer can still access these folders) option and ‘Save Changes’. This will restore the default feature state.
Turning off Public folder sharing for the guest, public, and/or private networks will not turn off access to the Public folder for the users who are on the same computer. These will still be accessible to anyone who has a local account on the PC.
We hope you have received enough information about Public Folders on Windows 11/10. We leave it to you to decide whether this folder is convenient for you and whether you wish to use it to share files and folders with people in your network.
Leave a Reply