Ray Tracing is a feature in Minecraft that when enabled amplifies the graphics of the game. It is developed by NVIDIA in order to increase lighting, shadows, and more in the game. However, not everyone can enjoy this feature as there is a minimum system requirement that should be met by the end user. In this post, we will be talking about this issue and see how to turn on RTX Ray Tracing in Minecraft.

What is RTX Ray Tracing in Minecraft?
Ray Tracing is a feature that is used by games to amplify the graphics of your game. It will improve the light effects, make shadows more pronounced, and make the game that you are playing more realistic. Not only that, but it also improves the digital sound effect (SFX) adding an extra layer of realism.
NVIDIA, the GPU manufacturer has made RTX, which is used to enable Ray Tracing in Minecraft in order to give the game the aesthetical boost that it needed. However, this feature can not be accessed on Windows computers, there are some requirements that your system must meet in order for you to use RTX Ray Tracing in Minecraft.
Minimum System Requirements to run Minecraft
Ray Tracing is a demanding task, which is why NVIDIA has asked users to get GeForce RTX 2060 GPU or better. Also, your Graphics Card should be RTX compatible. If you don’t have such Graphics Card, the feature won’t run on your system. Keeping this requirement in mind, here is the list of GPUs that you can get in order to use the Ray Tracing feature of Minecraft.
- GeForce RTX 2060
- GeForce RTX 2060 Super
- GeForce RTX 2070
- GeForce RTX 2070 Super
- GeForce RTX 2080
- GeForce RTX 2080 Super
- GeForce RTX 2080 Ti
- Titan RTX
Graphics Drivers are not everything. You need to have a good overall computer with at least the following specification to use this feature.
- Processor: Intel Core i5 10400 or AMD Ryzen 5 3600
- RAM: Corsair DDR4 RAM 16GB or 32GB
- Storage Type: Samsung 860 EVO SSD 250GB or Samsung 970 EVO SSD 250GB
Also, if your computer is just meeting the minimum system requirements, it is recommended to close all other background apps when using Minecraft with Ray Tracing enabled.
Note: The developers might change the minimum system requirements, that is why go to docs.microsoft.com to know more about the system requirements.
How to enable RTX Ray Tracing in Minecraft
Once you know that your computer is compatible to run RTX Ray Tracing in Minecraft, let us try to set it up on your computer. But before that, make sure to create a backup of your worlds if you don’t want them to get deleted. Also, make sure that your Graphics Drivers are updated because we don’t want any compatibility issues to hinder your experience.
First, install the latest version of Minecraft for Windows from Microsoft Store. You will have to buy this app if you don’t already have the subscription. So, launch Microsoft Store, search for Minecraft for Windows 11/10, and install it on your computer.
There are two ways to enable Minecraft Ray Tracing on your computer. Either should work for you, but if the first one doesn’t work, try the second.
- From Xbox Insider Hub
- From Minecraft App
Let us talk about both of them.
1] From Xbox Insider Hub

Once have downloaded the required tool, Ray Tracing won’t automatically get enabled, we need to configure the Xbox Insider App. Follow the prescribed steps to do the same.
- Launch the Xbox Insider Hub application.
- Go to the menu and select Insider content from the list of options.
- From the list of available games, you need to go to the Minecraft for Windows 10 option.
- Now, click on the Join button.
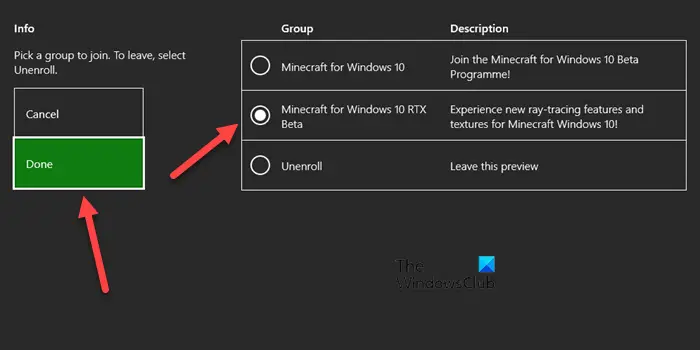
- Finally, choose Minecraft for Windows 10 RTX Beta and click on Done.
This will enable RTX Ray Tracing in your Minecraft.
2] From Minecraft App

If the first method didn’t work for you, try the following steps to enable Ray Tracing in Minecraft using the app itself.
- Launch Minecraft and log in using your Microsoft account credentials.
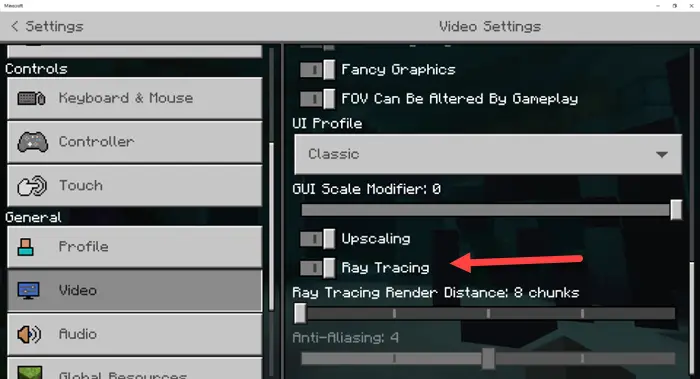
- Go to Settings > Video.
- You will see the Ray Tracing toggle, just enable it and you will be good to go.
In case, the toggle is greyed out, you have to download a suitable package containing all the textures and lighting required in the game. Follow the prescribed steps to do the same.
- Go to Marketplace in Minecraft.
- Click on the Search option, type “Ray tracing” and hit Enter.
- You will see packages with RTX and NVIDIA logos.
- Click on a free one and download it.
- After downloading the package, select Create this world > Create or Create Reals Server (for online sessions).
- Finally, follow the on-screen instructions.
The new world that you just created will have RTX, you can then go to Settings > Video and enable Ray tracing. You can configure Ray Tracing as per your requirements from the very window. Make sure to not push your GPU so much that your computer starts experiencing frame drops.
Read: How to play Minecraft Cross-Platform between PC and Xbox
How do I enable Ray Tracing in Minecraft?
If you have a compatible computer (to know the requirements scroll up), Ray Tracing can be easily enabled using either of the two methods. However, before that, get the latest version of Minecraft and install it on your computer. Now, to enable Ray Tracing, you should start with the first one, if that doesn’t work, move to the second method. Hopefully, you will be able to enable and use RTX Ray Tracing in Minecraft.
Read: How to play Minecraft Classic online on the web free
Do you need an RTX card for Minecraft Ray Tracing?
Yes, you must have NVIDIA RTX Graphics Card 2060 or superior in order to enable Ray Tracing. Since NVIDIA has developed this feature, this privilege is one given to their GPUs. If you have the required arsenal, try the methods mentioned in this article to enable Ray Tracing in Minecraft.
That’s it!
Also Read: How to reset Minecraft game application in Windows 11/10.