In this post, we will show you how to completely uninstall Eclipse Oxygen IDE from a Windows PC. Eclipse Oxygen is one of the most popular Java IDEs. It is open-source, cross-platform, and cloud-based. It also has an extensive plugin ecosystem that makes it easier for developers to create unique application features.

If you have Eclipse IDE installed on your Windows operating system and you want to uninstall it for any reason (such as to upgrade the version or to switch to a different IDE), here’s a complete guide on Eclipse Oxygen uninstallation on Windows PC.
How to uninstall Eclipse Oxygen on Windows PC
Eclipse doesn’t come with an uninstaller. So you have to manually delete some folders from your PC in order to remove the IDE successfully.
Here’s the list of folders you need to ‘delete permanently’ to uninstall Eclipse Oxygen:
- Delete the Eclipse installation directory
- Delete .p2 directory
- Delete .eclipse directory
- Delete Eclipse desktop shortcut
Let us see how to access these folders for deletion.
1] Delete the Eclipse installation directory

To uninstall Eclipse Oxygen, you need to first delete the Eclipse installation directory (the directory where the Eclipse IDE has been installed).
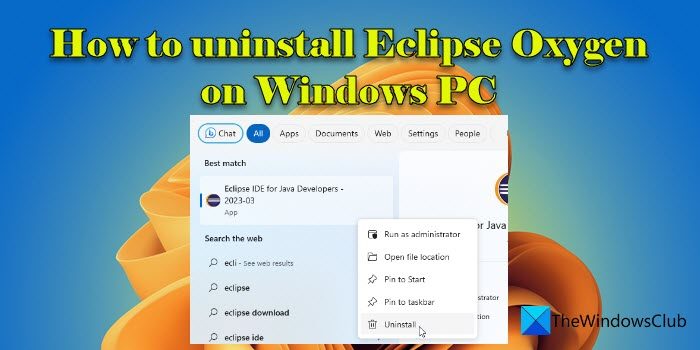
- Click on Windows Search and type ‘eclipse’.
- Eclipse IDE will show up as the best match.
- In the right panel, click on the Open file location option below the app name. You’ll be taken to the folder where the app shortcut is present.
- Right-click on the Eclipse IDE shortcut and select the Open file location option.
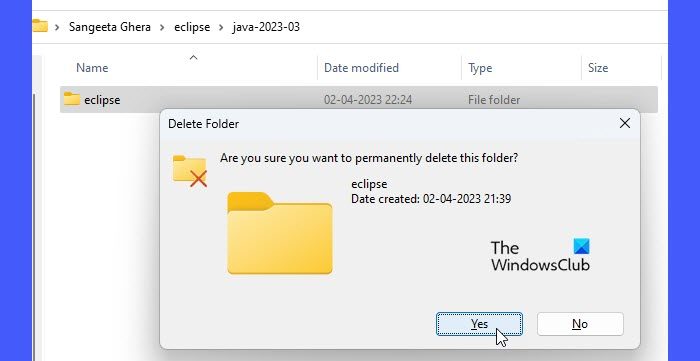
- This time, you will be taken to the location on your PC where the app is installed. By default, the Eclipse IDE is installed at ‘C:\Users\<username>\eclipse\java-<version>’.
- Select the eclipse folder (the Eclipse installation directory) and press the shift+delete keys.
- Click on Yes in the Delete File prompt that appears.
Note: There are a few subdirectories (.eclipse, .p2, .m2, .tooling) within your home directory that store data intended to be used by multiple Eclipse installations. So proceed to the next step only if you do not want any Eclipse installations on your system anymore.
2] Delete .p2 directory

To completely delete Eclipse IDE from your Windows 11/10 PC, you need to delete the Eclipse pool directory (the .p2 directory). This directory manages Eclipse’s cache, temporary files, and settings data.
Open File Explorer and navigate to ‘C:\Users\<username>’. Select the .p2 folder and press the shift+delete keys. Click on Yes in the delete confirmation prompt that appears.
Note:
- You may also delete the .m2 folder if you no longer use Maven. This folder contains the jar files downloaded by the Maven repository.
- You may also delete the .tooling folder. This directory store data for Eclipse Plug-ins for Gradle.
- You may also delete the eclipse-workspace folder. This folder stores the Eclipse project data. If you delete this folder, you won’t be able to get back your Eclipse projects when you install a newer version of Eclipse IDE on your system.
3] Delete .eclipse directory
Next, select the .eclipse folder within the same directory (‘C:\Users\<username>’). Press the shift+delete keys and click on Yes in the delete confirmation prompt to permanently delete the folder.
4] Delete Eclipse desktop shortcut

Finally, delete the Eclipse desktop shortcut.
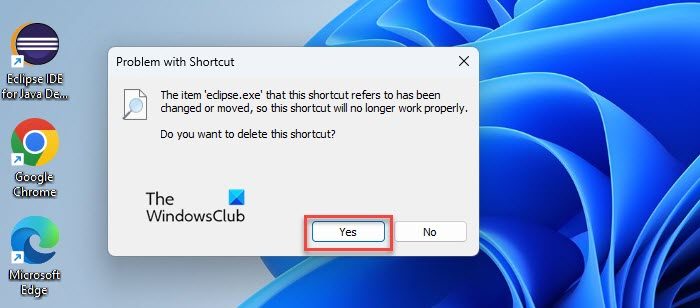
Double-click on the Eclipse IDE shortcut on your desktop. You will see a prompt that says the app no longer exists at the location, so the shortcut won’t work and you should delete it.
Click on Yes to delete the shortcut.
This sums up how to uninstall Eclipse Oxygen on Windows PC. I hope you find this post useful.
Also Read: How to install SAP IDES GUI for Free on Windows.
How do I completely remove Eclipse from Windows?
To completely remove Eclipse IDE from a Windows PC, you need to permanently delete the Eclipse installation directory and subdirectories (.eclipse, .p2, .m2, etc.) and the Eclipse IDE desktop shortcut. The Eclipse directory is located at ‘C:\Users\<username>\eclipse\java-<version>’ and the subdirectories are located at ‘C:\Users\<username>’ Once you delete all these folders, Eclipse IDE will be uninstalled from your system.
Why can’t I Uninstall Eclipse?
If you’re trying to uninstall Eclipse IDE from the Control Panel, you will probably not be able to locate the app in the list of installed programs. This is because Eclipse doesn’t provide the option for uninstallation from the Control Panel. It doesn’t come with an uninstaller, so you have to manually delete the Eclipse directory and subdirectories from your system to uninstall the app.
Read Next: Best Free C++ IDE for Windows.