If you want to uninstall PowerShell in Windows 11/10, here is how you can do it. There are multiple methods to completely remove Windows PowerShell or PowerShell from Windows 11/10 PC and here we have discussed all of them.
How to uninstall PowerShell in Windows 11/10
To uninstall PowerShell in Windows 11/10, follow these methods:
- Uninstall like any other App
- Uninstall using Windows Features
- Disable PowerShell using DISM
- Uninstall using Windows Settings
You can use any of these methods to remove PowerShell.
1] Uninstall it like any other app

Like other programs, PowerShell can be uninstalled easily.
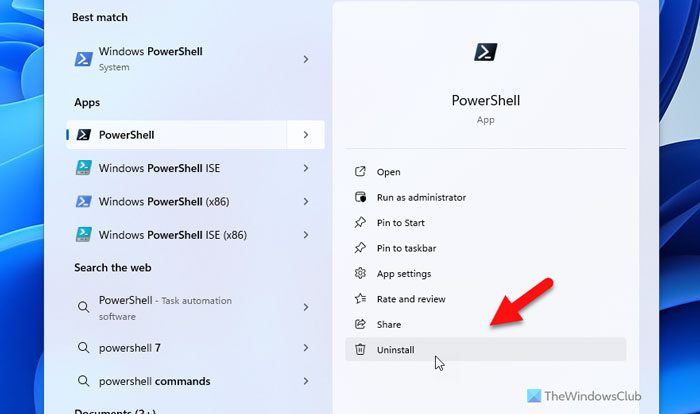
Type PowerShell in the Start Menu search box. It will reveal all the versions of PowerShell i.e., PowerShell (x86), PowerShell, PowerShell 7, and more. Right-click on any of them, and choose to Uninstall. You can also expand the menu and choose to uninstall it.
The only version that you can not uninstall is PowerShell ISE, aka Windows PowerShell Integrated Scripting Environment. It is useful for developers who can run commands and write, test, and debug scripts in a single Windows-based graphic user interface.
2] Uninstall using Program and Features

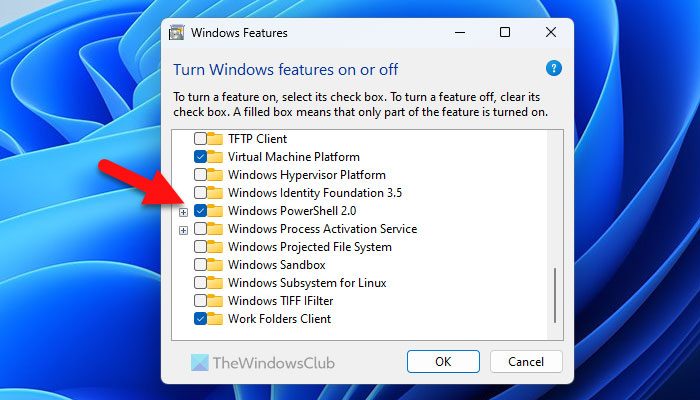
- Type Control in the Run prompt (Win + R), and press the Enter key.
- Locate and click on Programs and Features
- Then click on “Turn Windows Feature on or off” link on the left panel
- Locate and Uncheck PowerShell 2.0 from the list of programs which is revealed.
- Click OK, and let the program complete the process to uninstall PowerShell
3] Disable PowerShell using DISM

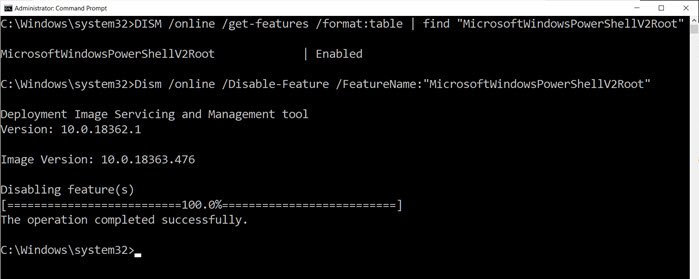
Open Command Prompt with elevated privilege by typing CMD in the Run prompt (Win + R) and then pressing Shift + Enter. Once it launches, type, and execute the command to verify.
DISM /online /get-features /format:table | find "MicrosoftWindowsPowerShellV2Root"
If it says, Enable, type the next command to disable it.
Dism /online /Disable-Feature /FeatureName:"MicrosoftWindowsPowerShellV2Root"
In case you change your mind, you can execute the following command to enable it again.
Dism /online /Enable-Feature /FeatureName:"MicrosoftWindowsPowerShellV2Root"
4] Uninstall using Windows Settings

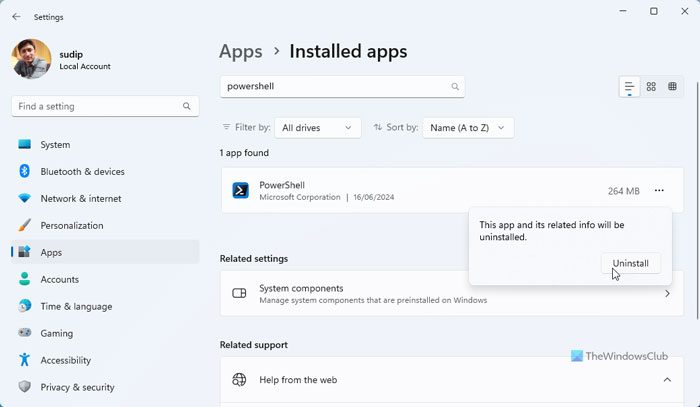
If you have installed PowerShell from the Microsoft Store, you can uninstall it using the Windows Settings panel. To uninstall PowerShell using Windows Settings, follow these steps:
- Press Win+I to open Windows Settings.
- Go to Apps > Installed apps.
- Find PowerShell and click on the three-dotted icon.
- Select Uninstall.
- Click the Uninstall button again.
That’s it.
While PowerShell on itself can stay, and you don’t have to remove it at all. In fact, if you leave it, it may come in handy someday. It is the tool that you will need to uninstall pre-installed apps. So you may consider keeping it.
I hope the post helped you remove PowerShell from your Windows 11/10 PC.
Read: How to disable PowerShell in Windows
How do I completely remove PowerShell from Windows 11?
To completely remove PowerShell from Windows 11, you can use the Windows Features method or the Windows Settings method. In the Windows Features wizard, remove the tick from the Windows PowerShell checkbox and click the OK button. In the Windows Settings method, open Apps > Installed apps > find PowerShell > click the three-dotted icon > select Uninstall. Then, click the Uninstall button again.
Can PowerShell be deleted?
Yes, PowerShell can be deleted from Windows 11/10 PC. For that, you need to get the help of Windows Features, Windows Settings, DISM, etc. You can go through any of the aforementioned methods to delete or remove PowerShell from Windows 11/10.
Read: Windows PowerShell crashes after flashing with error PowerShell_ise has stopped working