In this tutorial, we will help you how to uninstall the Recall feature on a Windows 11 PC. Windows Recall is an AI feature and an opt-in experience for Copilot+ PCs which if turned on lets Windows take snapshots of every task on your computer screen and store those snapshots on your PC. Earlier, there was no way to remove Recall AI from a Windows 11 device. But now, Microsoft has confirmed that users can uninstall or remove Recall entirely in devices running Windows 11. This post includes all the possible ways to remove Recall with a step-by-step guide.
How to uninstall Recall feature in Windows 11
You can completely uninstall the Recall feature from a Windows 11 PC using the three native features. These are:
- Uninstall the Recall feature using Windows Features in Windows 11
- Remove Recall AI using Command Prompt in Windows 11
- Uninstall Windows Recall using Windows Terminal in Windows 11.
Let’s check these options one by one.
1] Uninstall the Recall feature using Windows Features in Windows 11

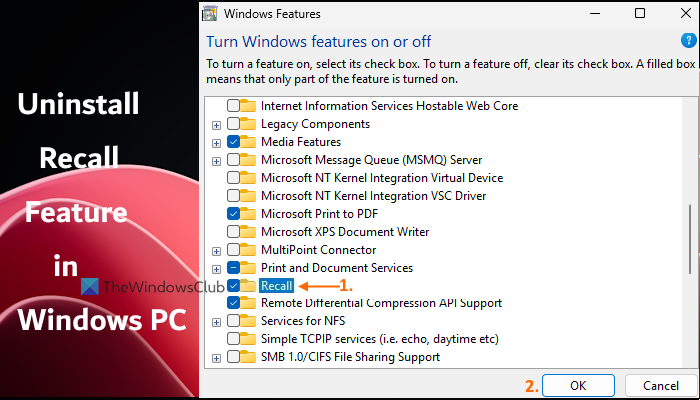
Windows Features (or OptionalFeatures.exe) helps to manage Windows Optional Features including Recall AI. Here are the steps to uninstall the Recall feature using the Windows Features interface on a Windows 11 computer:
- Open the Windows 11 Settings app
- Navigate to System > Optional features > More Windows features (under the Related settings section). This will open the Windows Features interface. Alternatively, you can type windows features in the Search box and hit the Enter key to open Windows Features
- Scroll down the list of available features
- Uncheck the Recall option
- Press the OK button
- Restart your Windows 11 PC.
It may take a while to apply the changes you made. After that, the Recall feature will be removed from your PC. However, note that the installation files of Windows Recall may remain there which would be helpful when you want to install the Recall feature again.
To add or re-install the Recall feature on Windows 11, follow the above steps, check the Recall option in the Windows Features interface, and press OK. Restart your computer.
2] Remove Recall AI using Command Prompt in Windows 11

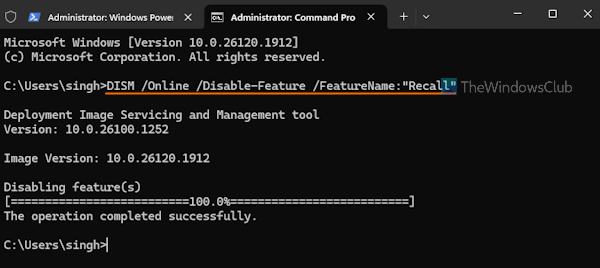
In this method, we will use the DISM (Deployment Image Servicing and Management) command-line tool in the Command Prompt window. This tool lets you repair Windows images, service a Windows image (*.wim), and enable or disable the Windows optional features (including Recall) offline and online. Follow these steps to remove the Windows Recall feature using Command Prompt in Windows 11 PC:
- Open Windows Terminal as administrator. To do this, right-click on the Start button, and select the Terminal (Admin) option
- Launch a Command Prompt profile
- Run the following DISM command with disable and online parameters and feature name that you want to disable or remove from your PC:
DISM /Online /Disable-Feature /FeatureName:"Recall"
Restart the PC and Recall AI will be removed.
To install the Recall feature again in Windows 11, launch a Command Prompt profile in an elevated Windows Terminal, and execute the above command with the enable parameter. The command is:
DISM /Online /Enable-Feature /FeatureName:"Recall"
Related: How to download and install Recall on an unsupported computer
3] Uninstall Windows Recall using Windows Terminal in Windows 11

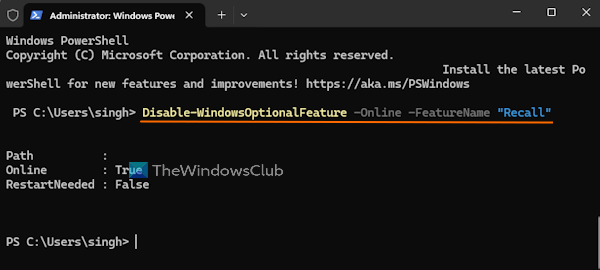
For this method, we will use Windows Terminal with a PowerShell profile. You can also open the PowerShell window directly if you want. The steps to uninstall the Recall feature using Windows Terminal in Windows 11 are as follows:
- Open the Windows Terminal interface as an administrator
- Launch a Windows PowerShell profile in a new tab of Windows Terminal
- Now execute the command that contains the disable parameter with Windows optional feature, and feature name. The command is:
Disable-WindowsOptionalFeature -Online -FeatureName "Recall"
Once the command is completed, restart the PC (if needed), and it will remove the Recall AI feature.
To install the Recall feature in Windows 11 again, launch a Windows PowerShell profile in an elevated Windows Terminal and use the above command with the enable parameter. The command is:
Enable-WindowsOptionalFeature -Online -FeatureName "Recall"
Restart your PC and the Recall feature will be enabled.
I hope this helps.
How do I disable the Microsoft Recall feature?
If you want to disable Recall Snapshots in Windows 11, then it can be done using the Settings app. For this, open the Settings app, access the Privacy & security category, and go to the Recall & snapshots page. Under that page, turn off the Save snapshots option. You can also use the Windows Registry or enable the Turn off Saving Snapshots for Windows setting in the Group Policy Editor to turn off or disable the Recall Snapshots feature.
Now read: Can’t open Recall in Windows 11
How do I turn off Recall AI in Windows 11?
During the initial set-up experience on your Copilot+ PC system, the Recall AI feature will remain turned off if you don’t proactively choose to turn on Windows Recall. And, when this is turned off, no snapshots will be taken or stored on your Windows 11 PC. So, make sure you choose No, don’t save option for the Unlock your photographic memory with Recall feature during the set-up experience.
Read next: How to Exclude an App or Website from Recall Snapshot in Windows 11.
Leave a Reply