If you want to update your BitLocker password on the protected drive in Windows 11 or Windows 10, here is how you can do that. There are three ways to do that, and this article explains all the methods. You can follow any of these methods to update the BitLocker password – using Control Panel, using Command Prompt, PowerShell – or Windows Terminal as well.
How to update BitLocker Password on Protected Drive
To update the BitLocker password on the protected drive in Windows 11/10, follow these methods:
- Using Control Panel
- Using Command Prompt
- Using Windows PowerShell
1] Using Control Panel
It is the most user-friendly option to change or update the BitLocker password on any protected drive on Windows 11 or Windows 10 computers. However, this guide explains the process of making the change for the C drive in Windows 11. It is possible to update the PIN or password on Windows 10 for any other drivers using the same steps.
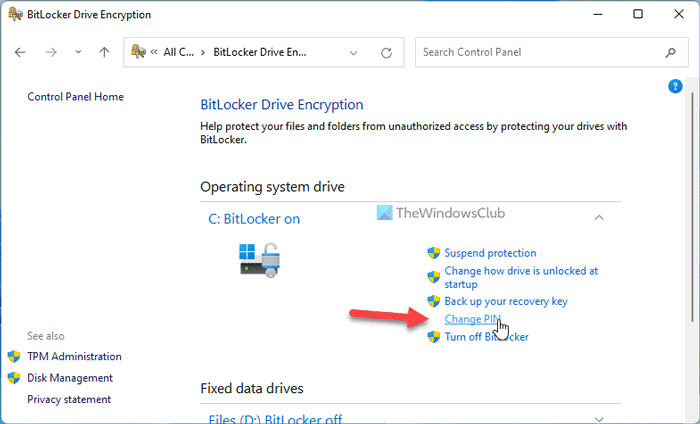
First, you need to open the Control Panel. For that, search for the control panel in the Taskbar Search box and click on the individual search result. Once it is opened, click on the BitLocker Drive Encryption menu.
However, if you cannot find it, click on the View by option and select Large icons. Then, find the protected drive and click on the Change PIN option.

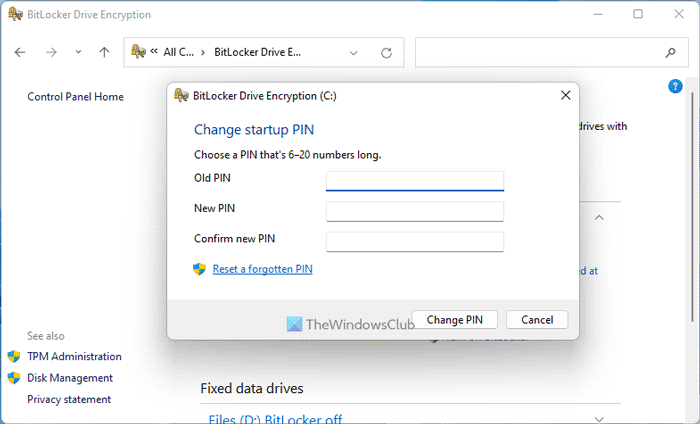
Next, you need to enter the old PIN along with the new PIN twice.

Finally, click the Change PIN button. Your BitLocker password will be updated immediately.
If you want to use any of the two following methods, you have two options on hand. First, you can open the standalone version of Command Prompt or Windows PowerShell. Second, you can open the Windows Terminal and switch between Command Prompt and PowerShell. The following steps are for standalone Command Prompt or Windows PowerShell users. However, you can use the same command in the Windows Terminal as well.
2] Using Command Prompt

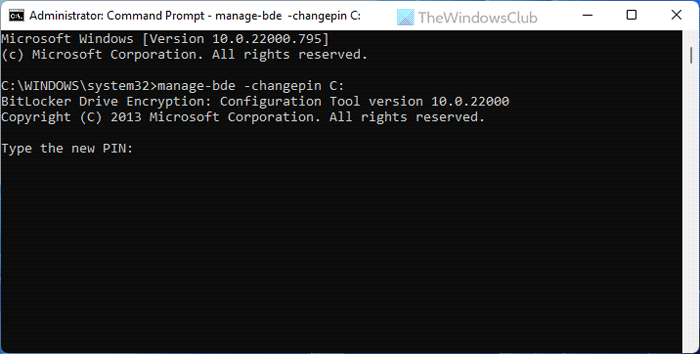
To use the Command Prompt method, you need to open an elevated Command Prompt window first. Then, enter this command:
manage-bde -changepin C:
Don’t forget to replace the C with the drive letter of your BitLocker-protected drive. Then, you need to enter the new PIN twice to confirm.
3] Using Windows PowerShell

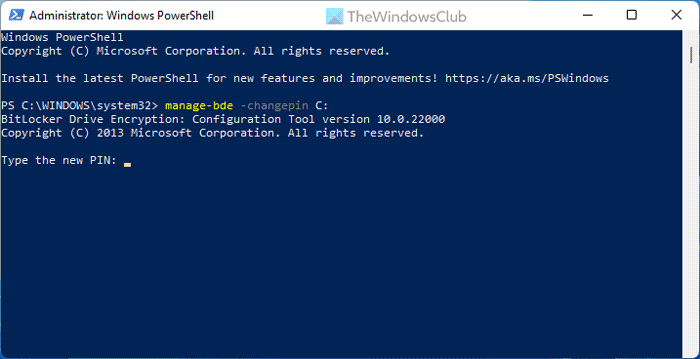
The command for Command Prompt and Windows PowerShell methods are the same. You need to open Windows PowerShell with administrator privilege first. Then, you can enter this command:
manage-bde -changepin C:
As usual, C is the drive letter of BitLocker protected drive. Next, you need to enter the PIN or password twice to save the change. Once done, you can use the new password to unlock the drive.
Read: How to change BitLocker PIN in Windows 11/10
How do I change the password on my BitLocker hard drive?
There are three ways to change the password on your BitLocker hard drive. You can use Windows PowerShell, Command Prompt, and Control Panel to get the job done. It is recommended to follow the guide mentioned above as per your requirements to change or update the password.
How to change BitLocker password with Recovery key?
To change the BitLocker password with the Recovery key, you need to open the BitLocker recovery panel first. Then, find the Recovery key ID and provide it to the administrator. If you are the administrator, you can enter the Recovery key ID in the respective empty panel. Following that, you will be able to enter the new password.
That’s all!