This post will show how to update your BIOS to recognize SATA drives as internal. In Windows devices, the BIOS determines whether a device is removable. The SATA ports are inspected by inbox drivers, and mark the removable devices as external. This could be a potential cause for corruption or data loss. Keep reading this post to make your device’s SATA drives internal.

How to update your BIOS to recognize SATA drives as internal?
Follow these steps to update your BIOS to recognize SATA drives:
- Firstly, check and install all available BIOS updates from your PC manufacturer.
- Once done, open Command Prompt as an Administrator.
- Type the following command and hit Enter:
devmgmt.msc
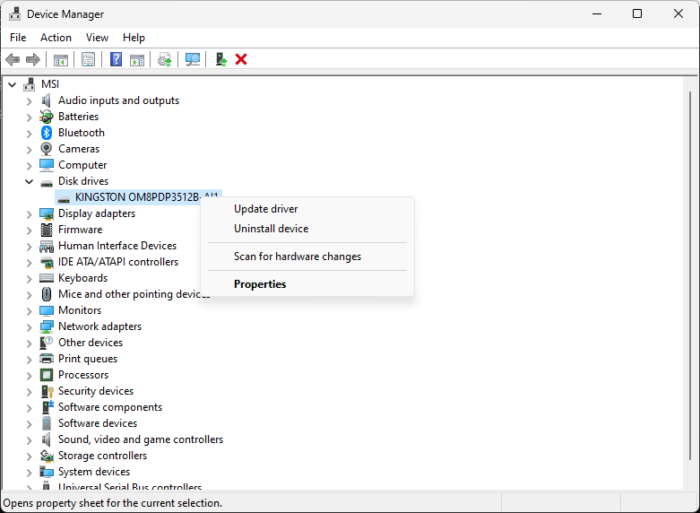
- Identify the SATA device under Disk Drives you want your inbox driver to consider internal.
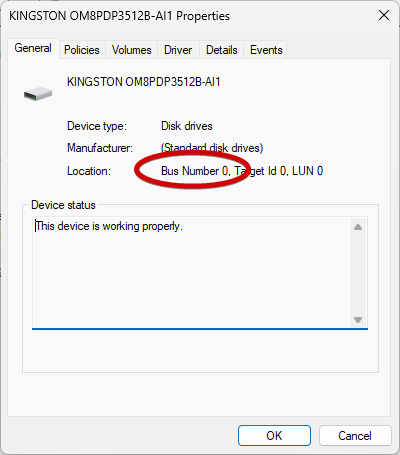
- Right-click on the selected device and click on Properties.

- A bus number will now appear; note that.

- Again, open Command Prompt as an Admin and run the following command:
reg.exe add “HKLM\SYSTEM\CurrentControlSet\Services\storahci\Parameters\Device” /f /v TreatAsInternalPort /t REG_MULTI_SZ /d x
- Here, x is the bus number noted previously.
- Restart your computer.
Read: Ensure disk controller is enabled in BIOS Windows installation error
I hope this helps.
Why is my SATA HDD not recognized in BIOS?
The SATA cable may be damaged if the BIOS doesn’t recognize the hard disk. Nevertheless, it can also occur if the BIOS settings are misconfigured or due to compatibility issues.
Read: How to speed up SATA hard drives in Windows
How do I check my BIOS SATA mode?
To check your BIOS SATA mode, navigate to the UEFI BIOS settings and click System Setup Main Menu > System BIOS > SATA Settings.
Leave a Reply