I bet, there are times when you just wished your computer to double up as an external screen. Well, that’s not so tough. Setting up your laptop screen as an external monitor just requires a bit of understanding of your connection options, the operating system, and a few adjustments.

Use your laptop screen as an external monitor
If you’re ready to get more out of the Windows PC you already own and save money over buying a dedicated second monitor, this tutorial is for you.
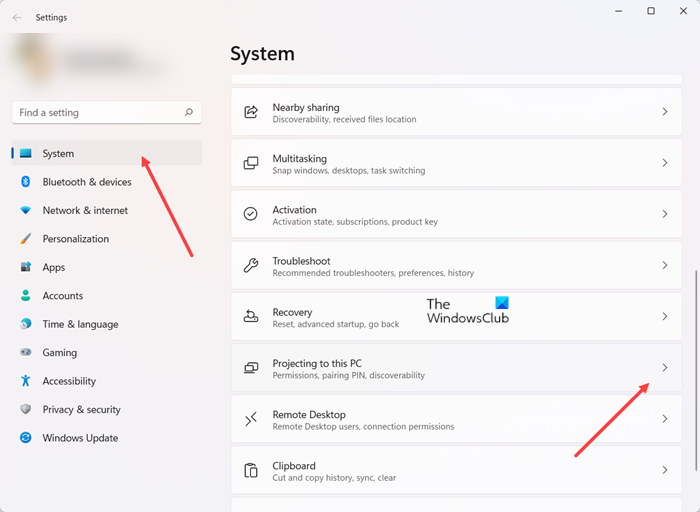
- Open Windows Settings > System.
- Choose Projecting to This PC.
- Choose one of the offered options.
- Go to the desktop or laptop you want to use as your main device.
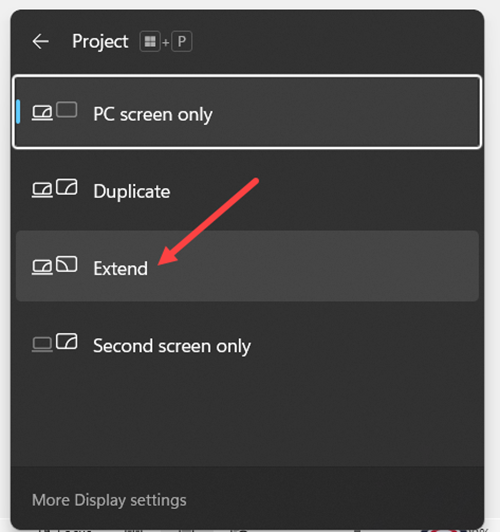
- Press Windows Key+P & select how you want the screen to be displayed.
- Choose the Extend option.
- Check if your device name is available as an option for connecting
- Start using multiple screens right away
Using your laptop screen as an external monitor is one of the last things buyers consider when they first purchase one. However, it’s good to have it as one of the options.
To get started, open Windows Settings on the laptop that you want to use as the second display.

Choose System > Projecting to This PC.

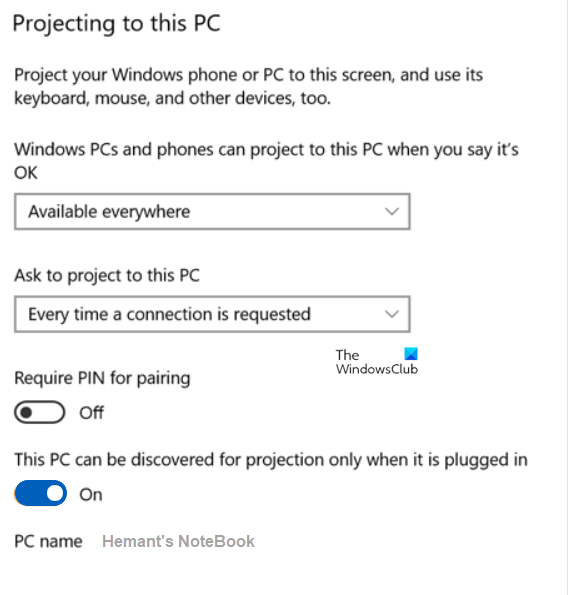
Here, you’ll be able to pick the options that best suit your situation and security needs. For example, you can choose one of the following options.
- Windows PCs and phones can project to this PC when you say it’s OK – Change the setting from Always Off to Available Everywhere or Available Everywhere on Secured Networks depending on your location and network security.
- Ask to project to this PC – Here, select between First time only or Every time a connection is requested, depending on whether you would mind being prompted each time you use the laptop as a monitor.
- Require PIN for pairing – You can choose to create a PIN if you are concerned about other devices projecting their data to your laptop screen. This mode is especially recommended when you’re on public connections or shared devices.
- This PC can be discovered for projection only when it’s plugged in – Many home users select this to ensure they have the device in their possession and to save on battery life.
Once you’re done with choosing an option, make a note of the PC name at the bottom of the settings window as you’ll need to select it at the time of choosing the device to connect to.
Read: Your PC can’t project to another screen, Try reinstalling the driver
Now, move to the second part which involves connecting your main computer.
Confirming your laptop is set up for projection, go to the desktop or laptop you want to use as your main device and press Win+P
Select how you want the screen to be displayed.

Choose Extend if you want your laptop to act as a true second monitor that gives you additional screen space for productivity.
You should now see your laptop device name as an option for connecting. Approve the action and you can start using multiple screens right away.
After you’ve finished your work, hit the Disconnect button to disconnect the connection.
Related:
Can I use two laptops as dual monitors?
Yes, you can use two laptops as dual monitors. On your main PC, use the Windows Key + P shortcut to open your PC’s display projection settings. Select Extend from the options list. This will allow you to use your laptop as a second monitor when you project to it.
Read: External monitor not detected with Windows laptop
What happens when you connect two laptops with HDMI?
If you’re lucky, nothing will happen. On the other hand, if you are not so fortunate, both laptops will short circuit. That’s because an HDMI transmitter sends a 5V power signal. So, when you plug 2 transmitters together, you send +5V from both sides, which can damage your device, if they aren’t designed with protection circuitry.
Now read: How to set up 3 monitors on a Windows laptop.