In this post, we will see how to use the BHIM app for payment. BHIM (Bharat Interface for Money) is a digital payments app that allows users to send or receive money or make online payments using smartphones. It is built on the UPI (Unified Payments Interface) platform, which supports direct bank-to-bank transfers.

The BHIM app was developed by The National Payments Corporation of India (NPCI) and launched by the Indian government in December 2016. It was part of the Digital India initiative that focused on transforming India into a digitally empowered nation. The aim of introducing the BHIM app was to reduce cash payments and promote digital transactions throughout the nation.
If you’re new to the BHIM app and struggling to use it on your smartphone, read this post. We will show you how to use the BHIM app of India, set the UPI PIN in the BHIM app, check your balance, change your transaction limit, cancel AutoPay or Mandate, and do other things with the app.
How to use the BHIM app for payment?
The BHIM app allows real-time fund transfers using mobile numbers, UPI IDs, and QR codes. It offers robust security features (including UPI PIN and fingerprint authentication) and a simplified interface to conduct digital transactions conveniently.
Before we dive deep into the app, let’s take a quick look at its key features.
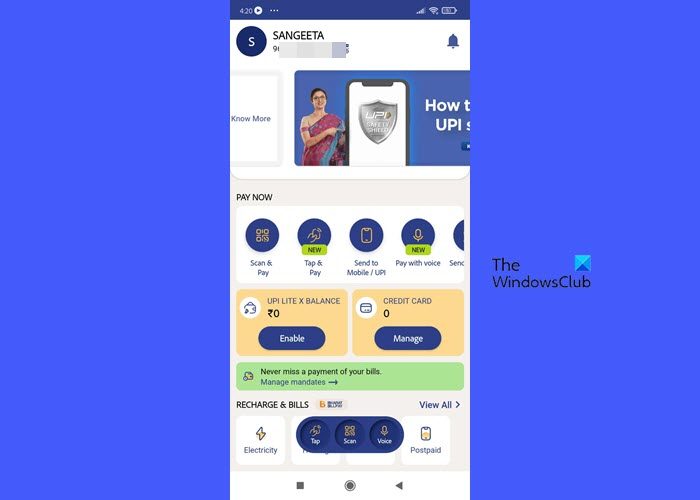
Key features of the BHIM app
- Send or receive money from individuals or businesses using UPI.
- Transfer money directly to bank accounts in real time.
- Pay bills on merchant websites (electricity, water, DTH, gas, life insurance, motor insurance, loan repayment, broadband postpaid, mobile prepaid, etc.).
- Make quick payments by scanning QR codes.
- Check transaction history on UPI.
- Recharge mobile phones and book flight tickets.
- Split bills among multiple users (BHIM and UPI).
- Set customized payment reminders.
- Save details of the beneficiary for future transactions
- Avail a daily transaction limit of ₹40,000 (up to ₹40,000 per transaction) for one bank account.
- No charges for transactions from ₹1 to ₹100,000.
- Can be run without the internet (a feature of BHIM 2.0).
- 24/7 availability, including weekends and bank holidays.
- Can be used outside India to send and collect money for your local accounts.
- Currently available in 20 languages, including Hindi, English, Marathi, Tamil, Telugu, Malayalam, Marwari, Haryanvi, Bhojpuri, Urdu, Konkani, Oriya, Punjabi, Gujarati, Manipuri, Mizo, Khasi, Kannada, Assamese, and Bengali.
- The app is free to download.
Prerequisites for using the BHIM app
Anyone with a smartphone and a bank account can use the BHIM app. But for that, you must have your mobile number registered with the bank, and a debit card linked to that account.
1] Download and install the BHIM app on your phone
The BHIM app can be downloaded from the Play Store or App Store. Android phone users can install the app using this link and iPhone users can install the app using this link. Once the app is installed, you can link your bank account with the app to make money transfers.
2] Set up the BHIM app
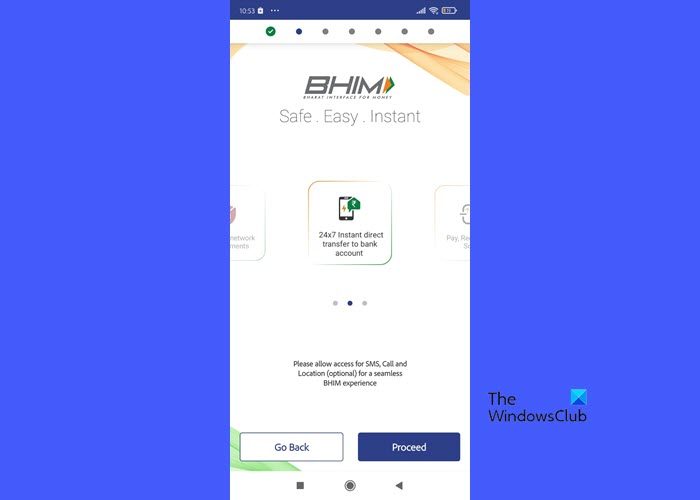
To use the BHIM app for payment, you can follow the below-mentioned steps. We are demonstrating the process using an Android mobile. iPhone users should follow a similar process for setting up or using the BHIM app on their mobile phones.
A] Verify your mobile number on BHIM
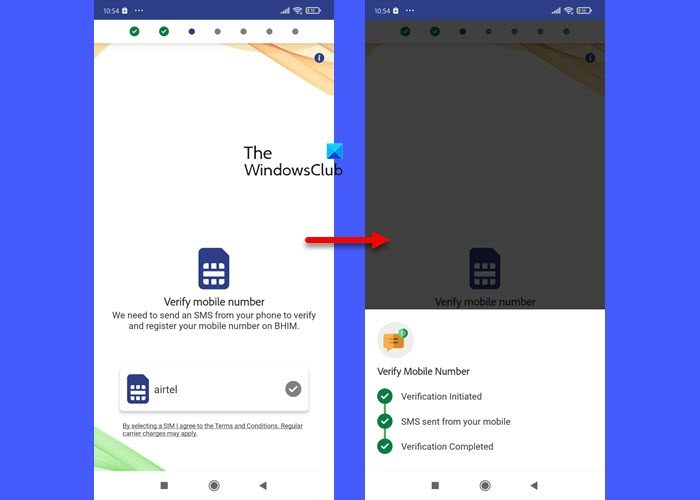
On launching the app, you will be asked to select your preferred language. Select a language and grant permission to the app for accessing SMS, Call, and Location on your phone. The app needs this permission to send an SMS from your phone to verify and register your mobile number on BHIM. Select a SIM for sending the SMS. The app will take a few seconds to process the verification.
B] Register new passcode on BHIM
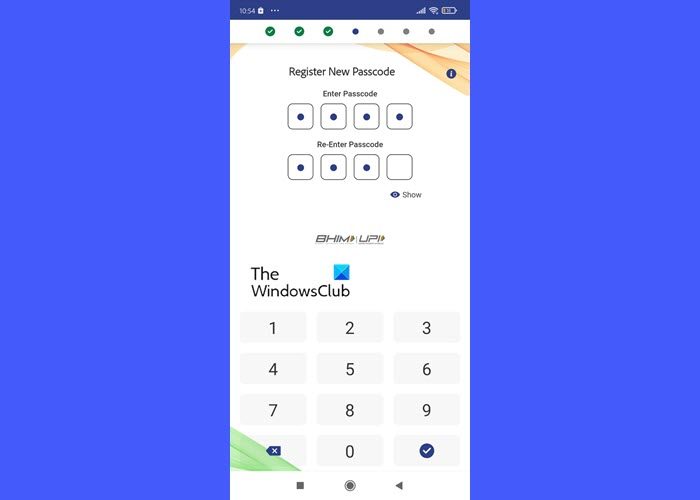
Your passcode is the unique PIN with which you’ll operate the app. Set a 4-digit PIN and confirm your input. The PIN will be required every time you open the app.
C] Link your bank account/RuPay credit card to BHIM
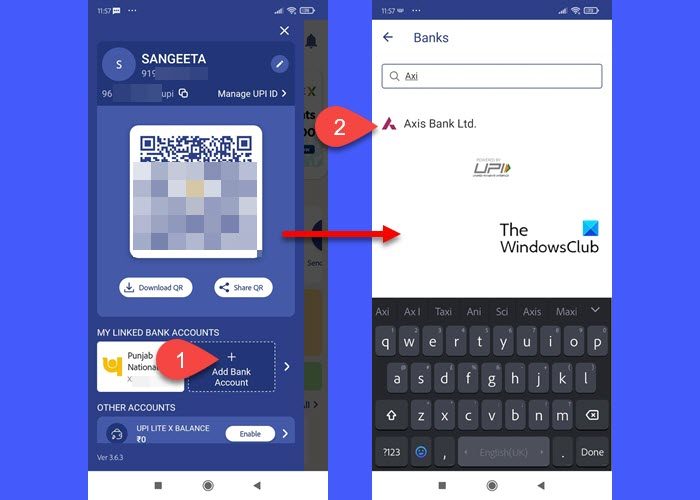
In order to send or receive funds, you must link your bank account (or your RuPay credit card) with the BHIM app. Select your bank’s name from the list of available banks and the account you want to link with the app (only one bank account can be added to the app at a time). Once you successfully link your bank account with the BHIM app, you will be able to see your dashboard.
To add more bank accounts, click on your profile icon in the top-left corner and then click on the Add Bank Account button. You may link up to 5 accounts with your BHIM account.
To add your RuPay credit card, click on the LINK RUPAY CREDIT CARD option and follow the instructions.
D] Set up your UPI-PIN on BHIM
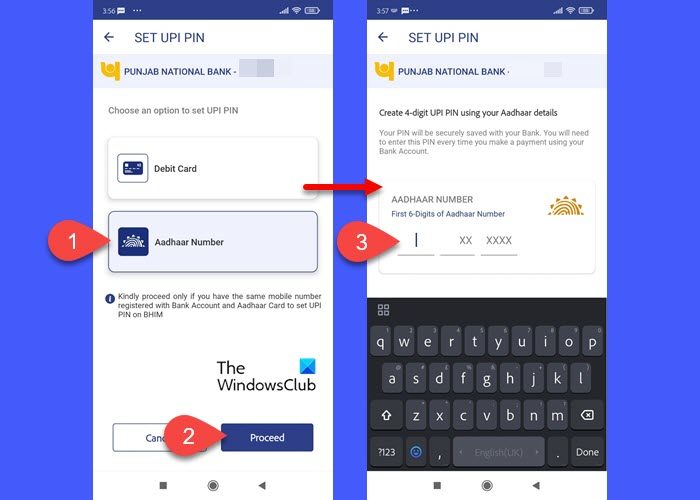
Your UPI-PIN is a 4-6-digit secret code that you create when you register with the app for the first time. This PIN is required to authorize all bank transactions made through the app. It is different from the MPIN issued by individual banks.
To set the UPI-PIN, click on your profile icon. In the panel that appears, click on your bank name under ‘My Linked Bank Accounts’.
On the next screen, click on the down arrow icon to expand the setting options for the bank. You will notice a SET UPI PIN option. Click on that option.
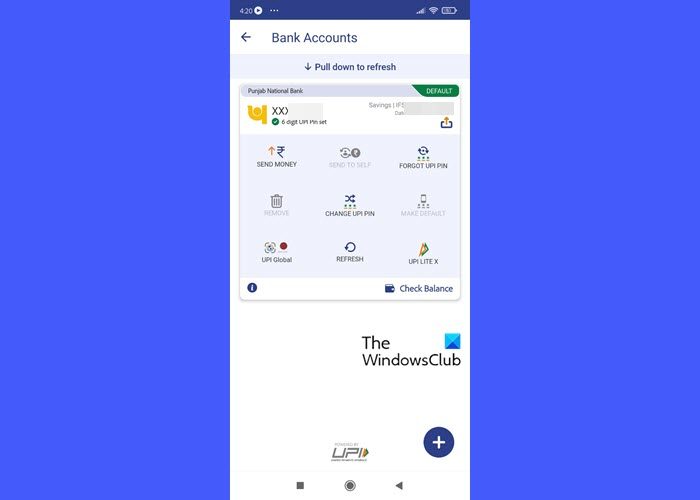
Note: This screen also shows options to remove a bank account from BHIM or make a specific account your default account for making payments.
You can set the UPI PIN using your Debit Card or your Aadhaar Card. Select one option and click on the Proceed button.
Based on your selection, you’ll be asked to enter the last 6 digits of your Aadhaar Number/Debit Card. If you choose ‘Debit Card’, you’ll be required to enter the ‘valid up to’ date and the PIN of your card as well. Next, you’ll receive an OTP for authentication, which you need to enter in the upcoming screen. Once the OTP is verified, you’ll be able to set your 6-digit UPI-PIN for authenticating all transactions done through the BHIM app.
After creating the UPI-PIN, options to reset or change the PIN will appear on the screen.
E] Allotment of the UPI ID/VPA for BHIM
The UPI ID/VPA (Virtual Payment Address) is an identifier that uniquely identifies a person’s bank account. When a user successfully registers on the BHIM app, a default UPI ID and QR Code are allotted to him. You can see this VPA by visiting your profile section (it should be in the following format: mymobileno@upi) or even create a second VPA (BHIM allows you to use two VPAs at max). A VPA is one of the methods of sending or receiving money through the BHIM app.
Once your VPA is created, you will be able to send, receive, or transfer money through ‘scan and pay’.
Read: How to block GPay, PayTM, PhonePe (UPI ID) when phone is lost
3] Send Money through BHIM
You can send money through the BHIM app using a person’s mobile number, VPA, or account number and IFSC code.
A] Send using UPI ID or VPA
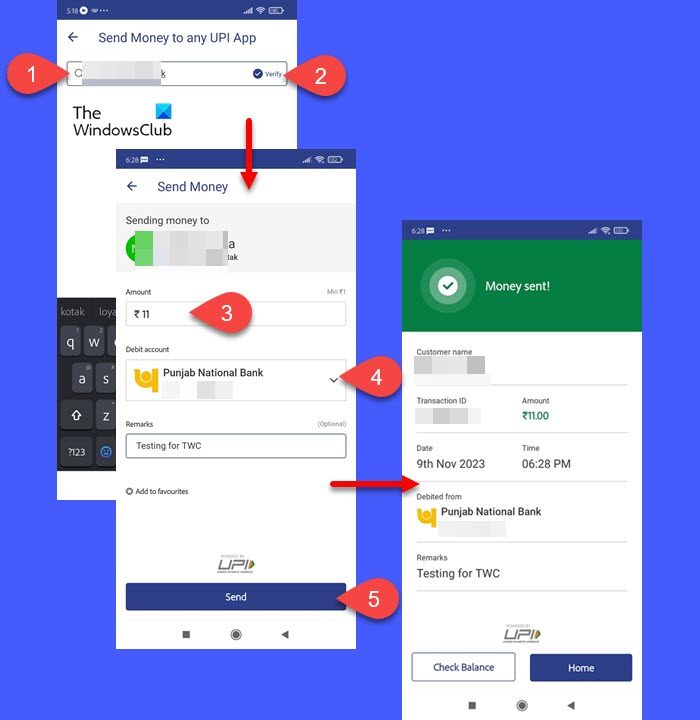
To send money, open the app and click on the Send to Mobile/UPI option. On the following screen, enter the mobile number/UPI ID/VPA of the person in the search bar on top and click on the Verify option. You will see the person’s name on top of the next screen, as mentioned in the bank’s system.
Note: Money once sent through BHIM cannot be reversed. So before sending the money, make sure the person (who’s sent you the UPI ID) and the bank account holder are the same. In case of conflict, re-confirm the VPA of the receiver.
Enter the amount in the ‘Amount‘ field, select a Debit account (your default bank account will be selected by default), and enter a remark (optional). Click on the Send button to send the money.
You’ll be required to enter your UPI-PIN to authorize the transaction. Upon entering the correct PIN, your account will be debited and you’ll receive a notification regarding the same.
You can click on the Check Balance button to check your current account balance or press Home to go back to the home screen in the BHIM app.
B] Send using ‘Scan & Pay’
This option can preferably be used while sending money to a merchant. Open the BHIM app and click on the Scan & Pay option. You can also quickly access this option by clicking on the Scan button in the middle of the right edge of your mobile phone’s screen when you launch the app and fill in the passcode.
Allow the BHIM app to access your Camera app. Once you grant the required permission, the scanner will open up. Scan the QR code and proceed with sending the amount. You’ll receive a notification and an SMS from your bank once the money is transferred.
C] Send to Self
If you’ve linked two bank accounts to the BHIM app, you can transfer money between your own accounts.
Click on your profile icon on the app’s home screen and select Bank Accounts. Select the account to which you want to transfer money and click on Send to Self. Enter the desired amount and select the account you want to send money from in the From Account field. Enter your UPI-PIN to transfer the amount.
4] Receive Money through BHIM
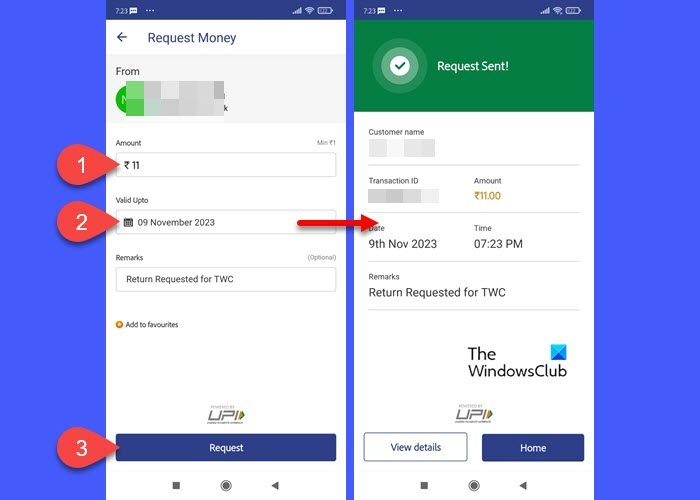
To request money through BHIM, open the app and scroll down to the Services section. Then scroll towards the left and click on the Request Money option.
On the Request Money screen, enter the mobile number/UPI ID/VPA of the person you want to request money from and click on the Verify button.
The name of the person will appear on the next screen. Enter the required amount in the Amount field, a ‘Valid Upto’ date (for how long you want to keep the request), and a remark (optional). Click on the Request button at the bottom of the screen to initiate the request.
The receiver may accept or decline your receive request within the specified time frame. You see the status of your request by clicking on your profile icon and selecting the Transaction History option. The requests you receive will appear under the Pending section.
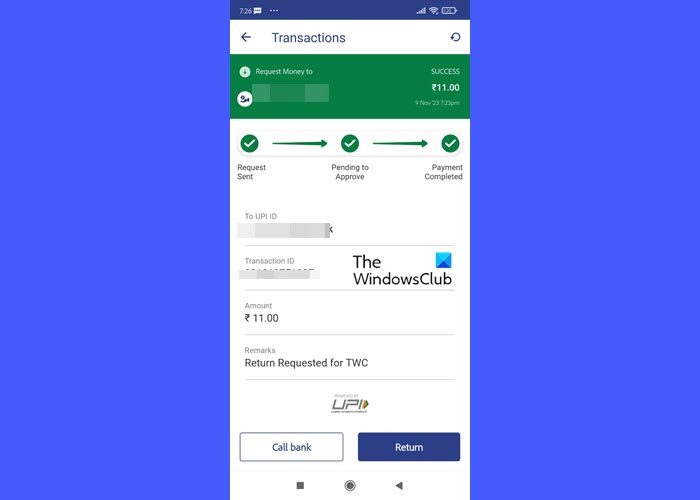
Note: If you see a suspicious request, click on Spam next to the request to block the person from sending you unknown requests.
5] Check Balance using BHIM
To check your account balance, click on your profile icon and select the account name under MY LINKED BANK ACCOUNTS. Tap on the Check Balance button in the bottom-right corner. Enter your UPI ID. The BHIM app will show your updated account balance.
6] Change Transaction Limit on BHIM
You can send up to up to ₹40,000 per day from one bank account using the BHIM app. To send more money, wait for the date change.
7] Set/Cancel AutoPay or Mandate on BHIM
UPI Autopay/e-Mandate is a feature that allows you to pre-authorize a transaction to be debited from your bank account later. The feature can be used for recurring payments, such as EMI payments, OTT subscriptions, etc.
You will receive a mandate request when you select BHIM UPI as the mode of payment in the merchant app. Pending mandates can be seen under the Pending tab of the Mandates option in the BHIM app. Click on the Approve button and enter your UPI PIN to authorize the mandate.
To cancel a mandate, go to Mandate > Active and click on the desired mandate. On the mandate details screen, click on the three-dots icon in the top-right corner. You will see a Revoke button. Tap on that button. A confirmation popup will appear. Click on the Revoke button to confirm your selection. You’ll be required to enter your UPI PIN. After entering the PIN, your e-mandate will stand canceled.
Read: What is UPI ID and how does it work?
Where to download BHIM app for Windows PC?
BHIM app is currently available for Android and iOS platforms only. It can’t be downloaded on a Windows PC. However, you can use an Android emulator, such as BlueStacks, to download the BHIM ‘.apk’ file and install the app. Once installed, you’ll be able to access the BHIM app using your Windows 11/10 PC.
What is BHIM app customer care number?
For any queries or complaints, you can reach out to the BHIM Customer Care team using the toll-free number 18001201740. You can also fill out the complaint or feedback form available on the official website of BHIM, or fill out the form available on NPCI’s website for any issues related to the app.
What is the difference between BHIM and UPI?
BHIM is an app that allows users to make payments or receive money using their mobile phones. UPI is the underlying platform that powers the BHIM app and several other UPI-enabled apps. While both are related to digital transactions, they are not the same.
What method is available on BHIM for sending money?
The BHIM app allows you to send money directly to a person’s bank account using the UPI ID/VPA/mobile number linked to that account or his account number and IFSC code. It also allows payments by scanning QR codes generated by the UPI-enabled apps.
Which bank supports BHIM?
All major banks in India including the State Bank Of India, HDFC Bank, Punjab National Bank, ICICI Bank, and AXIS Bank have partnered with the BHIM UPI app. You can check the complete list of 365 banks that are currently live on BHIM by visiting NPCI’s website here.
Read Next: What is RuPay payment network of India? How does it work?
Leave a Reply