This post explains how to use both Integrated and Dedicated Graphics on Windows 11/10 computers. Many mid-range to high-end laptops feature integrated and dedicated graphics in switchable graphics, which activates the required graphics based on the workload to optimize power consumption and performance. However, budget laptops often come with integrated graphics only. Some of these laptops may provide support for external GPUs (eGPUs) as well.

Can I use my graphics card and onboard graphics at the same time?
If you own a laptop with integrated graphics and external GPU support, you can connect an external graphics card to it (via Thunderbolt or another supported connection) for improved graphics performance when needed. The setup also allows taking displays from both the graphics card and the motherboard at the same time, facilitating multi-monitor configurations.
How to use both Integrated and Dedicated Graphics on Windows
To use both Integrated and Dedicated Graphics on Windows, you need to tweak your system’s BIOS/UEFI settings. This includes enabling iGPU, which refers to the graphics solution integrated into your system’s central processing unit (CPU). After enabling the iGPU, you can also use your motherboard display outputs in addition to the GPU ports, which means getting more displays without expensive new hardware upgrades.
Before we move further, it is worth noticing that the setting works only on low-end INTEL or AMD-based PCs with low-profile graphics cards. High-end PCs are already optimized to offer improved performance for demanding tasks, such as gaming, video editing, and 3D rendering.
Having said that, let us see how to enable iGPU to use both CPU and GPU graphics at the same time.
Enable iGPU in BIOS or UEFI settings

When you plug in an external graphics card, iGPU often operates in a standby or disabled state on your system. You need to manually configure the iGPU settings in the BIOS/UEFI to be able to use both integrated and discrete graphics simultaneously.
The process may vary depending on the specific motherboard and BIOS/UEFI version you have. However, here are the generic steps you may follow:
- Restart your PC and press the designated key (such as Del, F2, F10, or Esc) to access your system’s BIOS/UEFI during the boot process. Refer to your motherboard’s manual for the specific key for your system.
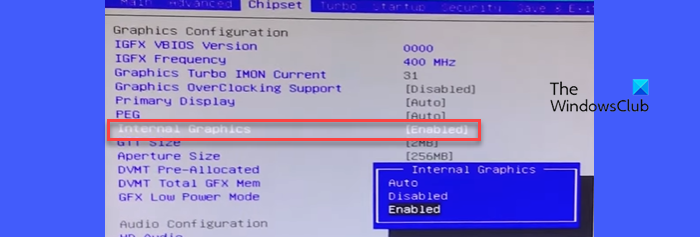
- Once you enter BIOS, you will see the system configuration options. Look for an option named IGD multi-monitor/Internal Graphics or something similar under the Advanced/Chipset tab. The exact wording may differ based on the make and model of your computer.
- Change the setting to ‘Enabled‘.
- Save configuration and exit BIOS (e.g., by pressing F10).
After this, reboot your PC. You may verify the status of both of these graphics using system monitoring tools or Device Manager. Right-click on the Start button and select Device Manager. You will see both the graphics enabled under the Display adapters option.

When you install a dedicated graphics card on your PC, your system takes display directly from the display ports of the graphics card and the display ports of your motherboard stop functioning. However, after enabling iGPU, you can also take display from the display ports of your motherboard, along with the display ports of your graphics card, and create a dual or triple-monitor setup on your PC.
I hope you find this helpful.
Read: Integrated or Dedicated Graphics card – Which do I need?
How do I switch between integrated and dedicated graphics?
To manually switch between integrated and dedicated graphics for a particular application, you may use your Graphics’ Control Panel (NVIDIA Control Panel/AMD Radeon Settings) or your system’s Display Settings. Right-click anywhere on the blank area of your desktop and select Display settings. Click on Graphics under Related settings. Select the desired application and click on the Options button. Select High performance (for dedicated GPU) or Power saving (for integrated GPU). Click on Save to save changes.
Read Next: How to disable Integrated Graphics Card on Windows PC.