PowerToys is continually evolving, introducing new tools and features to enhance user experience within the Windows environment. Color Picker is part of the suite of tools offered by PowerToys. It is a system-wide color-picking utility that allows capturing colors from any screen and copying them in a configurable format to the clipboard.

Windows Color Picker is a reliable tool for users who want accurate color compositions for various tasks, such as graphics design, web development, or digital art. In this post, we will describe how to use the Color Picker module in PowerToys for efficient and precise color management in Windows 11/10.
How to use Color Picker module in Windows PowerToys
To use the Color Picker module in Windows PowerToys, you need to first enable it on your Windows 11/10 PC.
Enable the Color Picker

Assuming the PowerToys app is running, in the PowerToys setting window, you need to switch to Color Picker. On the right side, you need to make sure that the feature is enabled.
Activate the Color Picker

Whenever you wish to use the color picker, you need to activate the feature. There’s a keyboard shortcut for activating the color picker that can be customized from the module’s settings page in PowerToys.
By default, you can press Win+Shift+C to activate Color Picker.
To change the shortcut, click the edit (pencil) icon next to the shortcut. A panel will appear. Press the desired keys and click the Save button to modify the hotkey for activating Color Picker (only shortcuts that begin with Windows key, Ctrl, Alt or Shift are valid). You can revert to the default shortcut by clicking the edit icon and the clicking Reset.
Change Activation Behavior
Activation Behavior controls how and when Color Picker is triggered and how it functions upon activation. In other words, you can choose what happens when you activate Color Picker by changing its Activation behavior.
Click the dropdown next to the Activation behavior option. You will see 3 options:
- Open editor: opens an editor that allows you to choose a color from the colors history, fine-tune a selected color, or pick a new color.
- Pick a color and open editor: activates Color Picker, opens the editor, and once you’ve chosen a color, copies it to the clipboard.
- Only pick a color: activates Color Picker and copies the selected color to the clipboard
Select the desired option from the dropdown and the changes will be saved immediately.
Using the Color Picker

Once activated, the color picker will show the exact hex code of the pixel below the cursor, wherever your cursor moves. Once you reach the desired pixel, stop the cursor and make a left mouse button click.
Now the color picker will work as per your setup in its activation behavior. For example, if the activation behavior is set to ‘Only pick a color’, the color picker will copy the selected color to the clipboard in the default color format (HEX) set in Color Picker’s settings.
If you want to view the area under your cursor in more detail, scroll the mouse wheel up. Scrolling will zoom in the area under your cursor to give you better precision of the color
To leave Color Picker, you can press the Esc key.
Using the Color Picker Editor

If you set the activation behavior to ‘Open editor’ or ‘Pick a color and open editor’, a Color Picker editor window will appear when you click the left mouse button for selecting a color.
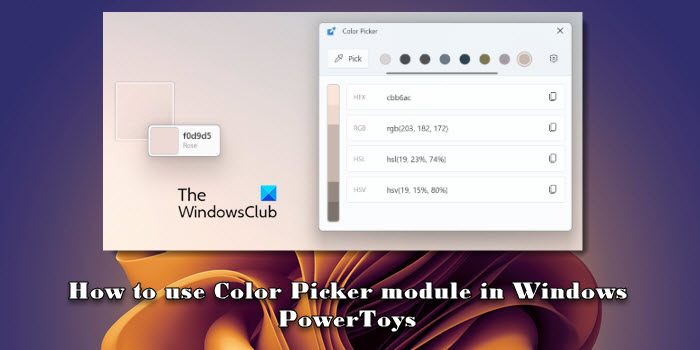
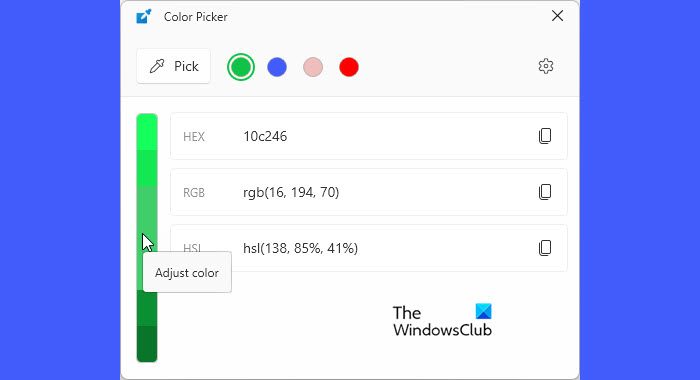
The window shows a preview of the selected color on top. On the left side of the color preview, you will see a Pick button. Clicking that button will bring up the eyedropper tool that lets you quickly pick more colors from screen. Clicking the Setitngs button on the right side of the preview will bring the PowerToys app in focus, with the Color Picker tab selected by default.
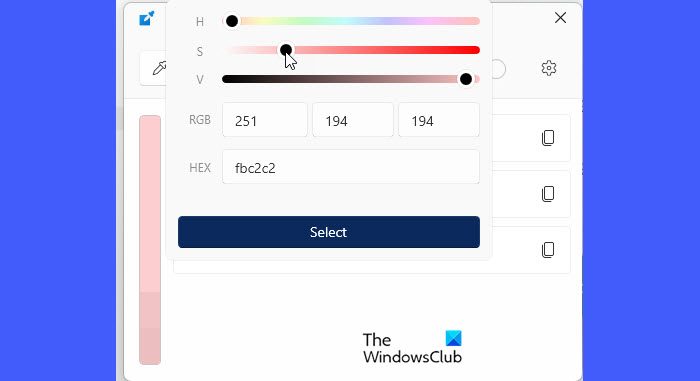
In the left side of the editor, you will see a shader color palette that lets you pick similar color or fine-tune the selected color by adjusting its hue, saturation, and value.

The editor can save around 20 colors in its color history. In the middle, it shows the color’s HEX, RGB, and HSL values, each having a copy icon next to them that copies the corresponding value to your system’s clipboard.
You can remove a color from the color history of the editor by right-clicking on it and selecting Remove. You can also group the values in the editor by colors or formats. To export the color history, right-click a color and select Export.
Color picker is multimonitor/multi-DPI aware. It respects monitors’ boundaries and stays always in view (predefined safe zones on the top, bottom, left, and right sides of a monitor). It can also display a high-level representation of the color (‘Green’, ‘Light Green’, ‘Dark Green’, etc.) by tuning on the ‘Show color name’ setting.
That’s all! I hope you find this useful.
Read: How to use Environment Variable Editor in PowerToys?
How do I activate Windows color picker?
Press the shortcut Win + Shift + C to activate Color Picker in Windows. Once the color picker is activated, you can move your cursor over the desired area on your computer screen to pick a color. The colors and their corresponding HEX codes will be displayed in the picker window, ready to be copied for use in your applications. This built-in tool allows you to quickly and precisely capture colors from your screen without needing additional third-party software.
How do you use a color picker?
To use a color picker, you need to interact with an interface that displays a spectrum of colors or a palette. You can click on any region within the spectrum to pick a color. Some color pickers also allow you to input HEX, RGB, or HSL codes for precise color matching and offer sliders or input fields to adjust specific color properties, such as hue, saturation, brightness, and opacity.
Read Next: How to Back Up and Restore PowerToys Settings.
Leave a Reply