Microsoft updated its open-source tool collection utility to a new version, and among the several new features and improvements, PowerToys is now equipped with an Environment Variable Editor. Apart from this feature, you can access all the PowerToys modules on its all-new Dashboard in the Settings. This helps you to easily enable or disable modules, view their settings, and learn how to use them.
Environment Variable Editor feature and other improvements in PowerToys
The Environment Variables editor allows you to create and control profiles for different System & User Environment Variables. So, whether you are a developer who wants to change between different development environments or you want to use the environment variables for personal or professional use, it can be useful for them.
Some of the other new improvements added to the latest version of PowerToys are the option to preview every file type, access to new characters in Quick Accent and Registry Preview, bug fixes applied to context-menu pop-ups in Fancy Zones, support for Remote Tunnels, VSCodium Stable & Insider, option to hide the toolbar, and more.
Having said that, since it’s a new feature, this guide is dedicated to using the Environment Variable Editor in PowerToys.
How to use Environment Variable Editor in PowerToys?
Environment variables are values designed to store data related to system configuration, such as the user profile, location of a certain app, and more. For example, %windir% is the variable name, and C:\Windows is the value. So, basically, there are two types of variables: User (applies to specific user accounts) and System (for all users). But till now, you have been managing environment variables in Windows, and now you can manage the environment variables in PowerToys through a user-friendly and sleek interface.
Let’s understand how to manage (view, add, edit, and delete) environment variables on your computer.
- Install PowerToys
- Add new environment variables to PowerToys
- Add a new system variable
- Edit existing variable
1] Install PowerToys
Before you edit the environment variables, you must install PowerToys on your Windows device. Once you have successfully installed PowerToys, here’s how to edit the environment variables.
Read: How to add or edit a PATH Environment Variable in Windows.
2] Adding a new User Variable through PowerToys

To add a new user variable through the PowerToys environment variables, launch PowerToys Settings, and click on Environment Variables on the left. Now, on the right, move the toggle switch to the right to turn on Enable Environment Variables. Next, click on Launch Environment Variables below.
Now, in the Administrator: Environment Variables window, click on New Profile on the top left. However, this is just an option since creating a profile allows you to enable/disable variables pretty fast without any impact on the default settings. Or, you can click on Add variable under User to add a new environment variable.
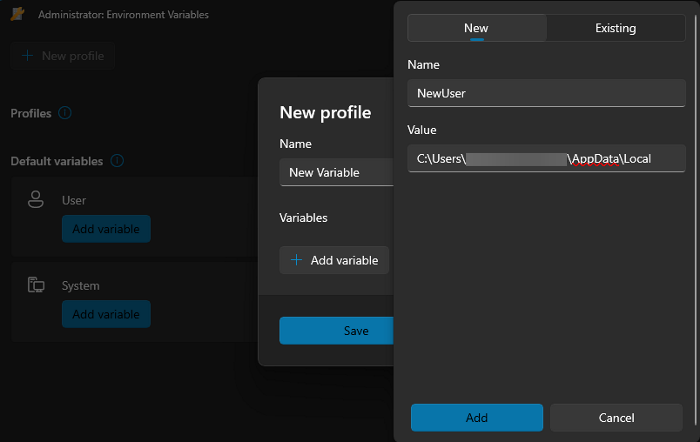
As the New Profile window pops up, type a name, such as “New Variable” turn on the Enable switch next to it, and click on Add variable. Next, under the New tab, set a Name for the variable, add your preferred location in the Value field, and press Add.
Once you have set up the variable successfully, you can then test it through the Run console. Press Win + R to open the Run box, type the variable name with percentage symbols, and hit Enter. If the variable has been applied to the current user successfully, Fiel Explorer will open the location directly.
Read: Environment Variables not working in Windows 11
3] Adding a new System Variable

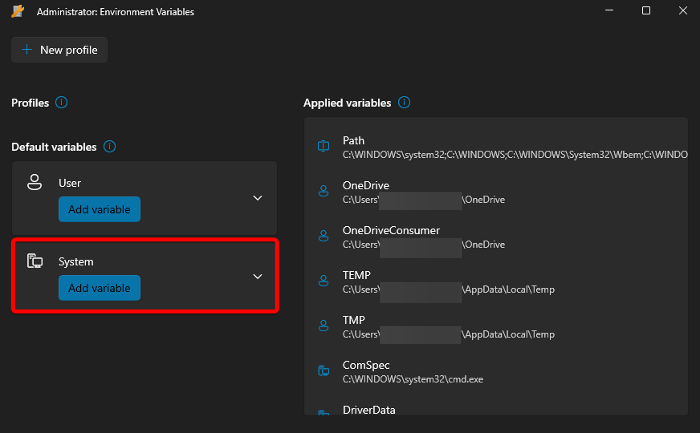
To add a new system variable, launch PowerToys, select Environment Variables on the left, and the right, move the switch to the right to enable environment variables. Now, click on Launch Environment Variables to open the Administrator: Environment Variables window. Here, go to System > Add variable.
In the Add Variable window, create a variable Name, enter a desired location under Value, and click on Save.
Once done, the new environment variable will apply to all users on the computer.
Read: How to see Names and Values of Environment Variables in Windows
4] Editing an existing Variable

To modify (edit or delete) an environment variable on Windows 11, open PowerToys > Environment Variables > Turn on Enable Environment Variables > Launch Environment Variables.
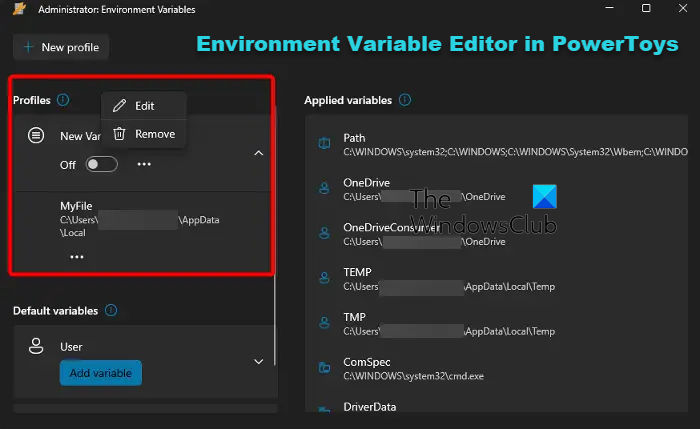
In the next window, go to the existing profile, click on the three dots next to it, and then either click on Edit to make changes or click on Remove to delete the profile.
Once you edit or remove the profile successfully, PowerToys will apply the changes to the Windows system.
Read: How to add Environment Variables to Context Menu
How do I open the Environment Variable Editor?
To open Environment Variables on Windows 11/10, press the Win + R keys simultaneously to launch the Run console. Here, type sysdm.cpl and hit Enter to open the System Properties window. Go to the Advanced tab and click on the Environment Variables button at the bottom. Next, select the user variable or system variable, and click on Edit or New to make changes or create a new profile. Once done, Save the changes.
How do you use User Environment Variables?
It’s quite easy to use the user environment variables in Windows. Simply open the System properties, select the Advanced tab, and click on Environment Variables. In the new window, select the desired variable from the list of User variables. You can then click on New to create a new user variable, press Edit to make changes or hit Delete to remove the variable.
TIP: Rapid Environment Editor is a powerful Environment Variables Editor for Windows.
Leave a Reply