Microsoft is known to update its Microsoft Office products with new features frequently. As artificial intelligence takes over, Microsoft 365 products have grown smarter. Now, you can convert hand sketched shapes into perfect ones. The procedure to use the Ink to Shape feature in Microsoft Office has been explained in this article.

How to use Ink to Shape in Word

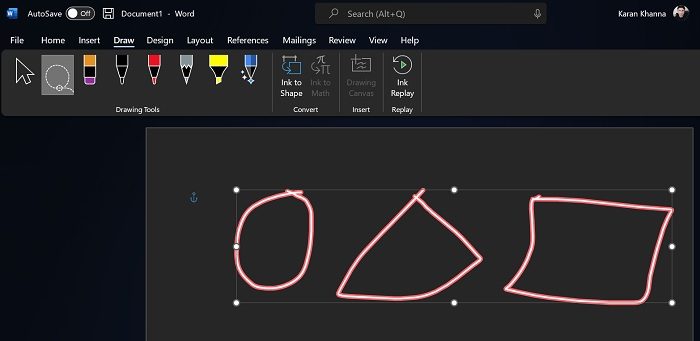
The Ink to Shape feature works with Microsoft Word. It is very useful when images are inserted from external sources. The procedure is as follows:
- Assume the images are already present in your Microsoft Word document.
- Now, go to the Draw tab.
- Now, use the Lasso select tool to select the shapes you wish to convert. The tool is the second option on the list.
- Once you select the Shapes, click on the Ink to Shape option.
See the magic as the shapes convert to perfect shapes!
How to use Ink to Shape in PowerPoint

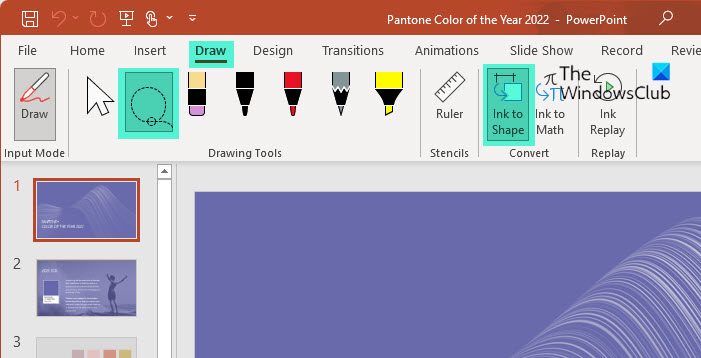
Just like Microsoft Word, the Ink to Shape feature can be used with Microsoft PowerPoint. The procedure is pretty much the same as with Word.
- Go to the Draw tab.
- Use the Lasso select tool to select the shapes you wish to convert. The tool is the second option on the list.
- Once you select the Shapes, click on the Ink to Shape option.
How to use Ink to Shape in Excel

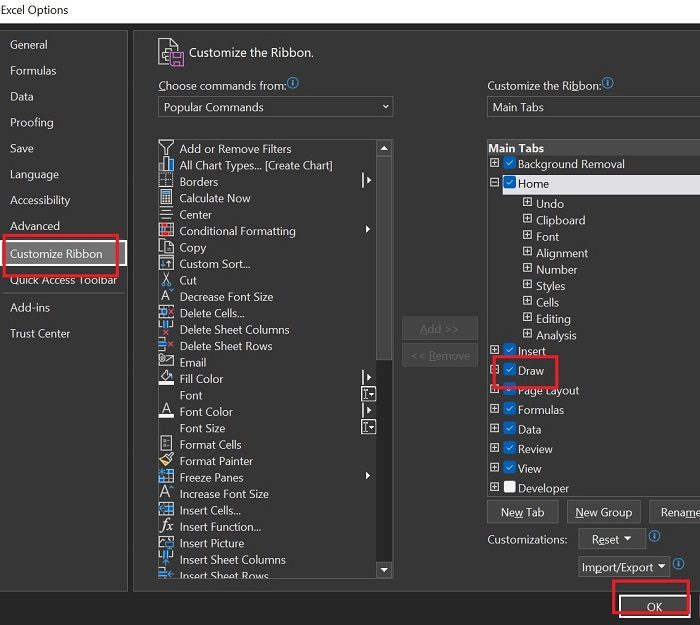
Unlike with Microsoft Word and PowerPoint, Microsoft Excel does not have the Draw tab by default. So, the procedure to use the Ink to Shape feature in Microsoft Excel is as follows:
- Click on File >> More >> Options.
- Go to the Customize Ribbon tab.
- In the list of Main tabs, check the box associated with Draw.
- Click on OK to save the settings.
- Now, the Draw tab will appear.
- Go to the Draw tab.
- Use the Lasso select tool to select the shapes you wish to convert. The tool is the second option on the list.
- Once you select the Shapes, click on the Ink to Shape option.
Similarly, you can create Shapes in OneNote using Ink to Shape feature.
Why can I not just add the shapes?
Microsoft Office products do have an option to insert shapes using the Insert tab. However, if you have an image with multiple shapes, it will be very cumbersome to create perfect shapes of the exact size and dimensions. In this case, the Ink to Shape feature comes out to be very helpful.
Can I select few shapes and not all full conversion?
You can use the combination of the Lasso select tool and the Ink to Shape feature multiple times to make sure that you do not select all shapes but only the ones which you look forward to converting. Rather this is the reason the Ink to Shape feature was created at the first place.
How to draw shapes in Microsoft Office?
You can draw shapes in Microsoft Office using the Draw feature. There are various pens and brushes available to draw the shape of your choice. You can also change the color of the drawn shapes. Furthermore, You can also use the Highlighter in the drawings.
How to convert drawn text into type text?
Just like the Ink to Shape feature, we have the Ink to Text feature with Microsoft Office products. You can use this feature to select the hand-drawn text and convert it to type text. After the conversion, you can change the size and font of the text as well.
How to add typical shapes in Microsoft Word, Excel, and PowerPoint?
To add typical shapes like circles, rectangles, and triangles in Microsoft Word, PowerPoint, and Excel, you have to go to the Insert tab. In the Insert tab, click on the downward-pointing arrow associated with shapes. Then select the correct shape from the list.
How to check the size of the shapes you created?
You can easily check the size of the shapes you created using the Ruler option. The Ruler can also be rotated and slid. It can be used to check the dimensions of all basic shapes. Other than this, when you create shapes using the Insert option, the size can be chosen.
Leave a Reply