When you print a Word document, you cannot work on it or other documents simultaneously. However, if you enable the ‘Print in background’ feature in Word, you will be able to print files while working on other documents in Word. Although the printing process may be slow, you can continue working on other files simultaneously.

At times, you might want to work on a document when Word prints your files in the background. By default, it may not do that on your computer since it slows down everything. However, if you need that feature urgently due to some reason, this article is for you.
How to use Print in background feature in Word
To use ‘Print in background’ feature in Word, follow these steps:
- Open Word on your computer.
- Click on the Options menu.
- Switch to the Advanced tab.
- Head to the Print section.
- Tick the Print in background checkbox.
- Click the OK button.
- Start printing your documents while working.
To learn more about these steps, continue reading.
First, you need to open Microsoft Word on your computer and click on the Options menu visible in the bottom-left section. However, if you have already opened the app, click on the File and select the Options menu.
After opening the Word Options panel, switch to the Advanced tab and head to the Print section. Here you can find an option called Print in background. You need to tick this checkbox to enable this setting.
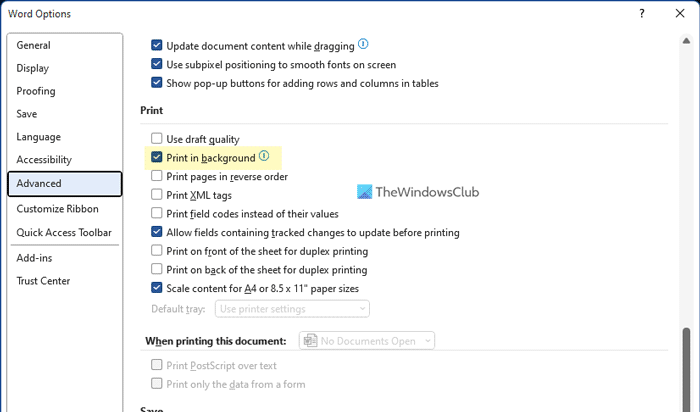
Finally, click the OK button to save the change. Next, you can continue working on your documents while Word starts printing them.
However, if you do not want to print in the background and want to disable this feature, you can do that using the same Word Options panel. For that, you need to open Word Options > Advanced > Print. Then, remove the tick from the Print in background checkbox and click the OK button to save the change.
Note: The next method is all about using the Local Group Policy Editor. By default, Windows doesn’t come with the Group Policy template for Office. That is why you need to follow this guide to install Group Policy template for Office first.
How to enable Print in background in Word using Group Policy
To enable Print in background in Word using Group Policy, follow these steps:
- Search for gpedit.msc in the Taskbar search box.
- Click on the individual search result.
- Go to Word Options > Advanced in User Configuration.
- Double-click on the Print in background setting.
- Choose the Enabled option.
- Click the OK button.
Let’s find out more about these steps.
To get started, search for gpedit.msc in the Taskbar search box and click on the individual search result to open the Local Group Policy Editor on your computer.
Then, navigate to this path:
User Configuration > Administrative Templates > Microsoft Word 2016 > Word Options > Advanced
Here you can find a setting called Print in background on the left-hand side. You need to double-click on this setting and choose the Enabled option.
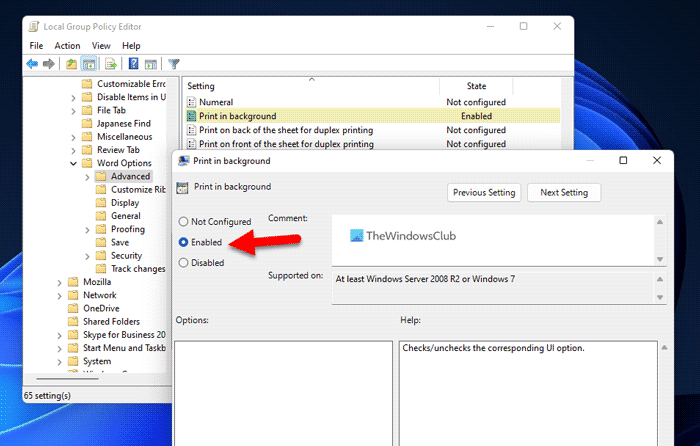
Finally, click the OK button to save the change.
In case you want to disable this feature, you can navigate to the same path in the GPEDIT, open the same setting and choose the Not Configured or Disabled option.
How to turn on and use Print in background in Word using Registry
To turn on and use ‘Print in background’ in Word using Registry, follow these steps:
- Press Win+R to open the Run prompt.
- Type regedit > click the OK button > click the Yes button.
- Navigate to Microsoft\office\16.0 in HKCU.
- Right-click on 0 > New > Key and name it as Word.
- Right-click on Word > New > Key and set the name as options.
- Right-click on options > New > DWORD (32-bit) Value.
- Name it as backgroundprint.
- Double-click on it to set the Value data as 1.
- Click the OK button.
- Restart your computer.
To know more about these steps, keep reading.
Precaution: It is recommended to back up Registry files and create a System Restore point before changing files in the Windows Registry.
First, you need to open the Registry Editor on your computer. For that, press Win+R > type regedit > click the OK button and click on the Yes button on the UAC prompt.
Once it is opened, navigate to the following path:
HKEY_CURRENT_USER\Software\Policies\Microsoft\office\16.0
Right-click on 16.0 > New > Key and name it as Word. Then, right-click on Word > New > Key and set the name as options.
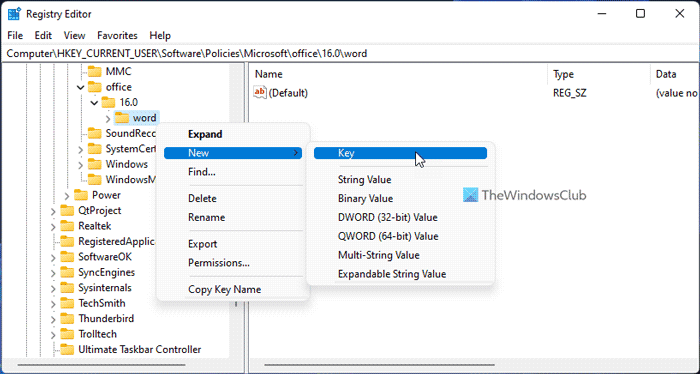
Next, right-click on options > New > DWORD (32-bit) Value and set the name as backgroundprint.
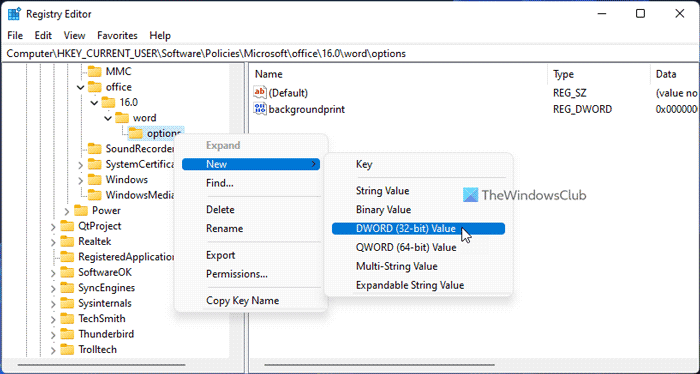
By default, it comes with a Value data of 0. You need to double-click on it and set the Value data as 1.
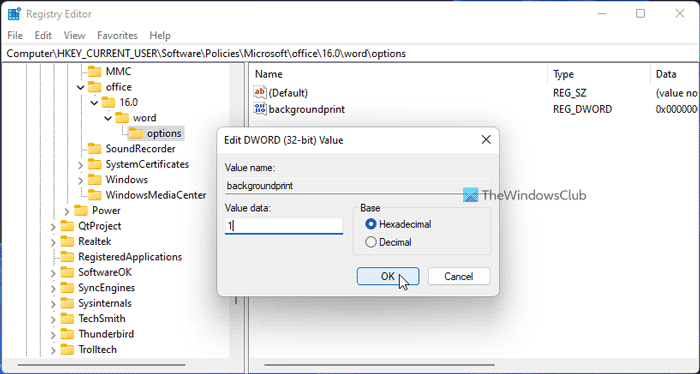
Finally, click the OK button to save the change and restart your computer to apply it.
In case you do not want to print in the background, you have two options on hands to disable this functionality. First, you can set the Value data as 0. Second, you can delete the REG_DWORD value. If you want to follow the first method, you need to open the same REG_DWORD value and enter 0 as the Value data. On the other hand, if you want to follow the second method, you need to right-click on the backgroundprint REG_DWORD value, select the Delete option, and click the Yes button.
As usual, you need to restart your computer after making all the changes.
Read: How to print Background and Color Images in Word
What does print in background mean in Word?
When you print documents via Word, it doesn’t allow users to work on other documents. However, if you enable the Print in background feature, you will be able to continue your work on documents while your computer prints files. Both can be done at the same time to increase your productivity.
How do I enable background printing?
To enable background printing in Word, you need to go through the aforementioned steps. There are three ways to turn on background printing in Microsoft Word. You can use the in-built Word Options panel, Local Group Policy Editor, and Registry Editor to get the job done.
That’s all!
Leave a Reply