One of the most common manifestations of workload transfer for many firms is the transfer of critical folders or files from one server to another. There are many ways to transfer files from one server to another, but if you want to find the best tool for this migration, you’ve come to the right place! We will suggest the best Windows Server Migration Tool and provide complete guidance on its working process and outstanding features. So, let’s get started with more details.

What is Server Migration Tool?
The server migration tool allows users to push all assets from the current server to the new server. This tool can be run as a shell script when placed on the server you wish to move. Users can filter what is migrated through the tool, although everything will be migrated by default.
How to use Windows Server Migration Tool
There are several ways to transfer files from one server to another. Many companies use Windows Server Migration Tools on Windows Server computers to transfer workloads. One of the most popular methods for migrating Windows Server is using Windows Server Migration Tools, which is a set of PowerShell cmdlets. Although this method is a bit complex and has several steps, you can follow the exact instructions to migrate your server successfully.
- Install Windows Server Migration Tools
- Create a deployment folder on the destination computer
- Register Windows Server Migration Tools on the Source computer
- Use Windows Server Migration Tools
We divided the operation of Windows Server Migration Tools into four parts for your better understanding and convenience.
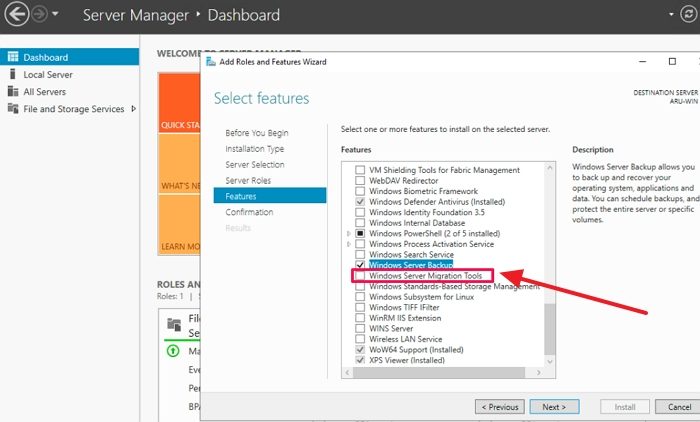
1] Install Windows Server Migration Tools on the destination and source Server

- Click on the Start button, which is located in the lower-left corner of your Windows system.
- In the search box, type Server Manager and press Enter.
- Click on Add Roles and Features under the Manage tab.
- After that, press the Next button. Select the destination.
- Press Next, then select Windows Server Migration Tools under the Features tab.
- After that, again, press Next to confirm the installation selections.
- Lastly, click Install to install this utility on the targeted computer.
2] Create a deployment folder on the destination computer
- To open the command prompt, press the Windows + X key and select Command Prompt (Admin), PowerShell, or Windows Terminal. Any of these options will work.
- To change to the directory where the smigdeploy.exe tool is stored, enter the following command at the prompt and press Enter
cd %Windir%\System32\ServerMigrationTools\
- You will need to type in the following command, which will direct you to the path of the deployment folder on the source system. After doing so, press Enter.
SmigDeploy.exe /package /architecture X64 /os WS08 /path
3] Register Windows Server Migration Tools on the Source computer
- Copy the deployment folder generated by the destination system to a local drive on the source system.
- Ensure that the architecture of the arrangement folder’s operating system matches that of the source computer.
- To open a Command Prompt window on the source computer, press Windows logo Key+X and select Command Prompt from the menu.
- In the command prompt section, change the directory to the location of the deployment folder from Step 1.
- To register Windows Server Migration Tools cmdlets, type the below-given command and press Enter.
Smigdeploy.exe
Now that you have finished all the arrangements let’s learn how to use Server migration tools.
4] Use Windows Server Migration Tools step by step
If you want to export the local users from the source server, follow the exact steps.
- Click on Server Manager and Tools on the source Server. Afterward, click on Windows Server Migration Tools to open it.
- Now run the following command:
Export-SmigServerSetting -User All -Group –Path C:SysAdminExportMigUsersGroups –Verbose
You can import local users to the targeted server by following these steps:
- Open Windows Server Migration Tools from Server Manager > Tools > Windows Server>Migration Tools.
- Execute the following command:
Import-SmigServerSetting–UserEnabled–Group-PathC:SysAdminExportMigUsersGroups -Verbose
The process may be complex for those not technically inclined, but if you follow the steps provided, you can complete it quickly.
How long does server migration take?
Various factors can impact the migration duration, including the amount of data being transferred, the stability of the original server, or other unanticipated issues. In most cases, migration will take anywhere from a few minutes to a few hours.
What is migration in AWS?
The AWS Server Migration Service provides an agentless way to migrate virtual-only workloads from on-premises infrastructure or from Microsoft Azure to AWS. When you cannot install an agent, this service makes it easier and faster to migrate to AWS.
Leave a Reply