The Wrap feature wraps text into multiple lines so that you can see all of it, meaning that if there is a sentence in a cell which starched across the column to other columns in the spreadsheet, you can use the Wrap text feature to align the sentence in the cell. In this tutorial, we will explain how to wrap text in a cell in Excel.

There are two methods in Excel that you can use to wrap text. Follow the steps to wrap text in a cell in Microsoft Excel.
- Using the Wrap text feature on the ribbon.
- Using the Format Cells dialog box to wrap text.
How to wrap text in Excel using Wrap text feature on the ribbon

- Launch Microsoft Excel.
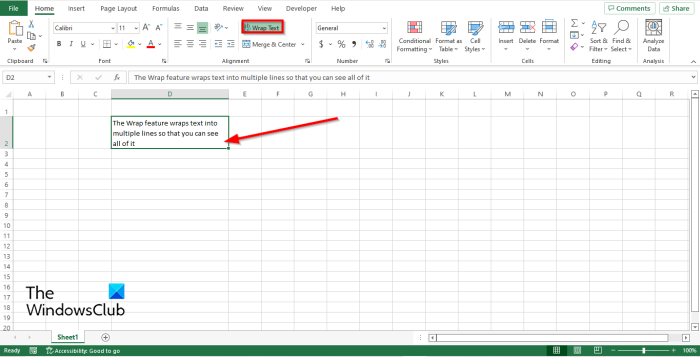
- Write a sentence in your cell. You will notice that the text in the sentence is spilling over to other columns in the spreadsheet.
- Then click the Wrap Text button in the Alignment group on the Home tab.
- You notice that the text is now in a single cell.
- Now align the rows and columns so that they can be aligned better.
- When the Wrap Text button is turn on, it is highlighted.
- To remove the text wrapping, click the Wrap Text button, and the cell will go back to normal.
Wrap text in Excel using the Format Cells dialog box

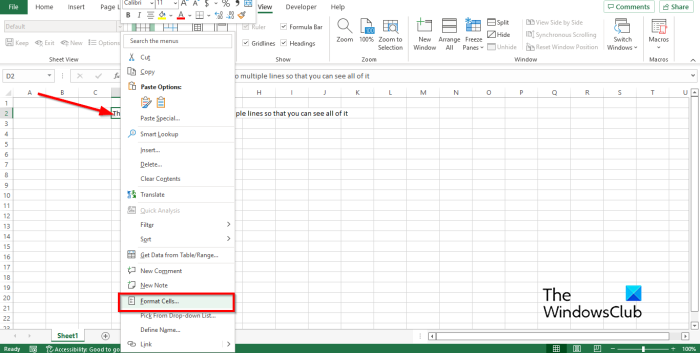
- Select the cell containing the text that you want to wrap.
- Right-click the cell and select Format Cells from the context menu.
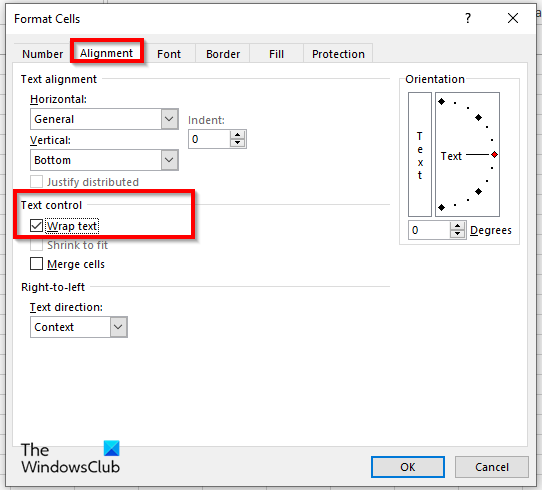
- A Format Cells dialog box will open.
- On the Alignment tab, In the Text Control check box, click the check box for Wrap, then click Ok.

Why is my text not wrapping in Excel?
If wrapping does not work in Excel, it is due to the selected cell being a merged cell. If you want to wrap the text in the cell, you must unmerge the cell.
How do I autofit text in Excel?
Follow the steps below to autofit in Excel:
- Select the column that you want to autofit.
- Click the Home tab and click the Format button in the Cells group.
- Click on the Autofit Column Width option.
What is Wrap text tool in Excel?
The Wrap Text feature shows all information in a cell, even when data overflows the cell boundary. The Wrap text feature is simple to use just with a click of the Wrap Text button. In this tutorial, we have explained the process of using the Wrap Text feature in Excel.
How do you wrap text on multiple lines in Excel?
To wrap text on multiple lines, press Alt + Enter at each line’s end. Now you can try to align the rows and columns of the cell. To align the rows and columns manually, place the cursor on the row until you see a cross cursor, then make your alignment. Do the same for the column.
READ: Microsoft Excel shortcut keys and their functions
Why do you use wrap text?
The wrap text feature is used in Excel so that the text can fit in the cell, especially if it overflows over the cell boundary. When a person uses the Wrap text feature all the information will fit in a single cell.
How do I make Excel cells expand to fit text?
You can make Excel cells expand in several ways:
- You can use the Wrap text feature that we have discussed in the tutorial.
- You can use the options Row Height, AutoFit Row Height, Column Width and AutoFit Column Width in the Format feature on the Home tab to fit the cell size.
READ: How to Ring an Alarm or Set a Reminder in Excel
We hope this tutorial helps you understand how to wrap text in Excel.
Leave a Reply