We noticed that after restarting the host computer, all or one Hyper-V virtual machine(s) were removed. This can be very frustrating as one may have to create a new machine and again go through the tiresome process. They can either be newly created virtual machines or replicated ones. In this post, we will talk about this issue and see what you can do if the Hyper-V Virtual Machine is removed after reboot.

Fix Hyper-V Virtual Machine removed after reboot
If the Hyper-V Virtual Machine is removed after reboot, ensure the host is updated. So, if you are on Windows 11/10 or Windows Server, make sure to check for updates. If the host machine is updated, you can follow the solutions mentioned below.
- Restart Hyper-V Virtual Machine Management Service
- Create a new virtual machine using the existing hard drive
- Point the virtual machine configuration file
- Reinstall Hyper-V
Let us talk about them in detail.
1] Restart Hyper-V Virtual Machine Management Service

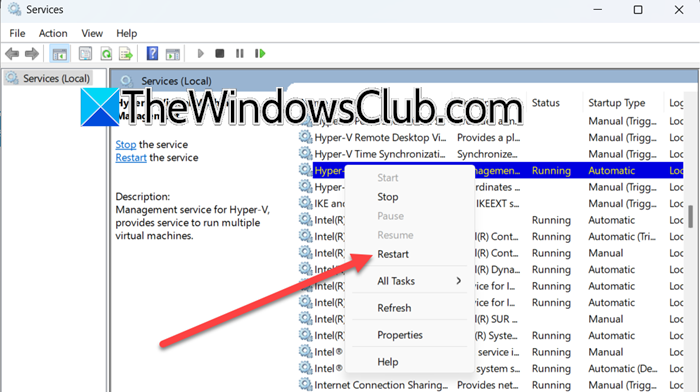
The Hyper-V Virtual Machine Management Service is a crucial Hyper-V component. It manages the operations and state of virtual machines (VMs) on a Hyper-V host. If you are facing an issue with Hyper-V, it is recommended that you restart this service. To do so, follow the steps mentioned below.
- Open the Services app by searching it out of the Start Menu.
- Now, look for the Hyper-V Virtual Machine Management Service.
- Right-click on it, and select Restart.
If the service was stopped, you need to right-click on the Service, change the Startup type to Automatic, and then click on Start. Once done, reboot the machine and check if the issue is resolved.
2] Create a new virtual machine using the existing hard drive

Next, we need to create a new virtual machine using the existing hard drive, as there is a possibility that the existing virtual machine is corrupted. If all the virtual machines were removed in your case, you can probably skip this solution, as it is a far-fetched idea that all your virtual machines are corrupted. To create a new machine using the existing hard drive, follow the steps mentioned below.
- Open the Hyper-V Manager by searching it out of the Start Menu.
- Now, go to the Actions section and click on New > Virtual Machine.
- You then have to enter the name of the machine, specify the location, and click on Next.
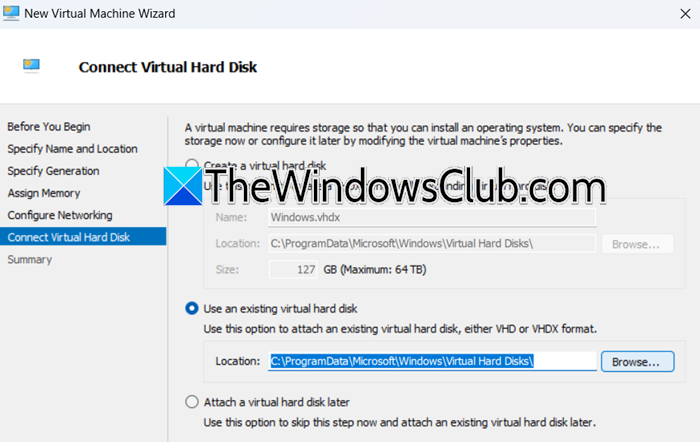
- You then have to specify the generation, assign the memory, and follow the on-screen instructions until you reach the Connect Virtual Hard Disk section.
- Select Use an existing virtual hard disk, click on Browse, go to the location where your VHD or VHDX file is located, and select it.
- Finally, follow the on-screen instructions and complete the process.
Once done, open the machine and see if everything is alright. If you know things are fine, you are able to open the machine, reboot the host, and see if the machine is getting removed. Hopefully, this time, you will not face this issue.
3] Point to the virtual machine configuration file
You need to check the location of the configuration file. Usually, the .XML files are located at C:\ProgramData\Microsoft\Windows\Hyper-V\Virtual Machines. Make sure to create a backup of your virtual machine configuration files before making any changes.
We are going to use Symbolic links to create a reference to the configuration file to make it appear as if it is at the original location. To do so, open the Command Prompt as an administrator and then run the following command.
mklink "C:\ProgramData\Microsoft\Windows\Hyper-V\Virtual Machines\<GUID>.xml" "D:\VMs\<GUID>.xml"
Replace <GUID> with the actual GUID of the virtual machine, and adjust the path D:\VMs\<GUID>.xml to point to the actual location of the .XML file on your alternative drive.
Once that is done, reboot the computer and see if the issue is resolved.
4] Reinstall Hyper-V

If all else fails, we need to reinstall the Hyper-V feature as if it is corrupted, you will encounter peculiar issues such as the one in question. To do so, follow the steps mentioned below.
- Open the Control Panel.
- Change the View by to Large icons.
- Click on Programs and Features.
- Now, click on Turn Windows features on or off.
- Look for Hyper-V, untick it, and click on Ok.
- Now, you need to tick Hyper-V again and then click on Ok.
Once you have reinstalled Hyper-V, add all your virtual machines and check if the issue is resolved.
Hopefully, you will be able to resolve the issue using the solutions mentioned in this post.
Read: How to import, export, or clone Virtual Machines in Hyper-V
When you delete a Hyper-V virtual machine what is not automatically deleted?
When you delete a Hyper-V virtual machine from the Hyper-V Manager console, the files on the virtual hard drive will not be deleted. They will remain on the local machine. If you want to restore the machine, you can use the hard drive file, but if you don’t intend to do that, you can always delete the file.
Read: Disable or Enable Virtual Memory Paging File Encryption in Windows 11
Can deleted VM be recovered?
If you have taken the backup of the virtual machine or enabled checkpoints, you can restore the virtual machine in Hyper-V. If you have none of that, you will have to create a new virtual machine and link the existing hard drive. To do the same, you can follow the second solution mentioned earlier.
Also Read: Fix Hyper-V Virtual Machine stuck in Stopping State.