The Event ID 7000, indicates that a driver has been blocked from loading. The message will be displayed. If you see the l1vhlwf service mentioned then it is related to nested network virtualization. There are various reasons for this issue such as disabled hardware virtualization in BIOS, driver conflict, corrupted system image, and more. In this post, we will see how to fix the l1vhlwf service failed to start, A hypervisor feature is not available to the user with Event ID 7000 in the Event Viewer of Windows 11/10.
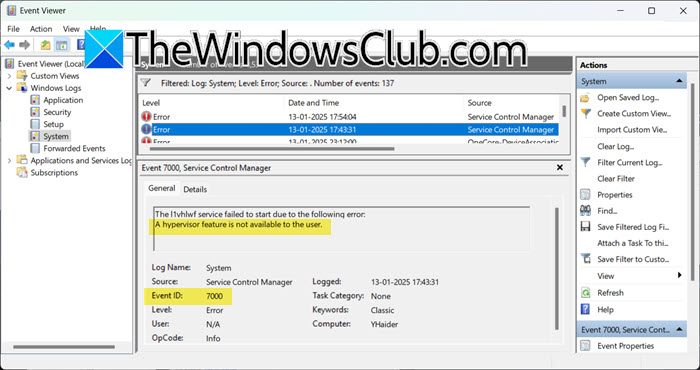
Fix A hypervisor feature is not available to the user, Event ID 7000 in Windows 11/10
If you see l1vhlwf service failed to start, A hypervisor feature is not available to the user with Event ID 7000 in the Event Viewer of Windows 11/10, follow the solutions mentioned below.
- Enable Hardware Virtualization from BIOS
- Enable Nested Virtualization
- Update all the drivers
- Reinstall the Windows Hypervisor Platform
- Repair System Files
- Disable l1vhlwf from the Registry Editor
Let us talk about them in detail.
1] Enable Hardware Virtualization from BIOS
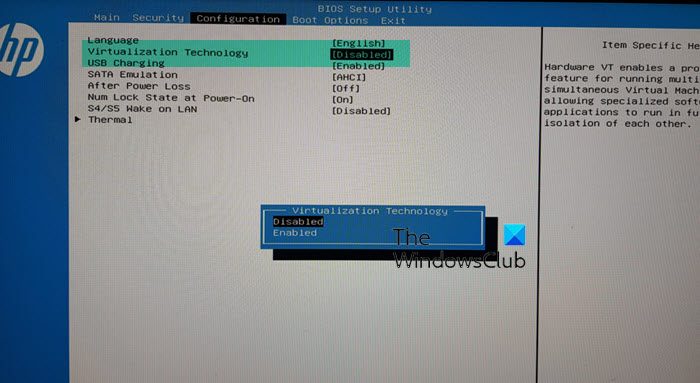
Hardware Virtualization, Intel VT-x or AMD-V, allows multiple operating systems to run concurrently on a single physical machine by using a hypervisor. If the feature is disabled, you will encounter Event ID 7000. In order to resolve it, we recommend you follow the steps mentioned below to do the same.
- Boot your computer into BIOS.
- Now, go to System Configuration > Virtualization Technology.
- Then, set Enabled, save the changes you have made, and exit from there.
You might see a different option or label on your computer, therefore, check the hyperlink for a proper guide.
2] Enable Nested Virtualization
There are a lot of programs that depend on Nested Virtualization, such as some games and WSL. So, we recommend you enable nested virtualization. Although the exact steps can vary depending on the virtual machine software you’re using, most popular tools offer a straightforward option for enabling nested virtualization.
3] Update all the drivers
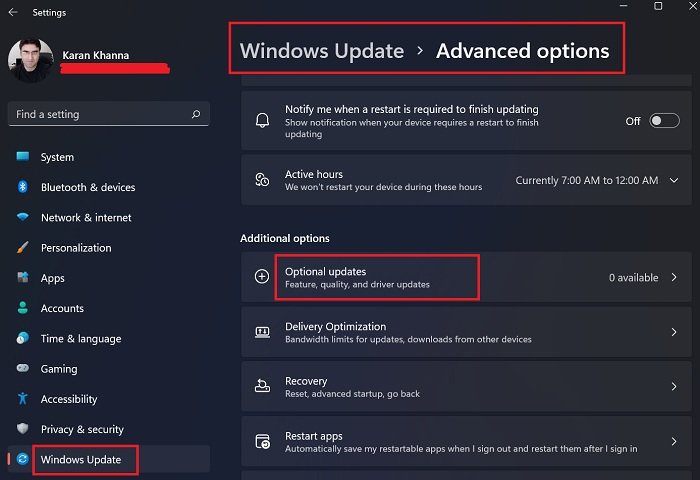
Next, we need to update all the drivers, especially the ones related to the processor and network. This is done to negate the possibility of incompatibility issues that can be caused by disparity between the versions of the driver and other programs on the computer. There are various ways to update your driver. You can pick one that suits you from the list given below and update it.
- Update the driver from the manufacturer’s website.
- Install a driver update utility to keep your drivers updated.
- Install Driver and Optional Update from Windows Settings.
- Open the Device Manager and update your driver.
Once you have updated your driver, check if the issue is resolved.
4] Reinstall the Windows Hypervisor Platform
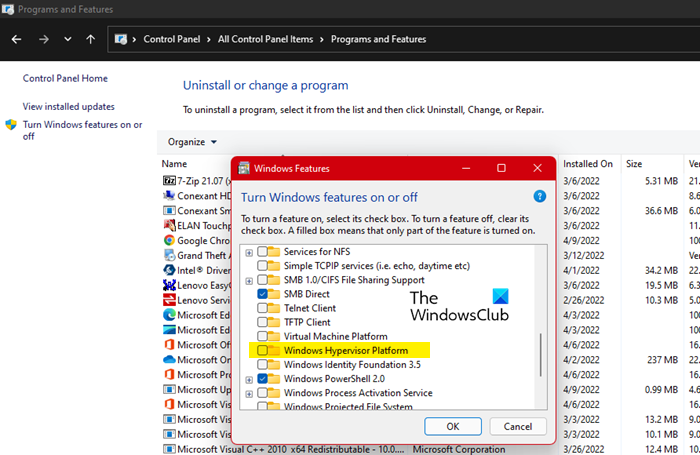
Event ID 7000 usually appears when the Windows Hypervisor Platform feature is enabled. So, it is pretty safe to say that the feature is already enabled on your computer. Therefore, we are going to reinstall the feature, as that can get rid of the issue for you. To do so, follow the steps mentioned below.
- Open the Control Panel by searching it out of the Start Menu.
- Change the View by to Large icons.
- Go to Programs and features.
- Click on Turn Windows features on or off.
- Look for Windows Hypervisor Platform, untick the box, and click on Apply > Ok.
- Once the feature is disabled, you need to again enable it by ticking the same box.
Finally, save the changes and check if the issue is resolved. In case, the issue still persists, do the same with the Hyper-V feature. Hopefully, this will do the job for you.
5] Repair System Files
There are various ways to repair the system files, you can run DISM or System File Checker to do the same. After repairing the system files, check if the issue is resolved.
6] Disable l1vhlwf from the Registry Editor
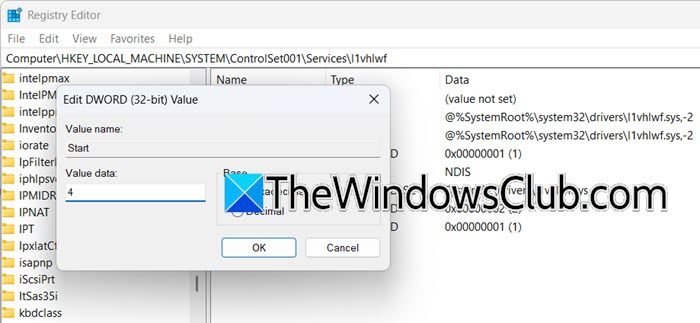
One of the workarounds that a lot of people have used to get rid of the Event ID 7000 is disabling the l1vhlwf service from the Registry Editor. However, this will only work if you don’t actively use Windows Hypervisor Platform. We can disable it, wait for Microsoft to release an update to resolve the issue. To do the same, follow the steps mentioned below, however, prior to that, create a backup of your registry.
- Open the Registry Editor by searching it out of the Start Menu.
- Navigate to
Computer\HKEY_LOCAL_MACHINE\SYSTEM\ControlSet001\Services\l1vhlwf - Look for the StartDWORD value.
- Set its value to 4 and click Ok.
Finally, reboot your computer and wait for Microsoft to release an update to resolve the issue.
Read: Virtual machine could not be started because the hypervisor is not running
How do I enable Hyper hypervisor?
You can enable Hyper-V in Windows 11 from the Control Panel. You can search it out of the Start Menu, go to Control Panel\All Control Panel Items\Programs and Features, click on Turn Windows feature on or off, and then enable Hyper-V.
Read: AMD-V is disabled in the BIOS, Not in a hypervisor partition
What is the cause of hypervisor error?
A hypervisor error can occur for various reasons, including hardware compatibility issues, incompatibility between host and guest operating systems, insufficient system resources, software conflicts or outdated drivers, and corrupted files or system data. These factors can disrupt the hypervisor’s functionality, leading to errors. Ensuring that your system’s hardware supports necessary virtualization features, updating drivers, resolving software conflicts, and maintaining sufficient system resources can help prevent such errors.
Also Read: No hypervisor was found; Error 0xc0351000 in Windows Sandbox.
Leave a Reply