If your organization uses Hyper-V virtual machines, you want to optimize them as much as possible. Optimizing the VMs can not only improve their performance but also prevent many errors. In this post, we will see some tips and tricks for improving and optimizing Hyper-V VM Performance.
Improve and Optimize Hyper-V VM Performance
If you want to improve and optimize Hyper-V VM Performance on your Windows computer, go through the tips and tweaks mentioned below.
- Use Dynamic Memory
- Stick to fixed VHDs
- Use synthetic network adapters and enable VLAN tagging
- Kill redundant apps and disable unnecessary services
- Enable Hyper-V Integration Services
- Use Hyper-V on Windows Server Core
- Use Multipath I/O
Let us talk about them in detail.
1] Use Dynamic Memory
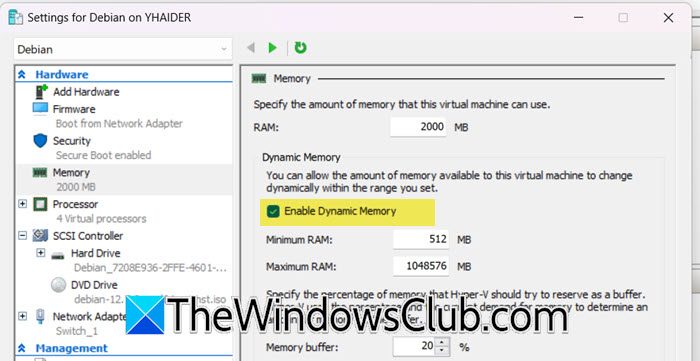
Dynamic Memory lets you add more memory to a virtual machine (VM) while it is running if the guest operating system needs more RAM. If the guest OS is offline and doesn’t need much memory, Hyper-V can take back the extra memory and give it to other active VMs. This not only keeps the performance of the guest machine in check but also prevents the host machine from overcooking due to the lack of resources. You can enable it during the creation of the virtual machine, but if you have not done that, follow the steps mentioned below to enable Dynamic Memory of your virtual machine.
- In Hyper-V Manager, right-click on your machine and select Settings.
- Now, go to the Memory tab.
- Tick the Enable Dynamic Memory checkbox from the Dynamic Memory section and then set minimum and maximum RAM limits.
- Once done, click on Apply > Ok.
Hopefully, this will do the job for you.
2] Stick to fixed VHDs
Usually, the Fixed-size disks perform better than their dynamic counterparts especially because they don’t have to keep on checking the resources and increasing them when needed. However, Dynamically expanding disks optimize physical storage and are suited for less resource-intensive applications. If you know what kind of application you will be dealing with and how much storage is required, we recommend you go with a Fixed-size disk for better and optimized performance.
3] Use synthetic network adapters and enable VLAN tagging
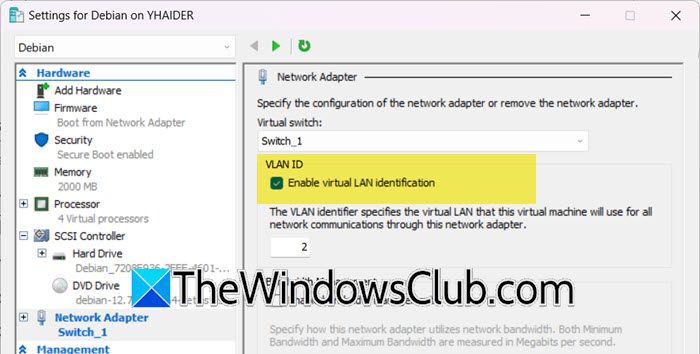
If you want the best network performance, it is always recommended to go with a synthetic network adapter over its legacy counterpart as they also support Hyper-V Integration service or Linux Integration service. VMBus enables network connectivity and facilitates communication between different partitions, it also supports VLAN tagging, which is something you should use. To set up a synthetic network adapter and enable VLAN tagging, follow the steps mentioned below.
- Launch Hyper-V Manager.
- Right-click on the VM that you want to configure and select Settings.
- Now, go to the Hardware tab, select Network Adapter (by default we use Synthetic Network Adapter, and Legacy only works with Generation 1 VM), and click on Add.
- In the Network Adapter section, select the Virtual Switch of your choice, and then tick the Enable virtual LAN identification.
- Click Apply > Ok.
Once done, you will be able to experience a lot better network performance.
4] Kill redundant apps and disable unnecessary services
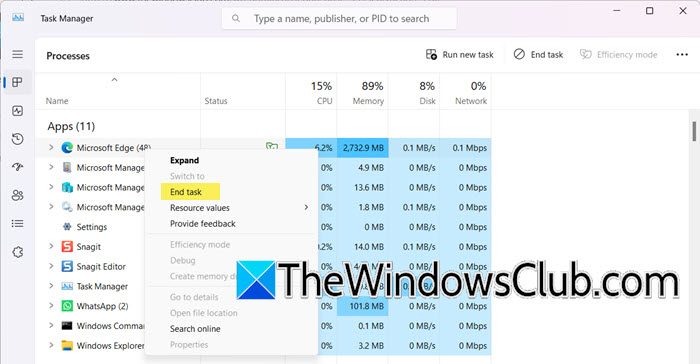
One of the easiest ways to improve the performance of your virtual machine is to kill all the apps that are not in use. Doing so will allow your computer to allocate more resources to your virtual machine, improving its performance. To check apps that are consuming your resources, open the Task Manager, and then check the Processes tab. Then, right-click on the resource-hogging app, and select End task.
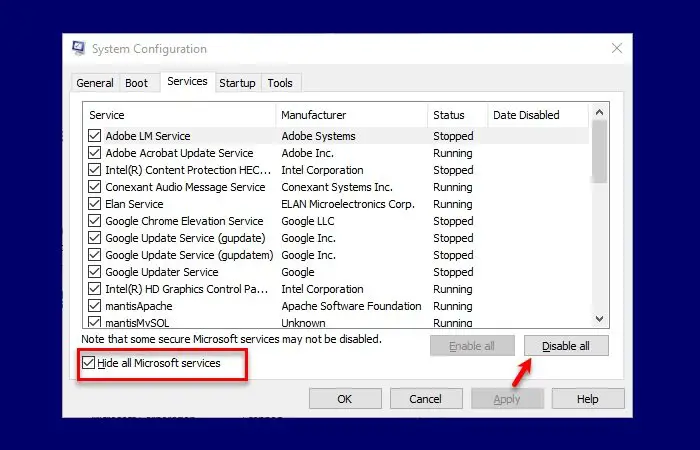
You can also start your computer in the Clean Boot state and disable all processes except those related to Hyper-V. Then, start Hyper-V’s VM and then see the difference in performance.
5] Enable Hyper-V Integration Services
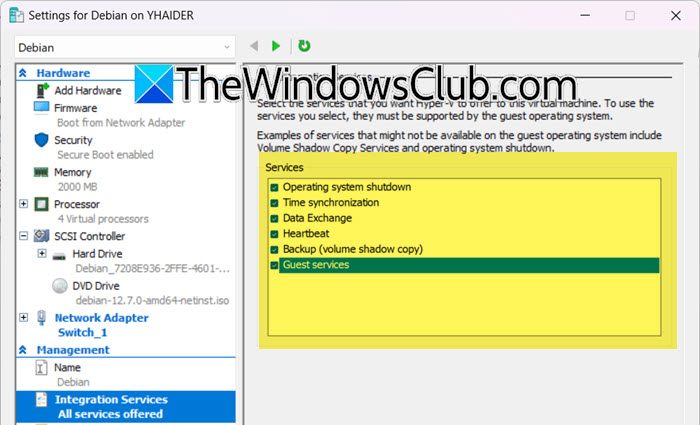
Hyper-V Integration Services is a set of drivers and tools that improve how guest operating systems (OS) perform in a Hyper-V virtual machine (VM). To get the best performance, enable Hyper-V Integration Services on both the Hyper-V host and all guest operating systems. Newer versions of Windows OS automatically include most Hyper-V Integration Services, except for Guest Services. If your VM is running Linux or an older version of Windows, check to see if Integration Services are enabled, if that’s not there, we will have to do it manually. Follow the steps mentioned below to do the same.
- In the Hyper-V Manager, right-click on your VM, and select Settings.
- Now, go to the Integration Services, and then tick the services you want to enable or disable, we recommend you enable Guest services.
- Click Apply > Ok to confirm.
This should do the job for you.
Read: How to Install Windows 11 using Hyper-V in Windows
6] Use Hyper-V on Windows Server Core
One way to improve performance is to install Hyper-V on Windows Server Core due to its many advantages. Unlike Windows Server with a GUI, Server Core is not huge, resulting in lower resource consumption and fewer vulnerabilities. These saved resources can enhance the performance of virtual machines (VMs) in a Hyper-V environment.
TIP: Veeam ONE Free Community Edition is a monitoring software for VMware and Hyper-V.
7] Install Multipath I/O
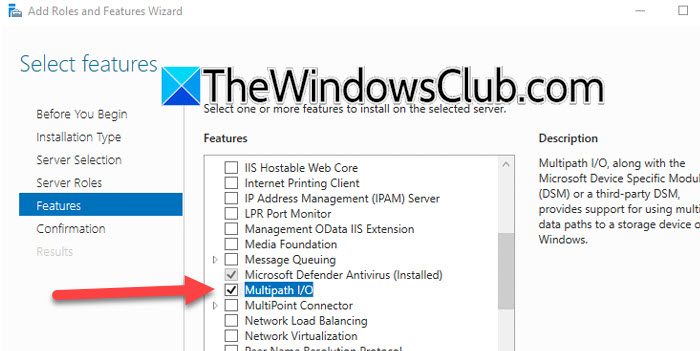
Multipath I/O (MPIO) provides redundant data paths between storage devices and servers, improving load balancing and high availability in Hyper-V environments. It’s recommended to enable MPIO, especially for large data workloads. If a connection fails, MPIO will use an alternate path to ensure data transfer continues. It is a Windows Server feature, and to install it, follow the steps mentioned below.
- Open Server Manager and go to Add roles and features.
- Keep clicking on Next until you reach the Features tab.
- Tick Multipath I/O and then click on Next; install this feature.
You can then configure it as per your organization’s requirement and you will notice a boost in performance.
Hopefully, implementing these changes will result in a significant boost in your virtual machine’s performance.
Further reading: Hyper-V virtual machine very slow to start? Speed-up Hyper-V virtual machine!
How to improve Hyper-V VM performance?
There are various things you can do to improve your virtual machine’s performance. We listed a few of them earlier in this post. However, how much performance you can improve depends a lot on your system’s hardware. If you are constantly facing performance issues and your VM is slow, it is recommended that you allocate more hardware, increase the RAM and storage, install a cooling system, etc.
Read: Enable or Disable Hyper-V for Standard Users in Windows 11
How to increase Hyper-V CPU?
You can either increase the Hyper-V CPU during the creation of the machine as you get the prompt to do it or afterward. If you have already created the machine and want to allocate more processors, right-click on the machine, and select Settings. Then, go to Processor, increase the Number of virtual processors, and then click Apply > Ok.
Read: Share Local Resources with Hyper-V Virtual Machine in Windows 11.