HDD or Hard Disk Drives tend to go become with time. Low disk space, aged hard drive, bad sectors, too many applications running in the background, we can count on. In this post, we will talk about how you can increase hard drive speed & performance in Windows 11/10. But before we go ahead, let’s understand if the guide applies to an SSD.

This guide doesn’t apply to SSDs, here is why
This is because of how they store data. Unlike HDDs, SSDs don’t have any moving parts. Instead, data is saved to a pool of NAND flash. That is the primary reason why SSDs have an excellent read and write speed. It does not match the speed we get on RAM, but it’s a lot more than HDDs. Every time data has to be written on an SSD, it finds a full empty block and writes it. It is easier than deleting, and then writing it.
That’s why SSDs slow down when they start running out of space. The controller has to work hard to figure out space that is marked for deletion, move files to a different block, and then rewrite again. If you run optimization tools, you will only end up lowering the disk life.
We have seen many guides written to optimize SSDs, and they don’t work. Most of the optimization tools are built for HDDs, and that’s where they should be applied to.
Read: How to disable defragmentation for SSDs in Windows.
Increase hard drive speed & Improve performance
The Storage device we are talking about here is Hard Disk Drive, which with come moving parts. The reason why HDD needs optimization is that after some time, the data is scattered throughout. There is a lot of distance, even if it’s the same file. The reader or the head will have to work harder. That’s what the optimization tools help to achieve. Data is rearranged so the data can be retrieved faster. Here is the list of methods to follow:
- Defragment and Optimize Drives
- Enable Write Caching
- Optimize Page File
- Optimize Background Services, Apps, and Storage Space
Right after this, we have talked about features you should not disable to optimize the drive.
1] Defragment and Optimize Drives

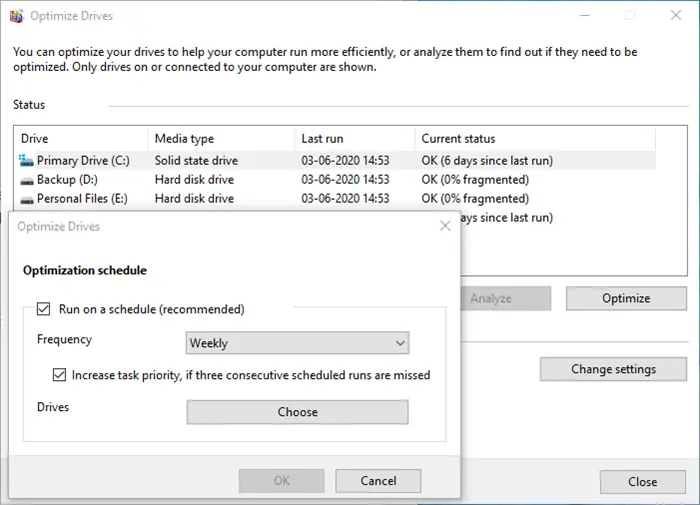
Windows has a Disk Defragmenter tool which has been there for a very long time. It improves performance by rearranging the files in such a way that they can be fetched quickly, i.e., less movement of the reading head. The tool has been enhanced over the years, and you can also schedule the process. While you can choose to leave everything on Windows, or if you have a schedule, then you can set it for weekends, but make sure to keep the computer turned on.
2] Enable Write Caching

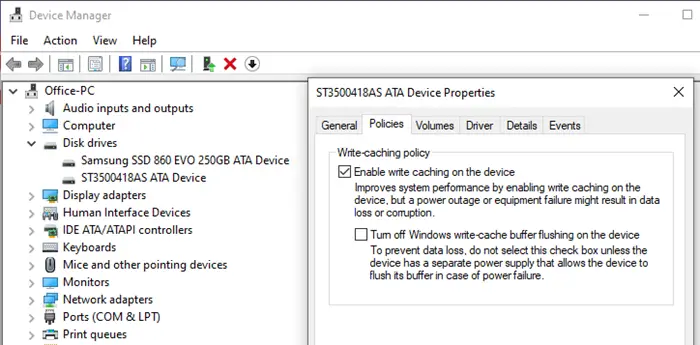
If you enable Write caching, it will take the load off the hard drive by using a cache in between. So when you save a file, it writes all information, including data into a temporary location. As writing to cache is faster than saving to hard disk, it results in better performance. It comes in handy when you are editing large files such as images and videos.
3] Optimize Page File
The Page File has been misunderstood for a very long time. Windows users it as a temporary space to hold when the RAM is full. While you may not run out of RAM, thanks to the affordable price, most have more than we need but removing PageFile.SYS won’t make a difference. In fact, it is better to have, it than not have it at all.
So if you are doing a memory-intensive, and you finally run out memory, PageFile.SYS will be handy. Windows will put data back into this, free up memory, and get some more done.
Read: How to improve Windows 11 performance.
4] Optimize Background Services, Apps, and Storage Space
It is a general tip that improves not only HDD performance but also the performance of the computer. If you have too many applications, background services, then it will impact as they will keep the hard drive buys, and you may not be able to work as expected. Also, if you are running low on storage space, it may impact as the hard disk will struggle to rearrange files, claiming space for the files to be saved.
The baseline is you should get rid of anything which is unnecessary and consuming resources.
That said, if all you want is to improve the overall performance of Windows 11/10, the best way is to switch to a hybrid model.
Install Windows on an SSD, and keep everything else on HDD. You can choose to perform optimization for HDD, and leave the rest on Windows to manage the SSD.
Read: Bad sectors on SSD and HDD
What you should NOT do to optimize Hard Disk Drives
A lot of posts talk about disabling Windows features both for HDD and SSD. Windows has come a long way, and so has the hardware. The same set of optimization that is being repeated for over a decade, will not work. Here is the list of features that you should not disable in them
- Windows Write-Cache Buffer Flushing: It allows applications to run faster by allowing them to proceed without waiting for data write-requests to be written to the disk.
- Windows Indexing, aka Windows Search Service: It only helps to improve the overall performance instead of lowering it. If there is no indexing, the hard disk will have to work even harder to find the data by crawling the entire hard drive for the data and consuming more resources.
- High Performance: There is no way you can improve the performance of a hard drive by keeping it on all the time. Windows Laptops offer a high-performance power plan, which makes sure the disk is turned on all the time. It doesn’t add to the advantage of improving performance. Windows manages well by turning on the drive when required. The plan is only useful when you are doing intensive CPU/GPU work like video editing or gaming.
I hope the post was easy to follow, and you were able to improve hard drive speed and performance. Also, the post breaks a lot of myths when it comes to optimizing the speed. Do not disable services based on recommendations, it’s best to understand what Windows offers as a solution.
Leave a Reply