When we insert a header or a footer on any page in a Word document, it automatically appears on all the pages. But sometimes, we need to insert headers and footers to some specific pages except the entire Word document. This tutorial will show you how to insert Headers and Footers on specific pages in Microsoft Word.

How do you put a Header on only certain pages in Word?
To insert a Header on only a certain page, say page 7 in Word, first, you have to insert a Next Page Section Break to the end of its previous page, page 6, and its next page, page 8. After that, insert your Header on the targeted page (page 7) and deselect the Link to Previous option. Now, delete the Header from the previous page (page 6) and the next page (page 8). This will put the Header on only the specific page. We have explained the entire process in detail in this article.
How to put Headers and Footers on specific pages in Word
The steps to insert Headers and Footers to some specific pages in Microsoft Word are listed below:
- Launch Microsoft Word.
- Enable the Formatting Marks.
- Go to the page on which you want to insert Header or Footer.
- Insert a Section Break at the end of the page just before the targeted page.
- Insert Header and Footer on the targeted page.
- Unlink Header and Footer on the targeted page from the previous pages.
- Delete Header and Footer from the page just before the targeted page.
- Insert a Section Break at the end of the targeted page.
- Select Header and Footer on the page next to the targeted page and unlink them from the previous pages.
- Delete Header and Footer from the page next to the targeted page.
Let’s see all these steps in detail.
1] Launch Microsoft Word.

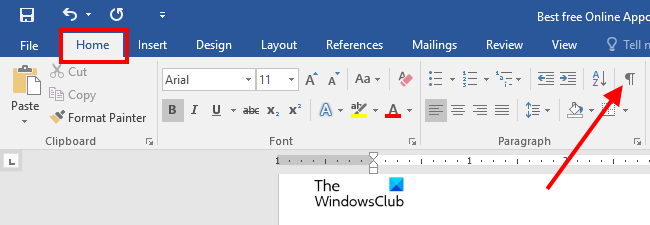
2] Select the Home tab and click on the Show/Hide Formatting Marks button to enable formatting marks (as shown in the above screenshot). The formatting marks will show you all the formatting that you do in your Word document. Hence, it will be helpful when you insert a Section Break.
3] Now, go to the page on which you want to insert Header and Footer, and add a Section Break to its previous page. Let’s say, if you want to insert the Header on page 5 in your document, you have to add Section Break on page number 4.

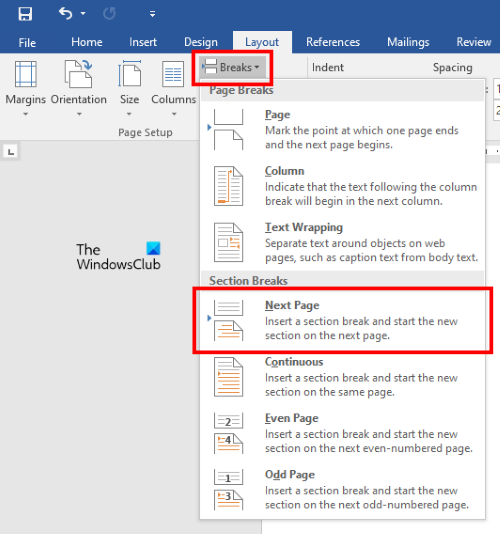
4] To add a Section Break, click at the end of that page (according to our example, it is page 4), and go to “Layout > Breaks > Section Break.” Now, select Next Page.
5] Now, go to the page where you want to insert a Header or a Footer. In the example that we have taken here, it is page 5. To insert Header and Footer, double-click at the top and bottom of that page respectively. Alternatively, you can insert the Header and the Footer from the Insert menu. Simply, go to the Insert menu and then click on the Header or the Footer drop-down menu to select the format of Header and Footer you want to insert into your document.

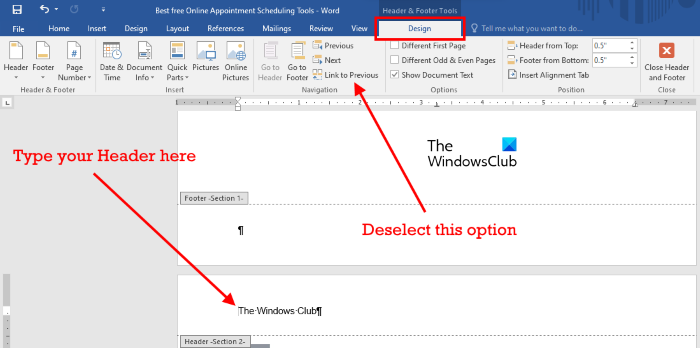
6] Type your Header and Footer on the targeted page. After that, click on the Design tab and deselect the Link to Previous option. When you are done, click on the Close Header and Footer button.
Read: How to use Header, Footer, and Footnote in Google Docs.
7] After inserting the Header and Footer, you will see that the Header and the Footer have automatically been added to all the pages in the document. To remove the Header and the Footer from all the previous pages, simply select them on the previous page (the page just before the targeted page), and press Delete. This will delete the Header and the Footer from all the pages before the targeted page.
8] To remove Header and Footer from the pages after the targeted page, add Section Break at the end of the targeted page. Let’s understand it with the help of the example that we have taken here. Our targeted page is 5. Therefore, to remove Header and Footer from all the pages after page 5, we have to insert the Section Break at the end of page 5.
To do this, go to “Layout > Breaks > Section Break” and select Next Page. Now, select Header and Footer on the page next to the targeted page (in our case, it is page 6) and deselect the Link to Previous option in the Design menu. After that, delete Header and Footer from the page next to the targeted page (page 6).
Now, your Header and Footer have successfully been inserted into a specific page in a Microsoft Word document. Save your document.
By following the above process, you can also add different Headers and Footers to different pages in a Word document.
How do I start a Header and a Footer on page 3 in Word?
To insert a Header and a Footer on page 3 in Word, first, you have to unlink the Header and Footer on page 3 from the previous pages (page 1 and page 2). For this, click at the end of page 2, go to “Layout > Breaks > Section Break,” and select Next Page. This will insert a Section Break after page 2. Now, insert Header and Footer on page 3. After that, click on the Design tab and then deselect the Link to Previous option.
Go to page 2 and delete Header and Footer from there. This will remove Header and Footer from the first two pages in your Word document.
I hope this helps.
Read next: How to add Header and Footer in Excel spreadsheet.