If when you try to join the Windows Insider Program, maybe after a fresh Windows installation or In anticipation of receiving newer Windows version Preview Builds and you get the message We aren’t able to talk to our service right now or at the moment when you click the Get started button on the Insider settings page on your Windows 11 or Windows 10 computer, then this post is intended to help you with suggestions that should resolve this issue for you on your system.
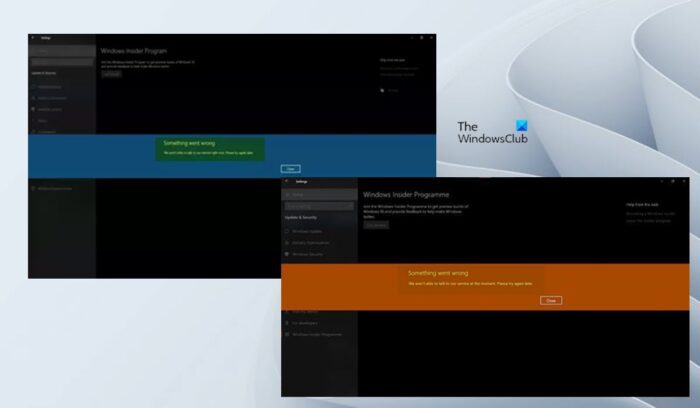
When this issue occurs on your device, you will get the Something went wrong error prompt stating either of the following messages;
- We aren’t able to talk to our service right now. Please try again later.
- We aren’t able to talk to our service at the moment. Please try again later.
Windows Insider – We aren’t able to talk to our service right now or at the moment
If when you try to join or rejoin the Windows Insider Program and you receive the notification stating We aren’t able to talk to our service right now OR at the moment on your Windows 11/10 device, then in no particular order, our suggestions outlined below should help you resolve the issue.
- Make sure Windows Insider Service is enabled
- Check your Hosts file and Adblocker (if applicable)
- Use the Insider Preview Build ISO
- Modify Windows Registry
- Reset PC
Let’s look at the description of the process as it relates to each of the listed solutions.
1] Make sure Windows Insider Service is enabled
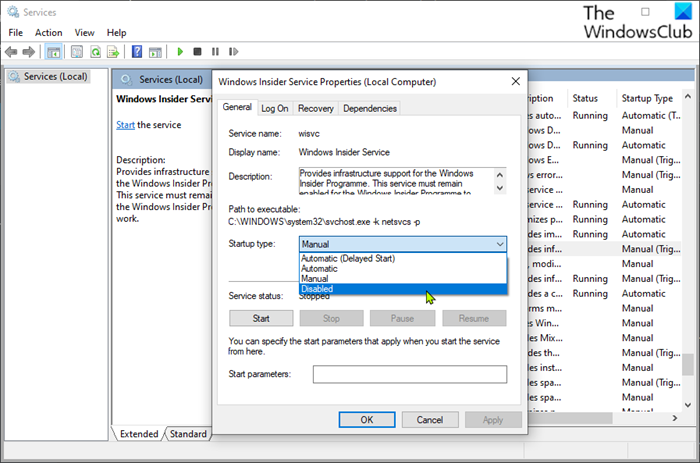
The Windows Insider Service (wisvc) provides infrastructure support for the Windows Insider Program. This service must remain enabled for the Windows Insider Program to work. So, your first attempt to troubleshoot the We aren’t able to talk to our service right now OR at the moment issue on your Windows 11/10 device is to make sure wisvc is enabled on your Windows 11/10 device. To perform this task, follow these steps:
- Press the Windows key + R to invoke the Run dialog.
- In the Run dialog box, type
services.mscand hit Enter to open Services. - In the Services window, scroll and locate the Windows Insider Service entry.
- Double-click on the entry to open its properties window.
- In the properties window, on the General tab, click the drop-down on Startup type and select Manual.
- Click Apply > OK to save changes.
Windows Insider Service is a Win32 service. By default, in Windows 11/10, the service only starts if the user, an application, or another service starts it (Manual Trigger Start). When wisvc is started, the service runs as LocalSystem in a shared process of svchost.exe along with other services. If Windows Insider Service fails to start, Windows will start up and notify the user that the wisvc service has failed to start due to the error. You can view the Event Log for the failure details. For the service dependencies, Windows Insider Service cannot be started under any conditions, if the Remote Procedure Call (RPC) service is disabled. In addition, the wisvc service uses the flightsettings.dll file that is located in the C:\Windows\system32 directory. If the file is removed or corrupted, the service will not start – you can replace this DLL file with a fresh copy available on Winbindex.
If you want to restore the default startup configuration of Windows Insider Service, first make sure that the RPC service is configured by default and functioning properly, then do the following:
- Invoke the Run dialog.
- In the Run dialog box, type
cmdand then press CTRL + SHIFT + ENTER to open Command Prompt in admin/elevated mode. - In the command prompt window, type or copy and paste the command below and hit Enter.
sc config wisvc start= demand
- Exit CMD prompt once the command executes.
- Restart the computer.
Read: How to disable Windows Insider Service on Windows 11/10
2] Check your Hosts file and Adblocker (if applicable)
From all indications, the error message in the highlight simply means the computer cannot access the service. Some affected users reported they were able to resolve this issue by checking their Hosts file at the location below which turned out to be blocking all kinds of ad and malware sites and quite possibly the service they’re trying to access and resetting the Hosts file back to default the problem went away.
C:\Windows\System32\drivers\etc\hosts
Some other users that had the same problem were able to resolve the issue and successfully join the Windows Insider Program after disabling Adblocker and rebooting Windows. If you use DNS-based ad blocking, you can simply switch the DNS (bypass the ad blocker) to resolve the issue at hand.
Read: SwitchHosts is a Hosts file switcher for changing Windows Hosts file easily
3] Use the Insider Preview Build ISO
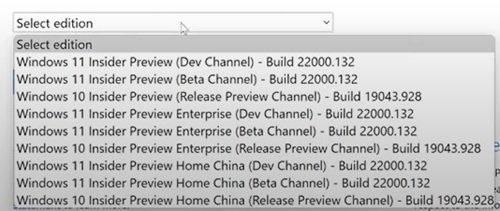
This solution requires you to head over to the official Windows Insider Preview page and sign in with your Microsoft account associated with the Insider program, then download the selected ISO for the build you want, mount the ISO, and run set up from there to perform an in-place upgrade of your existing Windows install, or create a bootable media to clean install the Windows Preview build.
Read: Fix Error Code 0x0 for Windows Insider Builds during the upgrade
4] Modify Windows Registry
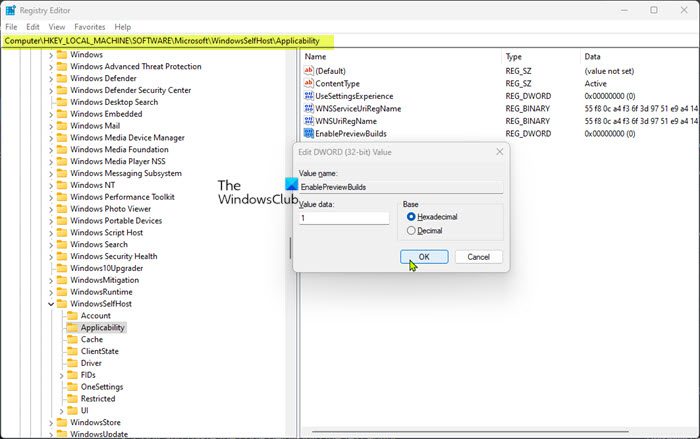
This solution requires you to modify and set the EnablePreviewBuilds registry key to value 1 (True). This setting will enable preview builds installation on the device. Users can download and install Windows preview builds on their devices by opting in through Settings > Update and Security > Windows Insider Program. Admins can also use other policies to manage flight settings on behalf of users when this value is set.
Since this is a registry operation, it is recommended that you back up the registry or create a system restore point as necessary precautionary measures. Once done, you can proceed as follows:
- Press the Windows key + R to invoke the Run dialog.
- In the Run dialog box, type regedit and hit Enter to open Registry Editor.
- Navigate or jump to the registry key path below:
HKEY_LOCAL_MACHINE\SOFTWARE\Microsoft\WindowsSelfHost\Applicability
- At the location, on the right pane, double-click the EnablePreviewBuilds entry to edit its properties.
If the key is not present, right-click on the blank space on the right pane and then select New > DWORD (32-bit) Value to create the registry key, and then rename the key accordingly and hit Enter.
- Double-click on the new entry to edit its properties.
- Input 1 in the Value data field.
- Click OK or hit Enter to save the change.
- Exit Registry Editor.
- Restart your PC.
Read: How to search Windows Registry Keys, Values, and Settings
Alternatively, you can set the EnablePreviewBuilds key to the value of 1 in the registry using a REG file. Here’s how:
- Press the Windows key + R to invoke the Run dialog.
- In the Run dialog box, type notepad and hit Enter to open Notepad.
- Copy and paste the code below into the text editor.
Windows Registry Editor Version 5.00

[HKEY_LOCAL_MACHINE\SOFTWARE\Microsoft\WindowsSelfHost\Applicability]"EnablePreviewBuilds"=dword:00000001
- Now, click the File option from the menu and select Save As button.
- Choose a location (preferably desktop) where you want to save the file.
- Enter a name with .reg extension (eg; SetEPBs1.reg).
- Choose All Files from the Save as type drop-down list.
- Double-click the saved .reg file to merge it.
- If prompted, click on Run > Yes (UAC) > Yes > OK to approve the merge.
- You can now delete the .reg file if you like.
- Restart PC.
Read: How to Compare or Merge Registry files using Regdiff
Similarly, you can achieve the same outcome by editing the registry using Command Prompt. Here’s how:
- Press the Windows key + R to invoke the Run dialog.
- In the Run dialog box, type cmd and then press CTRL + SHIFT + ENTER to open Command Prompt in admin/elevated mode.
- In the command prompt window, copy and paste the command below and hit Enter:
reg.exe Add "HKLM\SOFTWARE\Microsoft\WindowsSelfHost\Applicability" /V "EnablePreviewBuilds" /T REG_DWORD /D "1"
- Exit CMD prompt once the command executes.
Read: How to restore the Registry using Command Prompt in Windows
5] Reset PC
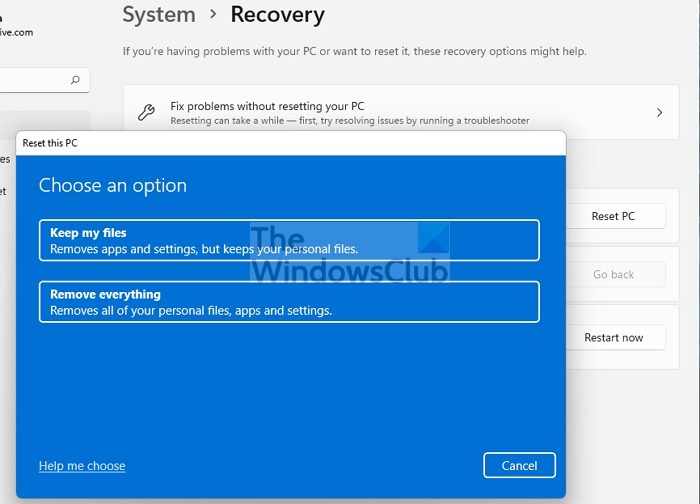
This is another viable solution that resolved the issue for some affected PC users. They reported that the Get Started button worked after performing a PC reset with the option to Keep my files. After the reset procedure, they were able to choose the preferred channel on their device.
Read: How to reset Windows without using the Settings app
I hope this post helps you!
Also read:
- Get started button greyed out; Cannot get Windows Insider Preview Builds
- Your Microsoft account requires attention to get Insider Preview builds
How do I fix Windows Insider problem?
To fix Windows Insider problems on your computer to a large extent depends on the nature of the problems you’re having. However, you can stop getting preview builds on your device. Go to Settings > Update & Security > Windows Insider Program > Stop Insider Preview Builds to see your options. If you’re in the Beta Channel or the Release Preview Channel, you can flip the switch to stop getting preview builds on your device when the next major release of Windows launches to the public.
Read: How to join Windows Insider Program without a Microsoft Account
How do I force Windows Insider Update?
On your device, navigate to Settings > Update & Security > Windows Insider Program. Set it to the Dev Channel. Now, navigate to Settings > Update & Security > Windows Update to check for the latest update, and update your device to the latest build available in the Dev Channel.
Read: Can’t switch Windows Insider Channel on Windows 11 – Dev or Beta.
Leave a Reply