This post will interest businesses, organizations, and enterprises with Volume License (VL) subscriptions, who are migrating from Windows Pro or Enterprise. In this post, we will illustrate how to install and activate Windows Extended Security Update (ESU) keys on multiple devices that are part of an on-premises Active Directory domain using a Multiple Activation Key (MAK).
Install & activate Windows ESU keys on multiple devices
To begin, you’ll need to download the Activate-ProductOnline.ps1 script and save it to a local folder. This script will install and activate the ESU product key.
The Activate-ProductOnline.ps1 script requires that Windows devices have Internet access for online activation. If you need to install ESU on isolated Windows devices or have restricted internet access, the ActivationWs project supports activation of Windows devices by using a proxy to communicate with the Microsoft BatchActivation Service. The ActivationWS project includes a PowerShell script (Activate-Product.ps1) compatible with the steps described in this post.
The basic logic for the script is as follows:
- Accept and validate required ProductKey and optional LogFile parameters.
- Exit if the product key is already installed and activated.
- Install the product key.
- Activate the product key.
- Produce a log file with default location: $env:TEMP\Activate-ProductOnline.log.
Next, you should ensure that all of the prerequisites are installed. The ESU key for Windows will not install properly if the prerequisites are missing. If the Software Licensing Service reports error 0xC004F050 when installing the ESU key, this indicates that either the prerequisites have not been installed, or the updates are being applied to the wrong operating system. The best way to resolve this is to ensure that you are applying the ESU key to Windows Pro, Enterprise, or Ultimate and reinstall each of the prerequisites individually.
After you have completed the pre-installation checks outlined above, you can now proceed to create a WMI-filtered Group Policy Object that will run the Activate-ProductOnline.ps1 on the Windows domain-joined devices.
Here’s how, says Microsoft:
To create a new GPO, and link it to the directory location holding the Windows devices in scope for the ESUs, do the following:
- On a domain controller or workstation with Group Policy Management tools installed, Select Start and type Group Policy and select Group Policy Management.
- Expand the forest and domain nodes to expose the appropriate OU or Container that contains Windows devices.
- Right-click the Organizational Unit (OU) or Container.
- Select Create a GPO in the domain.
- Name it Windows7_ESU.
- Click OK.
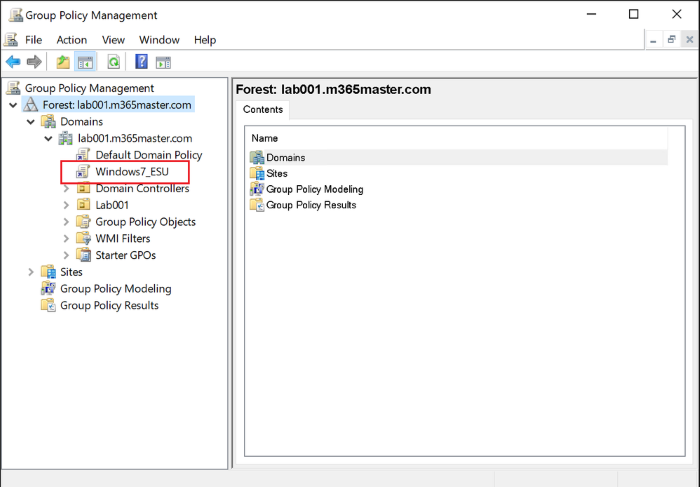
- Right-click the new GPO and select Edit to open the Group Policy Management Editor.
- Under Computer Configuration, expand Policies, then expand Windows Settings. Select Scripts (Startup/Shutdown).
- Double-click Startup in the right side of the pane and click the PowerShell Scripts tab.
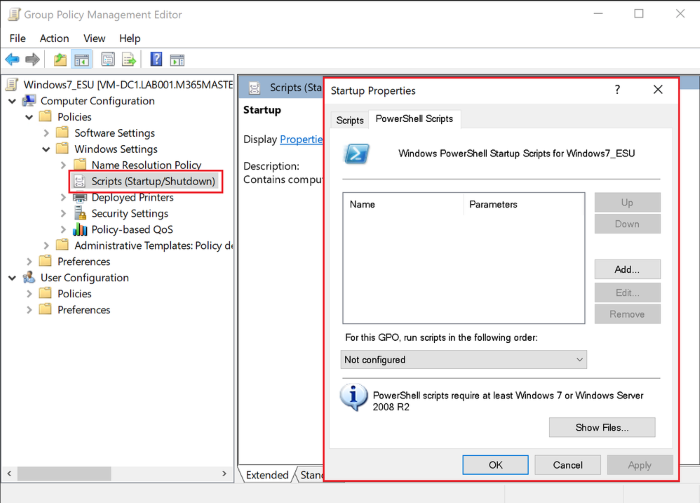
- Select Add to open the Add a Script dialog, and then select Browse.
The Browse button opens a Windows Explorer window Startup script folder for the Group Policy Object you created.
- Drag the Activate-ProductOnline.ps1 script into the Startup folder.
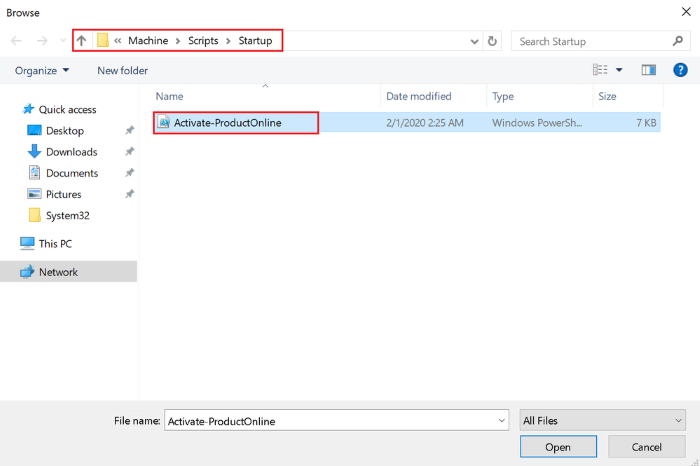
- Select the Activate-ProductOnline.ps1 you just copied and select Open.
- Ensure Activate-ProductOnline.ps1 is specified in the Script Name field and enter the parameter -ProductKey followed by your ESU MAK key.
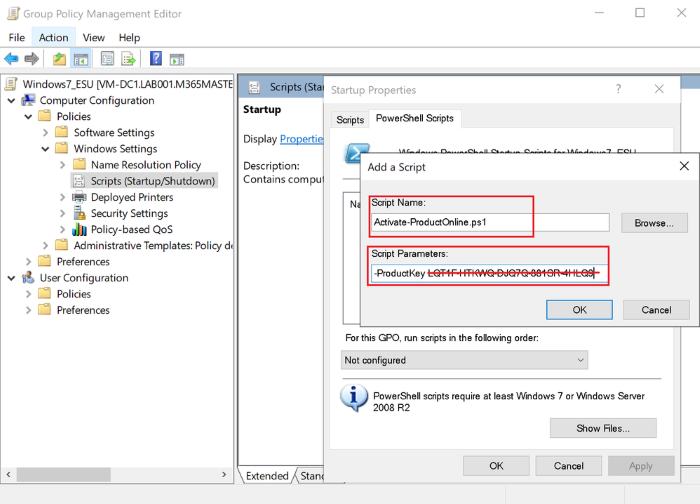
Select OK to close the Add A Script Dialog, select OK to close Startup Properties, then close Group Policy Management Editor.
In the Group Policy Management Console, right-click the WMI Filters node and select New to open the New WMI filter dialog.
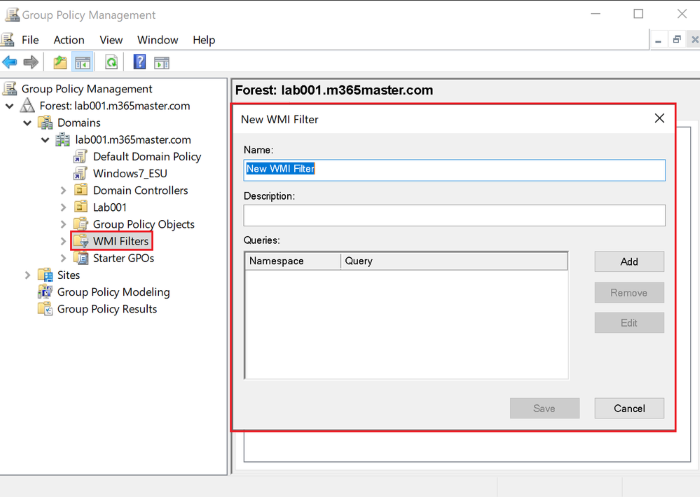
- Give the new WMI Filter a meaningful name and select Add to open the WMI Query dialog.
- Use the WMI Query Select Version from Win32_OperatingSystem WHERE Version like “6.1%” AND ProductType=”1″.
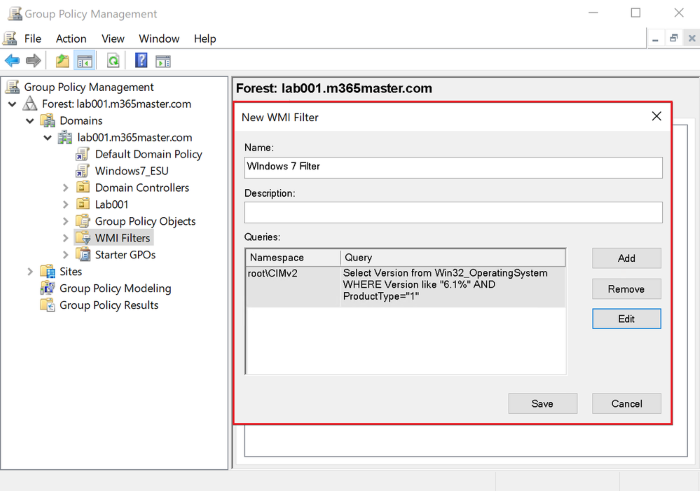
- Select OK to close the WMI Query dialog and then select Save.
- In the Group Policy Management Console, select the new GPO. In the WMI Filtering section, choose the WMI Filter you just created.
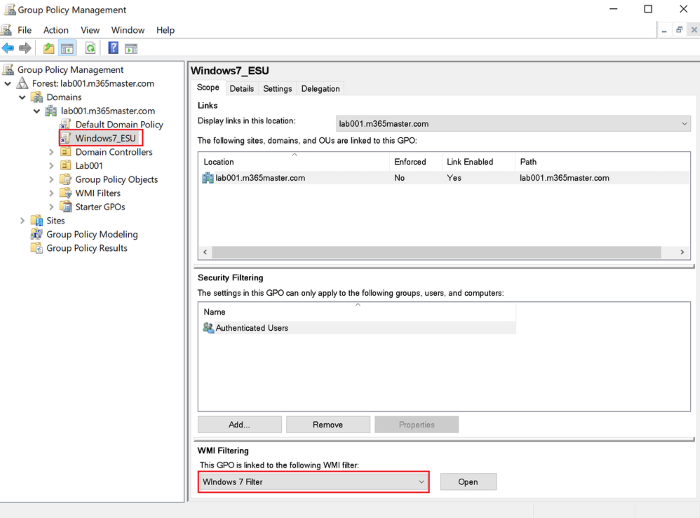
Now that you have completed the steps outlined above, you’ll need to verify that the ESU PKID is installed and activated.
To verify that the process has been successful, do the following:
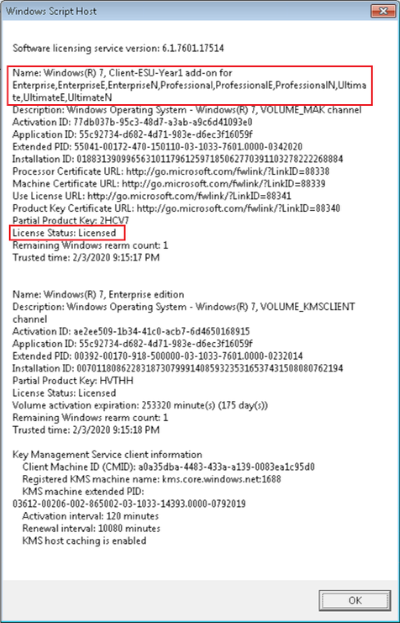
On a Windows computer in the scope of the GPO, run the command below from an elevated command prompt.
slmgr /dlv
Now verify the software licensing information for the Windows Client-ESU add-on and ensure that the License Status is Licensed as shown in the image below:
Note: It may take up to 45 minutes for the new policy to synchronize to all domain controllers in your site (longer for remote domain controllers, depending on the synchronization schedule). Once completed, reboot your Windows devices, forcing a Group Policy update and allowing the Startup scripts to run. The script will create a log file to be examined for additional verification. By default, the log file will be named Activate-ProductOnline.txt and located in the system TEMP directory C:\Windows\Temp.
If you receive an activation error, refer to our Activation troubleshooting guide.
Finally, if you cannot install the ESU key after verifying the operating system and verifying prerequisites, contact Microsoft Support.
That’s it! I hope IT admins will find this post useful.
Leave a Reply