A Windows Server Failover Cluster (WSFC) is a group of independent servers collaborating to enhance the availability and reliability of applications and services. If you are an IT admin or an aspirant, you should know how to configure it. So, in this post, we will discuss how to install and configure Failover Cluster in Windows Server.
Install and configure Failover Cluster in Windows Server
Failover Cluster holds utmost importance in a production environment. If you have configured WSFC in the environment, and for some reason, a node goes down, there will be a backup node ready to take up the load. So, let’s say we have a small environment containing a few nodes, if Node 1 goes down, the failover clustering will detect, and then change the state of Node 2 from passive to active.
If you want to install and configure the Failover Cluster in Windows Server, follow the steps below.
- Install Failover Cluster Feature
- Install File and Storage Service on the Storage Server
- Enable iSCSI Initiator
- Configure the Storage Server
- Configure Failover Cluster
Let us talk about them in detail.
1] Install Failover Cluster Feature
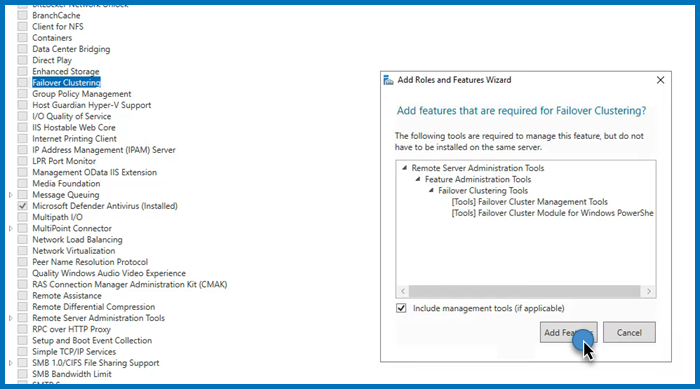
First of all, we need to install the Failover Cluster feature on every single node attached to your domain controller. If you have a way to deploy this feature to all the connected nodes, we recommend you use it, but if you don’t have a really large network, installing manually will not take a lot of time. To do so, follow the steps mentioned below.
- Open the Server Manager.
- Now, click on Add roles and features.
- Click on Next, make sure to select Role-based or feature-based installation, and click on Next.
- Now, keep clicking on Next until you reach the Features tab, look for the Failover cluster, and tick it.
- A pop will appear asking you to click on Add features, do that, and follow the on-screen instructions to complete the installation process.
As mentioned, you must install this feature on all the nodes you want to be part of the failover cluster environment.
2] Install File and Storage Services on the Storage Server
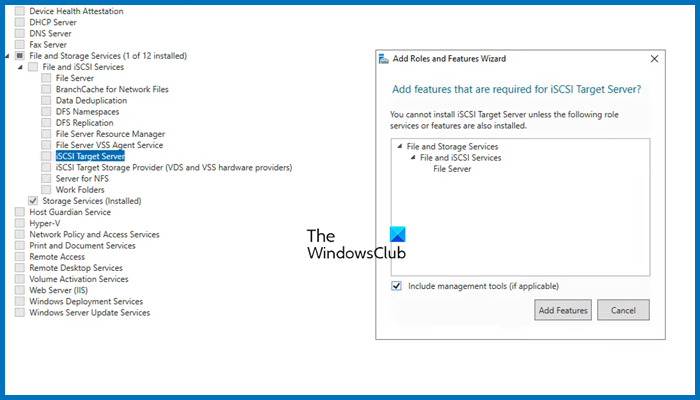
Next, we need to configure the storage that both these servers will be using. That storage server may or may not be a member of the domain, as everything is IP-based. Follow the steps mentioned below to install the File and Storage services for them.
- Open Server Manager.
- Go to Add roles and features.
- Click on Next until you reach the Server Roles tab, expand File and Storage services, look for iSCSI Target Server, tick it, and then and then install it.
Wait for it to complete the installation process. Since we will have only one storage server, you need to install it on a single computer.
3] Enable iSCSI Intiator
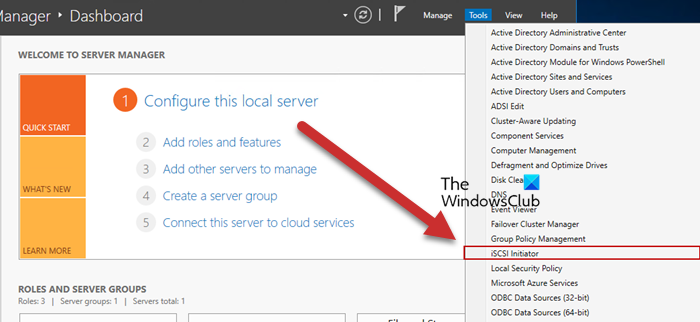
Now, we need to go back to the Failover Cluster nodes and then enable ISCSI Initiator. To do so, click on Tools > iSCSI Initiator in the node server, and then click Yes when prompted to enable the feature. You have to do this to all the servers attached to the node.
Read: How to install and use iSCSI Target to configure Storage Server
4] Configure the Storage Server
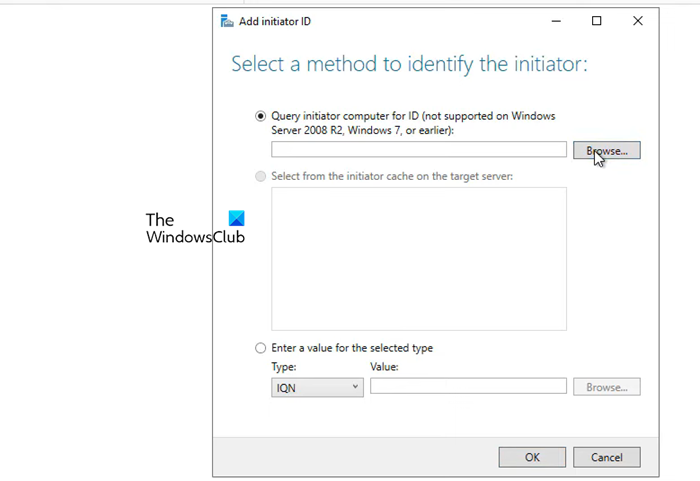
We enabled iSCSI Initiator on the node servers to make them accessible to the storage server. Now that we are done with that part, let’s add the nodes to the Storage Server. Follow the steps mentioned below to do so.
- Go to Server Manager > File and Storage Services.
- Click on iSCSI tab.
- Click on Tasks > New iSCSI Virtual disk.
- We can either select a hard drive or just a folder in the server, to do so, click on Type a custom path, then click on Browse, and select either the volume, an existing folder, or create a new folder.
- Click on Next, the virtual disk name, and click on Next.
- Select the size of the disk; Fixed is quicker but Dynamic gives you the flexibility of increasing the size when needed.
- Click on Next, give the target a name, and click on Next.
- When you reach the Access Server tab, click on Add.
- Make sure that the Query initiator computer for ID option is checked and click on Browse.
- Enter the name of the node computer and then click on Check names. Add all the nodes of your environment similarly.
- Click on Next.
- Enable CHAP if you want to add authentication between devices.
- Finally, create the connection.
This will create a storage environment consisting of the two nodes.
5] Connect nodes from the initiator back to the target
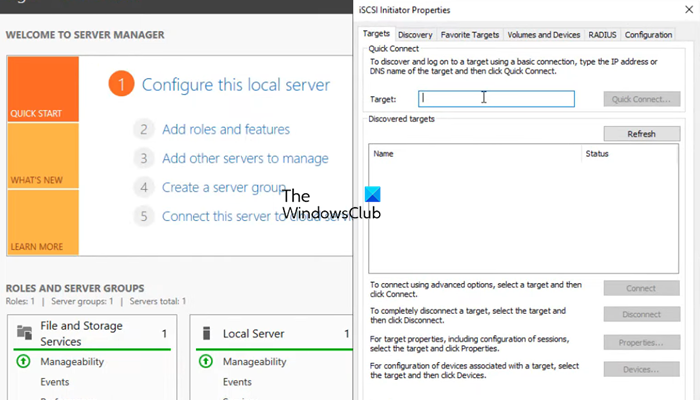
After configuring the storage environment, we can set the target for the initiator. Follow the steps mentioned below to do the same.
- Open Server Manager on the node computer.
- Go to Tools > iSCSI Initiator.
- In the Target field, enter the IP address of the iSCSI Target.
- Click on Quick connect > Ok.
You can go to the Discover tab to see the connection, then go to Volumes and Devices, and see if you can find the volume under the Volume list, if it’s not there, click on Auto Configure.
6] Configure Failover Cluster

Now that we have storage ready, we can just create a cluster and add the two nodes. Follow the steps mentioned below to do the same.
- Open the Server Manager.
- Click on Tools > Failover Cluster Manager.
- This will launch the Failover Cluster Manager utility, so, right-click on the Failover Cluster Manager tab, and click on Create Cluster.
- In the Create cluster wizard, click on Next.
- In the Select Server tab, enter the name of the server and click on Add. You can also browse if you want.
- Run the validation test, once done, click on Next.
- Give the cluster a name and an IP address not currently used. Click Next.
- Finally, click on Next and wait for the cluster creation to complete.
Then, in the upper left-hand corner, you will see that the cluster has been created. To access it, just click on it. Now, you can add roles and storage and make all the required configurations to the cluster.
That’s it!
Read: How to install and configure DNS on Windows Server
How to install Failover Cluster in Windows?
You need to use the Server Manager to install the failover cluster feature in Windows Server. In the Server Manager, go to Add roles and features, and then install the Failover Cluster from the Features tab. For more details, check out the guide above.
Read: How to set up an FTP Server on Windows 11
How to configure Failover Cluster in Windows Server?
To configure failover cluster in Windows Server, you need first install the Failover Cluster feature, configure Storage, create a cluster, and then add the servers. To know more, check out the guide mentioned in this post.
Also Read: Best free Encrypted Cloud Storage Services.