MultiPoint Services (MPS) lets several users share one computer at the same time. Each user has their own independent Windows experience. Users can connect to the MPS server with low-cost devices like USBs, video cards, or a local area network (LAN). This system is useful in schools, training centers, businesses with limited funds, and corporate meeting rooms. In this post, we will see how you can install and configure MultiPoint Service on Windows Server.
What is Windows MultiPoint Services?
Windows MultiPoint Service or MPS allows one to share a computer with various other with their own independent Windows experience. If you are setting up a school environment, a small business, or any organization that doesn’t require you to use a lot of resources, you can set up MPS, every user will have their own session, run separate applications, and configure settings as per their preferences.
Install and configure MultiPoint Service on Windows Server
To install and configure MultiPoint Service on Windows Server, you need to follow the steps mentioned below.
- Install MultiPoint Service
- Configure MutliPoint Service
- Use MutliPoint Service
Let us talk about them in detail.
1] Install MultiPoint Service

The MultiPoint Service is not preinstalled on Windows Server. One needs to install its role along with all the related features. To do the same, you can follow the steps mentioned below.
- In Windows Server, open the Server Manager.
- Click on Add roles and features.
- This will open the Add Roles and Features Wizard, you need to click on Next.
- In the Installation Type, select Role-based or feature-based installation, and click on Next.
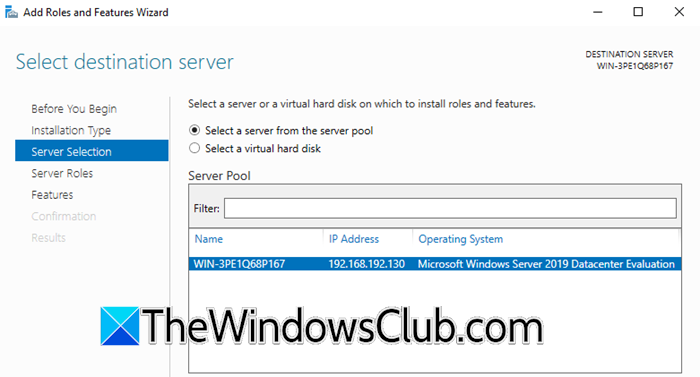
- Again click on Next keeping the default option selected in Server Selection tab (make changes if your environment needs it).

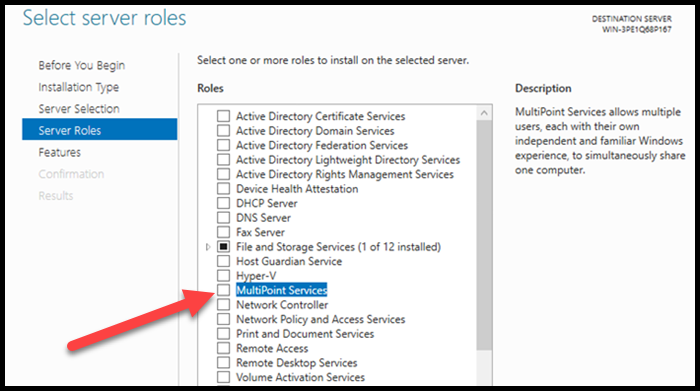
- When you are on the Server Roles tab, tick MultiPoint Services, and then click on Install.
Note: If you can’t find the MultiPoint Services role, install the Remote Access, and Remote Desktop Services role, along with the MultiPoint Connector feature) - You will get the option to install all the features along with the role, so, just install them when prompted.
- Once you click on Next, you will get to a lot about MPS. The thing to note here is that to use the MultiPoint Service, the Remote Desktop Licensing needs to be activated or you can use the trial period (120 days).
- When we are at Print Document Services > Role Services, make changes as per your choice; you can read the details about all the options mentioned there.
- A Print Server is necessary for managing multiple printers efficiently.
- The Distributed Scan Server allows you to manage and share network scanners that support Distributed Scan Management.
- Internet Printing creates a website where users can manage their print jobs on the server. If you have installed the Internet Printing client on your workstations, you can connect to and print from shared printers using a web browser and the Internet Printing Protocol.
- The LPD service, or Line Printer Daemon Service, enables UNIX-based computers to print to shared printers on the MPS (Multi-Printer Server) using the Line Printer Remote service.
- When you reach Remote Desktop Service > Role Services, enable Remote Desktop Licensing and Remote Desktop Session Host, and click Next.
- Tick Click at Restart the destination server automatically if required and then click on Next.
- Finally, complete the setup.
That’s how you can install MutliPoint Service along with other related features. You will have to reboot your server in order to apply the changes.
2] Configure MultiPoint Service

Once done, let’s see how to configure it now. To do so, follow the steps mentioned below.
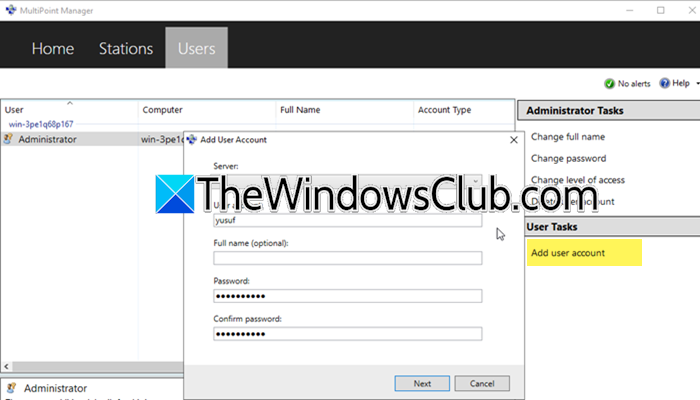
- Once your computer starts, you need to open the MultiPoint Manager by searching it out of the Start Menu.
- Now, you can add a MulitPoint Server or a personal computer.
- Go to the Users tab, and click on Add user account.
- Now, enter the required details and click on Next.
- Select the user type. We will go with the Standard user, but you can select as per your organization’s requirements.
- Click on Next.
Once you get a confirmation message, you can rest assured that the feature is installed on your system.
Read: How to delete Windows Server Backup Copies?
3] Use MultiPoint Service
When a user first logs into MultiPoint Services, they receive a privacy notification stating To assist you with your usage of this computer, your activities may be monitored by your system administrator. To proceed, click on “Accept and continue using this computer,” and then return to the MPS server.
Run the MultiPoint Dashboard on the MPS server. It will display screens from user stations, allowing you to monitor activity, block desktops, send messages, take control of sessions, and manage USB storage or web access on selected desktops.
Hopefully, this guide has given you an idea of how to configure and use MultiPoint Service on Windows Server.
Read: How to Configure Data Deduplication on Windows Server.
How to setup a Windows MultiPoint server?
To set up Windows MultiPoint service, you must first install the related role from Windows Server Manager and the required features. Once you’ve done this, you can create the user and add the server by following the guide mentioned earlier in this post.
Leave a Reply