Windows Deployment Service (WDS) is a powerful tool that allows network-based installation of Windows OS to computers without needing physical media. This guide will walk us through installing and configuring WDS on a Windows server, ensuring efficient and streamlined OS deployment across the network.
How to install and configure Windows Deployment Services?
If you want to learn how to install and configure Windows Deployment services on a Windows server, refer to the guide below:
- Ensure the prerequisites are satisfied
- Install the Windows Deployment Services Role
- Configure Windows Deployment services
- Add boot and install images
- Add a boot image to the WDS server
- Add the Install image to the server
Let’s get started with this guide.
1] Ensure the prerequisites are satisfied
Before installing and configuring Windows Deployment Service, it is necessary to verify that the prerequisites are met. Failure to do so can lead to issues during the installation or operation of WDS.
- Active Directory (AD): The server must be a domain controller or member.
- DHCP: WDS relies on DHCP to provide PXE (Preboot Execution Environment) booting capabilities to client computers.
- DNS: Domain Name System must be configured and operational.
- NTFS Partition: The WDS server requires an NTFS partition for the image.
After verifying that prerequisites are in place, the next step is to install the Windows Deployment Services Role.
2] Install the Windows Deployment Services Role
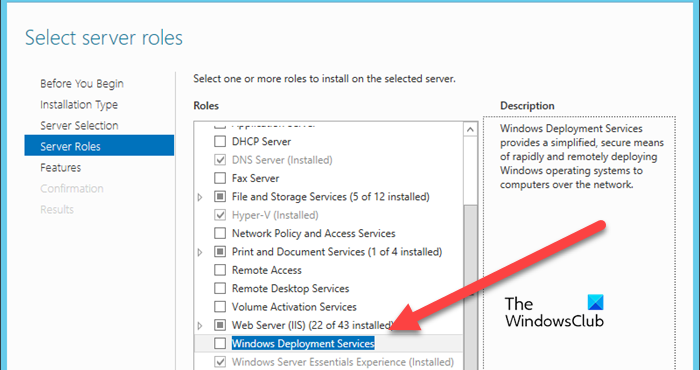
After verifying the prerequisites, the first step in setting up Windows Deployment Service is to install the WDS role. This role enables the server to deploy the Windows operating system to the client computer via a network-based installation.
- Launch Server Manager, go to the Manager Tab, select Add Roles and Features, and hit the Next button.
- In the Select Installation Type window, select the Role-based or feature-based installation option, and click the Next button.
- Select the server where WDS Roles will be installed, so click on Select a server from the server pole, and then hit the Next button.
- The next step is to select server roles, so, tick the Windows Deployment Services followed by clicking the Next button.
- In the Feature window, click the Add Features button, followed by Next.
- The Role services window wizard will appear on the screen. By default, both the Deployment Server and Transport Server boxes will be ticked.
Lastly, click the Installation button, follow all the prompts, and then click the Close button.
3] Configure Windows Deployment Services
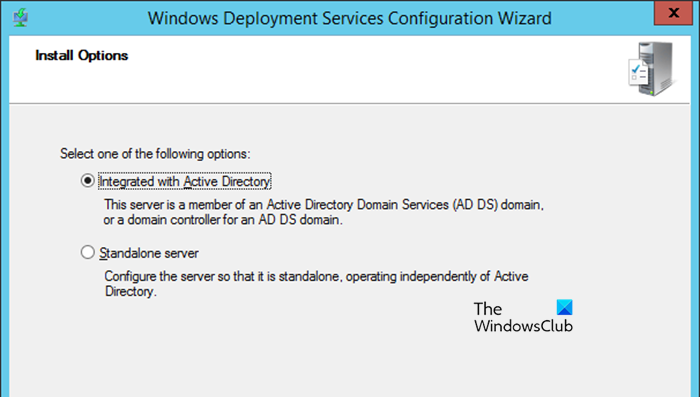
After installing the WDS Roles, the next step is to configure them. Configuring WDS involves specifying where WDS stores its files, setting up the PXE boots option, and configuring how the server responds to clients’ requests.
- Launch Server Manager, go to the Tools tab, and click on Windows Deployment Services.
- In the Windows Deployment Services window, expand the Server option, and then right-click on the server.
- Select the Configure Server option, and hit the Next button when Windows Deployment Services Configuration Wizard pops up on the screen.
- In the Install options window, choose to either integrate WDS with Active Directory or configure it in Standalone mode (for non-domain environment), but we are going to select the former for now. Click the Next button after each step.
- Enter the path to the Remote installed folder location > Next > Yes.
- In the PXE Server Initial Setting, choose one option and click Next.
WDS Configuration will take some time, so wait for it to finish. Once done, uncheck the Add Images to the Server Now option and select Finish.
4] Add boot and install images
Boot and Install images are essential components. One is responsible for booting client machines into a pre-installed environment, while the latter contains the OS files that will be installed on client machines.
- Insert the Windows installation media into the server’s optical drive or mount the Windows Installation ISO File if you use an image. Alternatively, users can use a bootable USB drive containing the Windows installation file. You need to copy the Boot.win file from the Source folder to the WDS Server.
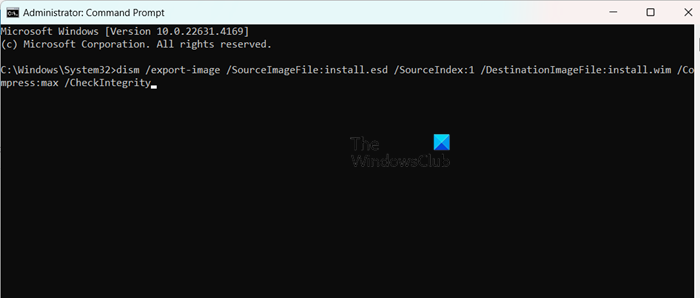
- Now, convert install.ESD (in Windows Installation Media) to install.WIM. You can use the DISM command to do this. Open the Command Prompt as an admin and then run the following commands.
- Navigate to the directory containing install.esd using ‘cd’ command.
cd c:/filepath
- Run the following command to list available images and their index numbers.
dism /Get-WimInfo /WimFile:install.esd
- Convert the install.esd to install.wim by using the dism /export-image command to convert the file. Replace SourceIndex with the index number of the image you want to export (e.g., 1, 2, etc.):
dism /export-image /SourceImageFile:install.esd /SourceIndex:1 /DestinationImageFile:install.wim /Compress:max /CheckIntegrity
Now, you will see install.win file created in the destination folder.
5] Add a boot image to the WDS server
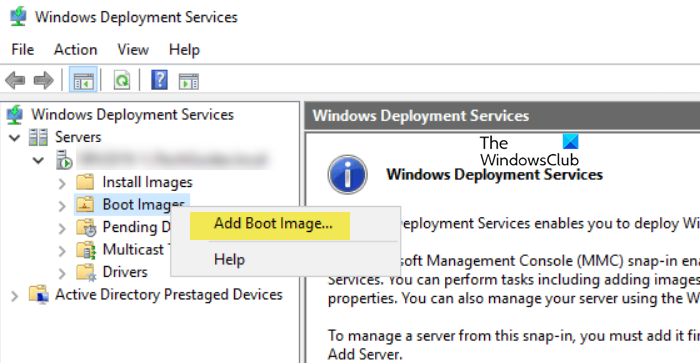
After preparing the boot.wim file, the next step is to add it to the Windows Deployment Services server. The boot image is essential for booting the client into Windows PE, where the installation process begins. Here’s how to do the same:
- Launch the Windows Deployment Services console, expand the Servers section, and then expand the name of the WDS server.
- To add a boot image, right-click on Boot images, and then select Add Boot Image.
- In the Image File field, click Browse to navigate to the location where Boot.wim is installed, select it, and hit the Open option.
- After selecting the Boot.wim file, customize the Image name to something descriptive as this will be the identifier later when selecting it during PXE boot on client machines.
- Click Next for each window to begin adding the boot image WDS server.
Once the boot image has been installed successfully, click the Finish button. The boot image is now configured in WDS that will be used to boot client machines into Windows PE when they boot from the network.
6] Add the install image to the server
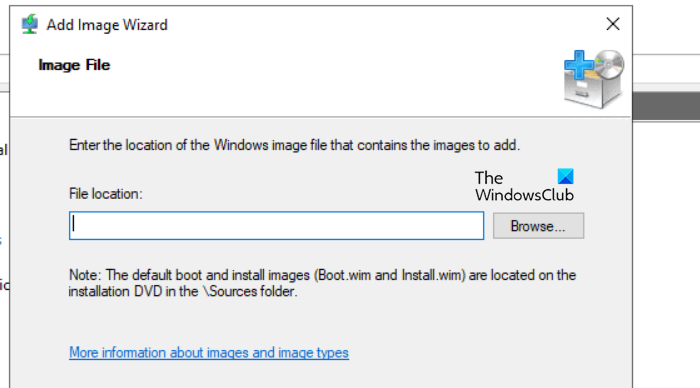
After the boot image, users now need to add an Install image. The install image is what contains the actual operating system that will be deployed to client machines. This image usually comes from the install.wim file we prepared earlier.
- Launch the Windows Deployment Services console, and expand the Server node and then the WDS server.
- Right-click on Install Image, select Add Install Image, and for the first time adding an install image, users must create a new image group. Alternatively, pick one from the Select an existing image group drop-down menu if an image group already exists.
- Once done, select the Finish and Next buttons. After creating the image group, click on Browse to navigate to the location where install.wim file is installed, select it, and hit the Open option.
- After selecting the Install.wim file, customize the Image name to something descriptive as this will be the identifier later when selecting it during PXE boot on client machines.
- Click Next for each window to begin adding the boot image WDS server.
Wait for the images to be imported. Depending on the size of the install,wim file, this process might take a few minutes. When the process completes, click Finish. The install image will now appear under the Install images node in the WDS console.
That’s it!
Also Read: How to install and configure File Server on Windows Server.
How to install Windows Deployment Service?
The Windows Deployment Service is a role that you can install from the Server Manager. You can open the Server Manager, go to Add roles and features, look for Windows Deployment Service, and then install it by following the above guide.
Read: How to configure Secured-core Server for Windows Server?
How to install and configure RSAT?
You can install RSAT features from Windows Settings. Open Settings by Win + I and go to System > Optional features. Click on View features placed next to Add an optional feature, search for RSAT, and install it.
Also Read: Windows deployment services encountered an error 0xc0000023.
Leave a Reply