Installing Oracle Linux on Oracle VirtualBox is a straightforward process that allows users to run a powerful and secure Operating System within a Virtual environment. In this article, we will learn how to install Oracle Linux on Oracle VirtualBox.
How to install Oracle Linux on Oracle VirtualBox?
To install and configure Oracle Linux on Oracle VirtualBox, execute the steps mentioned below.
- Download Oracle VirtualBox and Linux ISO Image
- Create a new Virtual machine and attach the ISO file
- Launch the new VM, and configure installation options
Let us get started with the guide and talk about them in detail.
1] Download Oracle VirtualBox and Linux ISO Image

To ensure a smooth installation of Oracle Linux on Oracle Virtualbox, users must ensure that the system has sufficient resources, including at least 40 GB free for the VM and at least 4GM RAM. If VirtualBox is not installed, navigate to virtualbox.org and follow the onscreen prompts to install it.
Now that we have installed Oracle VirtualBox, the next step is downloading the Oracle Linux ISO file. However, ensure steady Internet speed before proceeding. Head to the Oracle Linux download page at yum.oracle.com and download the latest Installer ISO file. Wait for the process to complete, and once done, proceed to the next step.
2] Create and configure a new Virtual Machine

After we have installed the Oracle VirtualBox and Linux ISO file, the next step is to create a new VM where we will install the OS. Follow the steps mentioned below to do so.
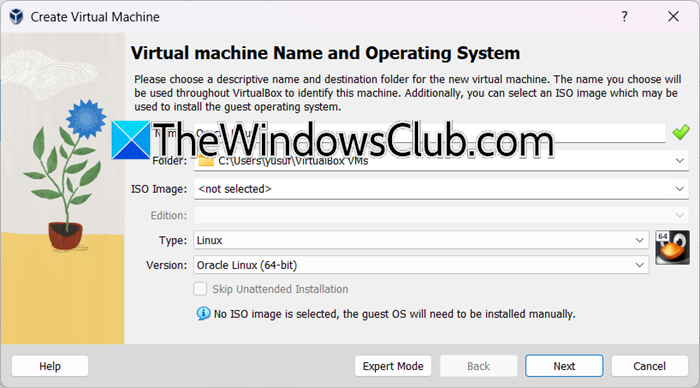
- Launch Oracle VirtualBox, and click on the New button.
- Enter a name for the VM, add the location where the VM will be stored keeping in mind to locate a disk with enough space, and then select Linux and Oracle (64-bit) in the Type and Version drop-down menu respectively.
- Next, allocate memory (RAM) to the VM, and in the hard disk section, choose VDI(VirtualBox Disk Image), and click Next.
- Now either select the Dynamically allocated option or Fixed size option accordingly, and set the bar to at least 40-60GBs in the File Location and Size window and hit the Create button.
And that’s how the Virtual Machine is created.

The next step is to attach the Oracle Linux ISO file, and here’s how to do it
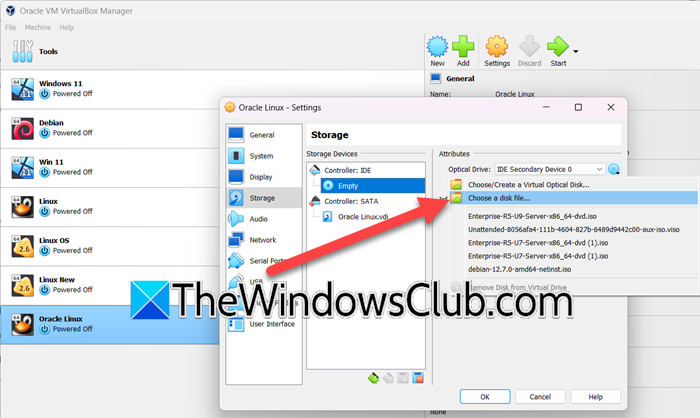
- Once the Virtual Machine is created, click on it and select Settings.
- Navigate to the Storage tab, click on the Empty CD/DVD option, and then click on the disk icon next to the Optical Drive to add a disk file.
- Browse and select the location where the Oracle Linux ISO file is stored, and hit the OK button to save the settings.
This will successfully create a virtual machine and attach the ISO file with it.
3] Launch the new VM, and configure installation options

Now, let’s go ahead and install Oracle Linux on the machine.
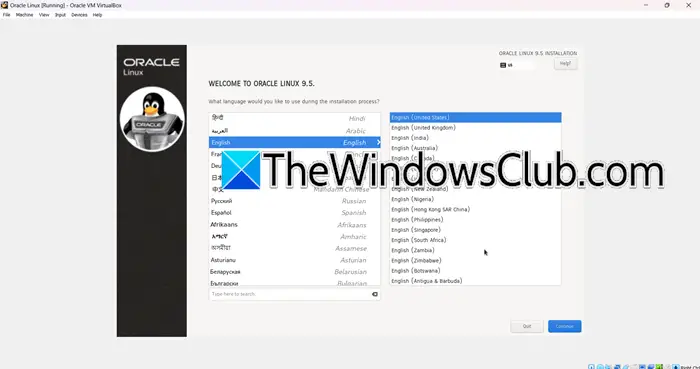
- Click on the Start button to boot up the Virtual Machine. The Oracle Linux boot screen will appear.
- Click on Install Oracle Linux version.x (this will have the version information) to start the Oracle Linux 8.x. installation, then select the installation language, and the Continue button to proceed with the installation.
- Click on the Keyboard, select the preferred layout, and click on the Installation Destination, then select the hard disk we created earlier. Now, navigate to the Software Selection, click on the Server with GUI option, and tick the following options:
- Development Tools
- Graphical Administration Tools
- System Tools
- Next, click on the Root password, set a password for the root user, and hit the Done button. Once you’ve done this, go to the Network and Host link, enable the virtual Ethernet network card, enter a name for the computer, and hit the Done button.
- Set up the time and date, and then head to the User Creation link to create a user account for all the non-administrative tasks as the Root user is vulnerable and should not be accessed by everyone. Add in the username and password of your preference. Lastly, hit the Begin Installation button to set up the system.
The process may take some time depending on the system’s resources, and once the installation is complete, click on the Reboot button to apply all the changes. Once the system boots up, accept the license agreement and finish the setup. Enter the username and password to get started. on the Oracle Linux Virtual Machine.
Read: How to install Ubuntu in VirtualBox in Windows 11
How to install Linux on Oracle VirtualBox?
To install Linux on Oracle VirtualBox, download and install VirtualBox and a Linux ISO file, create a new Virtual Machine in the VirtualBox, and configure the resources. Lastly, attach the ISO file to the VM, restart it, and then follow the installation prompts and configure settings. Check out the article mentioned above to learn how to do it.
Read: How to run Hyper-V, VirtualBox and VMware on same computer
Is Oracle Linux free?
Yes, Oracle Linux is free to download, use, and distribute. However, access to Oracle’s support services, including patches, and technical assistance, requires a subscription. You can follow the link mentioned earlier to download Oracle Linux for free.
Also Read: Install Debian on VirtualBox in Windows 11.
Leave a Reply