If you want to experience the functionality of Raspberry Pi OS without the physical hardware, then what’s better than using it on VMware Workstation? This setup is perfect for testing, learning, or exploring the OS in a virtual environment. In this guide, we will walk through the step-by-step process of installing Raspberry Pi on VMware Workstation.
How to install Raspberry Pi on VMware Workstation?
If you want to install Raspberry Pi on a VMware Workstation, follow the steps mentioned below:
- Meet all the Prerequisites
- Install VMware Workstation and Raspberry Pi OS ISO file
- Create a new Virtual Machine
- Set up Raspberry Pi and configure the settings
Let us talk about the procedures in detail.
1] Meet all the prerequisites
Before proceeding, the initial step is to verify that the device fulfills all the necessary prerequisites. The requirement consists of a host system with at least 8 GB of RAM, a quad-core processor, and 500GB of available hard disk space. Once verified, the next step is to install the VMware Workstation and Raspberry Pi OS ISO file.
2] Install VMware Workstation and Raspberry Pi OS ISO file
The next step after verifying the prerequisites is to install both VMware Workstation and Raspberry ISO files on the host system. To download VMware Workstation, navigate to support.broadcom.com, and download the latest version from the list. Next, we need to install the Raspberry Pi ISO file, and for that navigate to download.raspberrypi.org, and download the Raspberry Pi Imager. While downloading the ISO file, ensure that it is stored in an easily accessible location.
3] Create a new Virtual Machine

After we have completed all the prerequisites, setting up the VMware Workstation and creating a new Virtual Machine is the next step. Follow the steps mentioned below to do the same:
- Launch VMware Workstation, and click on the Create a new Virtual Machine option.
- The new Virtual Machine Wizard will open up, select the Custom (Advanced) option, select the hardware (keep it default), click Next, and then in the Guest Operating system installation window, select the option “I will install the Operating System later“.
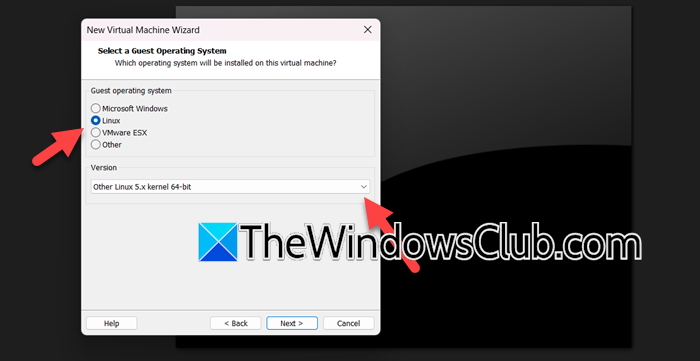
- On the next screen, tick the Linux box, click on the drop-down menu, and select the version (you can select Other Linux 5.x kernal 64-bit) . Enter a new name for the Virtual Machine, provide a location, and hit the Next button.
- In the Processor Configuration window, set the number of processors, cores for the Virtual Machine and the host system, and enough RAM to ensure fast speed. Hit the Next button after every step.

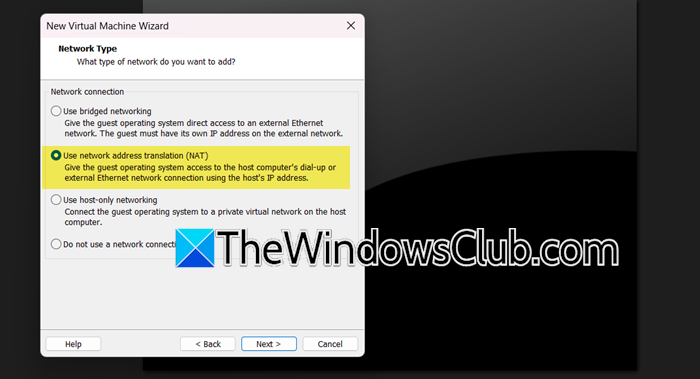
- In Network type, click on any of the options, here we are selecting the Use Network Adress Translation (NAT) option, click Next, and then click on LSI Logic for I/O controller Types option.
- Select a disk type, and then click on the Create a new virtual disk option > Next, and then set the maximum disk size. Click on the Split Virtual Disk into multiple Files option if you want to easily move the Virtual Machine to another computer or select Store Virtual Disk as a single file to increase the performance.
- Specify the location where the disk file will be saved, and click the Customize Hardware option. Navigate to the CD/DVD, browse and choose the ISO files, and finally, select the Finish button.
That’s how we create a new Virtual machine, so once done, launch the VMware Workstation, and proceed to the next step.
4] Set up Raspberry Pi and configure the settings

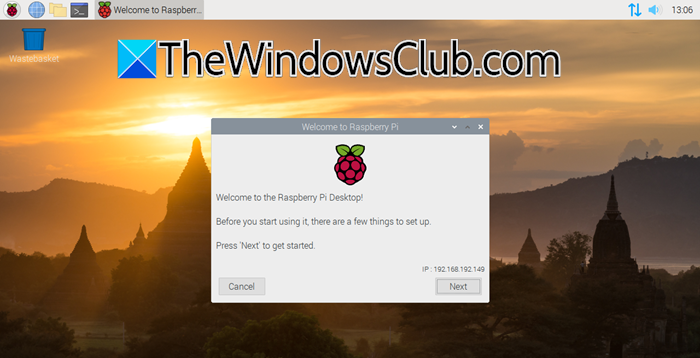
After creating and booting the newly created Virtual Machine, users will be greeted with the Raspberry Pi Desktop installer bootup. Now, we are going to set up Raspberry Pi and configure the settings.
- Click the Next button to get started.
- Choose the language, keyboard, and time Zone, and hit the Next button.
- Once done, set up a new password for the user ‘pi’, and hit the Next or Skip button to update the software.
Raspberry Pi has been set up now, users can now use the OS to their heart.
Read: How to create Raspberry Pi Virtual Machine
How to install Raspberry Pi OS step by step?
To install Raspberry Pi OS, users can install and use the Raspberry Pi OS in the VMware Workstation. This includes installing Raspberry Pi OS ISO, creating a new VM in VMware, configuring it, and installing the OS through the ISO image, which we have explored in the above-mentioned article. Alternatively, users can download a Raspberry Pi imager, write Raspberry Pi OS to an SD card, insert it into a Raspberry device, and complete the setup.
Read: Enable Remote Desktop access with XRDP on Raspberry Pi
Does Raspberry Pi come with OS installed?
Raspberry Pi does not come with an Operating System pre-installed. However, users need to install the OS on a micro-card. The Raspberry Pi Foundation offers an easy-to-use tool called Raspberry Pi Imager to help install the OS on the card. Once the OS is installed and the Raspberry Pi is powered on, it is ready to boot up and put to use.
Leave a Reply