If you cannot install the VMware Tools on the guest operating system running on your Windows 11 or Windows 10 host machine because the Install VMware Tools option is grayed out, then this post offers a simple and quick fix to this issue.
![Install VMware Tools greyed out [Fixed] Install VMware Tools greyed out [Fixed]](https://www.thewindowsclub.com/wp-content/uploads/2023/01/Install-VMware-Tools-greyed-out-Fixed.jpg)
You will run into this issue if:
- The image of the tools is already mounted on the guest VM.
- The system doesn’t have a virtual optical drive.
- You have connected the virtual machine’s virtual CD/DVD drive to an ISO image file when you installed the operating system — the usual way to install the VMware Tools is to start the guest machine and then from the VMware Workstation Player menu choose Manage > Install VMware Tools.
Read: Add TPM to VMware Player Virtual Machine in Windows 11
Fix Install VMware Tools is greyed out
The VMware Tools is a free set of services and modules that enable several features in the guest virtual machine – for example, faster graphics performance, improved mouse performance and the most significant is the ability to transfer files between Virtual Machine and Host Computer (similar to the Drag and Drop support in VirtualBox). The VMware tools are required to be installed if you want to enable the extra VMware features on the guest machine — although the guest OS can normally run without the VMware Tools installed.
So, if the Install VMware Tools option is greyed out on the guest OS, then you can follow the step-by-step instructions below to resolve this issue.

- Shut down the Virtual Machine.
- Right-click on the virtual machine and select Settings.
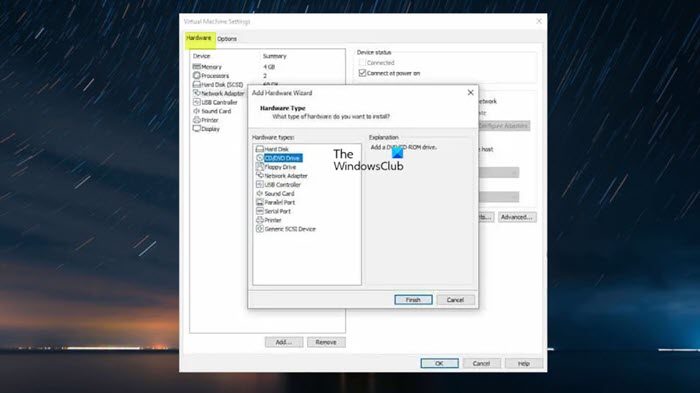
- Under the Hardware tab on the left sidebar, select the CD/DVD Drive and then click the Remove button.
- Next, select Floppy Drive and click the Remove button.
- Next, click on the Add button.
- Select CD/DVD Drive.
- Click the Finish button.
The right pane should now have the option Use Physical Drive > Auto Detect enabled as previously the Windows ISO is selected hence the issue.
- Click OK to close the settings options.
- Now, start the Virtual Machine.
- Click the Player drop-down.
- From the menu, select Manage.
- Click Install VMware Tools.
That’s it!
Read next: How to install VirtualBox Guest Additions on Windows
How do I fix VMware Tools not running?
If the VMware Tools installation does not start automatically on your computer, you can manually start the VMware Tools Installer by following these steps: choose Settings > Cancel VMware Tools Install. Again, choose Settings > VMware Tools Install, then click the Install button in the dialog box that appears. If you can’t install VMware Tools, the CD-ROM drive may not work if the operating system assigns the incorrect driver which is also assigned to the NIC, and VMware Tools cannot be installed without a CD-ROM drive. To resolve this issue, you must assign the correct driver.
Read: VMware Workstation cannot enter Unity mode
How to install VM Tools in vSphere?
To install VM Tools in vSphere, follow these steps:
In vSphere Client – Hosts and Clusters view
- Right-click the Virtual Machine > Guest OS > Install VMware Tools.
In vSphere Web Client
- Click the All Actions icon > Configuration > Install/Upgrade VMware Tools.
In vSphere Host Client
- Click Actions > Guest OS from the drop-down menu and select Install VMware Tools.
Also read: How to install VMWare ESXi in a Hyper-V Virtual Machine.
Leave a Reply