Installing Windows 11 on Raspberry Pi4 enables many possibilities as it allows you to have a mini PC at your disposal. However, Microsoft tends to have strict protocols that we need to bypass to install Windows on an ARM computer. In this post, we will see how you can bypass these restrictions and install Windows 11 on Raspberry Pi4.
Install Windows 11 on Raspberry Pi4
Before we go ahead and install Windows 11 on your Raspberry Pi, it is crucial to meet the following system requirements.
- You need 4GB (minimum) or 8GB (recommended) Pi versions of Raspberry Pi 4.
- An external flash drive or SSD (recommended) to install Windows 11 onto. It should at least have 64 GB of space.
- An SD Card is required if you wish to install Windows 11 on your Raspberry Pi device directly.
- Hardware such as keyboard, mouse, and an HDMI monitor.
- A decent network connection.
Once you have met these requirements, it’s time to update it to the latest firmware. If you are already done with updating your firmware, skip to the installation part of the article. To update Raspberry Pi4 firmware, open Terminal and run the following commands one by one.
sudo apt update
sudo apt full-upgrade
sudo shutdown - r
Once your Raspberry Pi4 is updated, follow any of the mentioned methods to install the latest version of the tool.
Let’s get started.
1] Directly from the Raspberry Pi OS
One of the most efficient ways to install Windows 11 to the device is directly installing from the Raspberry Pi OS. To do the same, follow the steps mentioned below.
- First of all, you need to install Windows on Raspberry Pi. For that, open Terminal and execute the following command.
git clone https://github.com/Botspot/wor-flasher
- Execute the command mentioned below to run WoR Flash.
~/wor-flasher/install-wor-gui.sh
- Give Y for confirmation when asked.
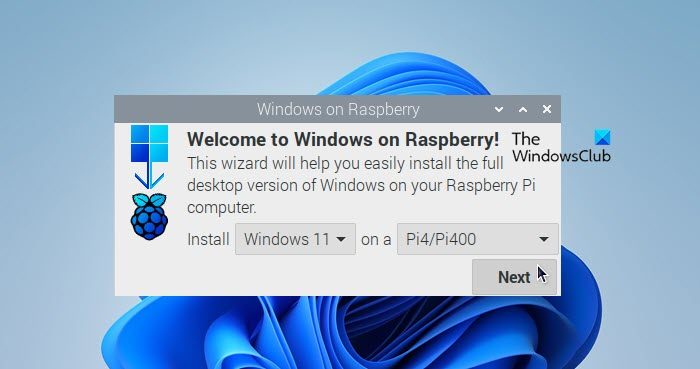
- Windows for Raspberry screen will pop up, select Windows 11 and Pi4/400 in their respective sections.
- Click on Next.
- Keep your USB connected, select the appropriate language, and proceed.
- You then have to select the correct location where you want to install Windows.
- Finally, click on Flash.
- Make sure that the device is running and USB is connected as it will take some time to flash.
- Once done, turn off the Raspberry Pi 4 and remove the card that has Raspberry Pi OS.
- Make sure that the USB drive containing flashed Windows 11 is connected and start the device.
- You will see Windows Installation Wizard, just follow the on-screen instructions to complete the process.
This will install Windows 11 on your Raspberry Pi4 device.
Read: How to install Windows 11 on Raspberry Pi4?
2] Using a Windows computer

If you are not familiar with Raspberry OS and want to install Windows 11 using your Windows computer, we can do something for you. Follow the steps mentioned below to install Windows 11 on a Raspberry Pi using a Windows computer.
- Open any browser and visit uupdump.net.
- In the search bar, enter “Windows 11 dump” and hit Enter.
- Click on the version you want to install, select the Language on the next page, and click on Next.
- Select the correct Windows version and click on Next.
- In the Download Method, select Download and Convert to ISO, and finally, click on Create download package.
- This will download the ZIP file, which you need to extra and run the uup_download_windows.cmd script as an administrator. It will download all the Windows components and create a Windows 11 ARM ISO file.
- Go to worproject.com and download the WoR image ZIP file.
- Extra the ZIP file and run WoR.exe as an admin.
- You will be asked to select language, do that, and click on Next.
- Select the USB drive that you are flashing Windows 11 into in the Storage drive section and then make the Device type Raspberry Pi 4.
- In the Select image section, choose the Windows 11 ARM ISO file we just created in the UUPdump script folder. Click Next once other fields are automatically filled.
- In the Select the drivers page, check the option, Use the latest package available on the server, accept terms and condition, and click on Next.
- In the Select the UEFI firmware page, select Use the latest firmware available on the server and click Next once it is downloaded.
- Move to the installation page, and there, click on Install to trigger the installation process.
- Once it’s done, connect the USB drive and it will boot up the Windows 11 installation wizard, you can just follow the on-screen instructions and you will be good to go.
That’s it!
Read: How to set up a Raspberry Pi module with default settings
How to install Windows 10 in Raspberry Pi 4?
The process of installing Windows 10 on Raspberry Pi 4 is similar to that of Windows 10. All you need to do is, instead of downloading Windows 11 ARM, download Windows 10 ARM and then install it.
Read: How to Program on Arduino with Raspberry Pi
Can Windows 11 run on Raspberry Pi 4?
The ARM version of Windows 11 can run pretty smoothly on Raspberry Pi 4 after the introduction of WoR-flasher. It is a free tool that allows us to install Windows 11 on Raspberry Pi 4. Follow the aforementioned steps to know how to do the same.
Read: Windows IoT Core vs Raspbian – Which is better.
How to install Windows OS on Raspberry Pi?
The Internet of Things is a collection of interconnected smart devices. When a device is connected to the internet to enhance its abilities, it is called a smart device. Smart devices come in various sizes – as small as a small drone to as big as driverless trucks to Industrial Internet of Things (IIoT). Since the size is a factor, the motherboard needs to be as small as possible. And that is why people prefer Raspberry Pi as it packs more power into a smaller board. This article tells you how to install Windows 10 IoT Core on Raspberry Pi.

There are two IoT versions of Windows 10 for the Internet of Things from Microsoft. To know about them, read about Microsoft Windows 10 IoT Core vs Windows 10 IoT Enterprise. IoT Core is good for the single board, single app machines. If you have to install Windows 10 on Raspberry Pi, it would be IoT Core as it takes less space without compromising on quality. Let us see what you need to install Windows 10 IoT Core to Raspberry Pi 3.
You already have the motherboard/computer-board in the form of the Raspberry Pi. You will need:
- An input device to select language during installation
- A display to view the proceedings;
- An HDMI cable to connect Raspberry Pi to Display (either computer or TV)
- SD Card to be able to install the OS onto Raspberry Pi
- A shared WiFi connection
That’s the hardware part.
You will need a copy of Windows 10 IoT Core Dashboard. You can download it from the Microsoft website. You will get Setup.exe that you have to run to download the remaining components from the Internet. It takes a minute or two, depending on your computer and internet speed.
Towards the end of setup, you will get the Windows 10 IoT Core Dashboard. The first screen is the Set up a New Device screen, as shown below.

- Select the device type which would be “Raspberry Pi 3” or “Raspberry Pi 2 & 3”
- Make sure the OS Build is showing Windows IoT Core
- Insert a removable device (preferably an SD Card) on which the installer will be copied
- Enter your Administrator password and confirm it
- Select the correct Internet/WiFi connection and click Install
How to install Windows 10 IoT Core on Raspberry Pi
- Do not yet power up your Raspberry PI
- Insert the SD card into the Raspberry Pi 3 card slot
- Use the HDMI cable to connect the motherboard to TV/monitor
- Connect Internet – either Ethernet cable or USB WiFi
- Connect the Input device to be able to select the language during install
- Now power up the Raspberry Pi
As soon as you power up the Raspberry board, it boots and installs Windows IoT Core. Now it is time to install your app to the Raspberry board. You can use your app or use one from the samples available in the Dashboard. Each sample is interconnected to an online help page telling you how to use it.
Read next: Windows 10 IoT Core vs Raspbian – Which is better?
