Intel published a technical advisory around the Intel Processor Machine Check Error vulnerability that is assigned CVE-2018-12207. Microsoft has released updates to help mitigate this vulnerability for guest Virtual Machines (VMs) but the protection is disabled by default. In this post, we will show you how to enable Intel Processor Machine Check Error vulnerability protection in Windows 11/10.
Intel processors that support machine check architecture have a mechanism to detect and report hardware errors (such as system bus, ECC, parity, cache, and TLB errors) to system software. The machine check architecture enables the processor to generate a machine check exception to signal the detection of a machine check error. This allows system software and OS developers to gracefully shut down the system when hardware error conditions are detected on the platform.
Enable Intel Processor Machine Check Error vulnerability protection
Enabling or disabling this protection requires an action on the Hyper-V hosts running untrusted VMs.
To set a registry setting to enable or disable Intel Processor Machine Check Error vulnerability protection on the Hyper-V hosts running untrusted VMs, follow these steps:
- Search for cmd in the Taskbar search box.
- Click on the Run as administrator option.
- Click the Yes button.
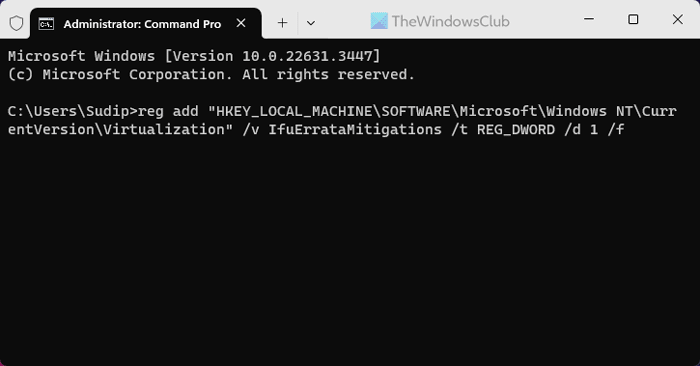
- Enter this command to enable: reg add “HKEY_LOCAL_MACHINE\SOFTWARE\Microsoft\Windows NT\CurrentVersion\Virtualization” /v IfuErrataMitigations /t REG_DWORD /d 1 /f
- Enter this command to disable: reg add “HKEY_LOCAL_MACHINE\SOFTWARE\Microsoft\Windows NT\CurrentVersion\Virtualization” /v IfuErrataMitigations /t REG_DWORD /d 0 /f
- Restart your computer.
To learn more about these steps, continue reading.
To get started, you need to launch the command prompt in admin mode. For that, search for cmd in the Taskbar search box, click on the Run as administrator option, and click the Yes button on the UAC prompt.
In the command prompt, copy and paste the command below to enable Intel Processor Machine Check Error vulnerability protection:
reg add "HKEY_LOCAL_MACHINE\SOFTWARE\Microsoft\Windows NT\CurrentVersion\Virtualization" /v IfuErrataMitigations /t REG_DWORD /d 1 /f
Shut down and then restart your computer and all Guest VMs running on the Hyper-V host.

To disable it, copy and paste the command below:
reg add "HKEY_LOCAL_MACHINE\SOFTWARE\Microsoft\Windows NT\CurrentVersion\Virtualization" /v IfuErrataMitigations /t REG_DWORD /d 0 /f
Shut down and then restart all Guest VMs running on the Hyper-V host.
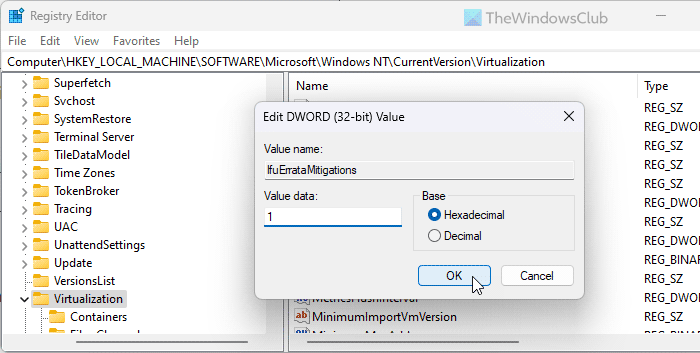
For your information, you can do the same by opening the Registry Editor as well. In that case, you need to navigate to this path:
HKEY_LOCAL_MACHINE\SOFTWARE\Microsoft\Windows NT\CurrentVersion\Virtualization
Double-click on the IfuErrataMitigations REG_DWORD value and set the Value data as 1 to enable and 0 to disable it.

However, if you can’t find the REG_DWORD value, create it manually by going to the New > DWORD (32-bit) value.
That’s it!
Read: Fix Intel Unison not working on Windows
Why is my security processor not showing up?
The main reason why your Security processor is not showing up is because you do not have a TPM or Trusted Platform Module. However, if you have TPM, there is a chance that it is disabled. You need to open the UEFI setting and enable it manually.
How do I force Windows Security to enable it?
To force Windows Security to enable, open the Local Group Policy Editor and go to this path: Computer Configuration > Administrator Templates > Windows Components > Microsoft Defender Antivirus. Double-click on the Turn off Microsoft Defender Antivirus setting. Choose the Disabled option and click the OK button.
Read: Cannot or Unable to turn on Windows Defender on Windows
Leave a Reply